- What does fastapi-opa do
- Installation
- How to get started
- Open Policy Agent
- Authentication Flow
- Custom Payload Enrichment
fastapi-opa is an extension to FastAPI that allows you to add a login flow
to your application within minutes using open policy agent and your favourite
identity provider.
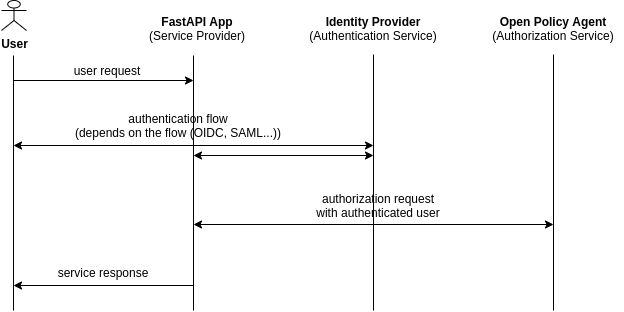
When a user tries to get a response from an endpoint he/she will be redirected to the identity provider for authorization. After the authentication the app validates the token provided. Once it was validated the user information is used to get an OPA decision whether the user is allowed to get any information from the endpoint.
poetry add [--extras "graphql"] [--extras "saml"] fastapi-opa 💡 Checkout the wiki for a complete environment setup with Keycloak and Open Policy Agent:
Getting Started with FastAPI app with Authentication and Authorization
The package provides a very easy way to integrate authentication and authorization. We can decide what authentication flow we inject into the OPAMiddleware to be able choosing between different flows.
from typing import Dict

from fastapi import FastAPI

from fastapi_opa import OPAConfig
from fastapi_opa import OPAMiddleware
from fastapi_opa.auth import OIDCAuthentication
from fastapi_opa.auth import OIDCConfig

# The hostname of your Open Policy Agent instance
opa_host = "http://localhost:8181"
# In this example we use OIDC authentication flow (using Keycloak)
oidc_config = OIDCConfig(
    well_known_endpoint="http://localhost:8000/auth/realms/example-realm/.well-known/openid-configuration",  # well known endpoint
    app_uri="http://localhost:4000",  # host where this app is running
    client_id="example-client",  # client id of your app configured in the identity provider
    client_secret="bbb4857c-21ba-44a3-8843-1364984a36906",  # the client secret retrieved from your identity provider
)
oidc_auth = OIDCAuthentication(oidc_config)
opa_config = OPAConfig(authentication=oidc_auth, opa_host=opa_host)

app = FastAPI()
# Add OPAMiddleware to the fastapi app
app.add_middleware(OPAMiddleware, config=opa_config)


@app.get("/")
async def root() -> Dict:
    return {
        "msg": "success",
}The (validated/authenticated) user token is sent to the Open Policy Agent
with the additional attributes request_method and request_path.
{
    "input": {
        "exp": 1617466243,
        "iat": 1617465943,
        "auth_time": 1617465663,
        "jti": "9aacb638-70c6-4f0a-b0c8-dbc67f92e3d1",
        "iss": "http://localhost:8080/auth/realms/example-realm",
        "aud": "example-client",
        "sub": "ccf78dc0-e1d6-4606-99d4-9009e74e3ab4",
        "typ": "ID",
        "azp": "david",
        "session_state": "41640fe7-39d2-44bc-818c-a3360b36fb87",
        "at_hash": "2IGw-B9f5910Sll1tnfQRg",
        "acr": "0",
        "email_verified": false,
        "hr": "true",
        "preferred_username": "david",
        "user": "david",
        "subordinates": [],
        "request_method": "GET",
        "request_path": ["finance", "salary", "david"]
    }
}
In open policy agent you can now easily create policies using user roles, routes, or request methods etc.
An example policy (from the official OPA docs) for this setup could be like:
package httpapi.authz

# bob is alice's manager, and betty is charlie's.
subordinates = {"alice": [], "charlie": [], "bob": ["alice"], "betty": ["charlie"]}

# HTTP API request
import input

default allow = false

# Allow users to get their own salaries.
allow {
  some username
  input.request_method == "GET"
  input.request_path = ["finance", "salary", username]
  input.user == username
}

# Allow managers to get their subordinates' salaries.
allow {
  some username
  input.request_method == "GET"
  input.request_path = ["finance", "salary", username]
  subordinates[input.user][_] == username
}There is an interface provided to easily implement the desired authentication
flow and inject it into OPAMiddleware
(fastapi_opa.auth.auth_interface.AuthInterface), or you can open a pull
request if you would like to contribute to the package.
Also there are implementations ready to use.
The example in How to get started provides an example for the implementation of the OIDC Authentication.
For the saml implementation create your certs using
openssl req -new -x509 -days 3652 -nodes -out sp.crt -keyout sp.key and
add the keys to the sp section of your settings.json. Checkout the test
settings to get an idea (tests/test_data/saml/*.json). The path to your
own settings.json and advanced_settings.json has to be provided in the
SAMLAuthConfig like in the example below (do not use the test data in
production).
from fastapi_opa import OPAConfig
from fastapi_opa.auth.auth_saml import SAMLAuthentication
from fastapi_opa.auth.auth_saml import SAMLConfig

opa_host = "http://localhost:8181"

saml_config = SAMLConfig(settings_directory="./tests/test_data/saml")
saml_auth = SAMLAuthentication(saml_config)

opa_config = OPAConfig(authentication=saml_auth, opa_host=opa_host)
The cert has to be uploaded to your identity provider. Using Keycloak as an
idp you need to configure encrypt assertion, client signature required,
force POST bindings on creating the client.
Also configure: Client Scopes -> role_list (saml) -> Mappers tab ->
role list -> Single Role Attribute
In fastapi_opa.opa.opa_config.Injectable an interface is provided to add
more information to the payload sent to OPA.
The injectables can be added to the OPAConfig. Let's look at an example:
class FancyInjectable(Injectable):
    async def extract(self, request: Request) -> List:
        return ["some", "custom", "stuff"]

fancy_inj = FancyInjectable("fancy_key")

opa_config = OPAConfig(
    authentication=oidc_auth, opa_host=opa_host, injectables=[fancy_inj]
)For GraphQL there is a ready to use injectable in
fastapi_opa.opa.enrichment.graphql_enrichment.GraphQLInjectable