The aim of this guide is not to reiterate what is found in Terraform or Github's documentation but rather to encapsulate the workflow that we have established at Anomaly. The guide will cover a few core concepts and followed by steps that will help you get a project setup quickly.
Whilst the defined stack should work for most applications at Anomaly, please review the resources required by your application.
- Terraform
- Traefik via Nodebalancer
- Helm to install charts
The examples are split to achieve two scenarios:
- A setup completely deployed as Pods in a K8s cluster (this includes the database, message broker, application, load balancer, etc.)
- A setup partially deployed as manage services like databases and the application, worker and load balancer running as Pods.
The guide assumes the availability of the following tools:
- Terraform 1.1.x or higher
- Linode CLI 5.16.x or higher
sedcurljq
and the following services:
- GitHub for source control with their Actions feature available
- Terraform for provisioning and managing infrastructure, with the Terraform Cloud feature available
- Docker for containerisation of the infrastructure, with Docker Hub and Docker Compose available
Note: this is a template repository and the requirements for the actual project may vary
You will require the following credentials:
- Linode API Key with full access for Terraform Cloud to run the jobs, see here
- Terraform API Key for Github actions to trigger Terraform jobs, see here
This guide assumes you are using macOS 11+
Before you are able to use this guide, you must setup certain tools and components once and others per project.
Install the command line utilities via Homebrew:
brew install jq
brew install terraform
brew install helm
brew install linode-cli
You can install autocomplete for Terraform CLI using:
terraform -install-autocompleteLogin to Linode and Terraform via:
linode-cli login # Follow the prompts
terraform login # Follow the promptsThis guide assumes that we are, automating infrastructure provisioning for a new project with the aim of being able to evolve or tear down environment as the requirements change. Our plan assumes that we will Terraform Cloud to run the jobs and then use Github Actions to trigger Terraform jobs.
- Provision secrets and setup Terraform Cloud
- Provision secrets and setup Github Actions
A provider is a plugin that Terramform relies on to interact with the API of a cloud provider. Each provider adds a set of resource types and/or data sources that Terraform can manage. Linode provides an official verified provider via the Terraform registry.
Our aim is to get a git based workflow for our infrastructure deployment, a typical workflow would look like as following:
- Clone this template repository
- Perform the initial set of configuration changes
- Deploy the infrastructure to the provider (in our case Linode)
- Branch off for any changes
- Deploy the branch and let Terraform cloud validate changes in a staging envirnonemtn
- All going well, lodge a pull request to the repository
- Merge it to the
mainbranch for the changes to goto production
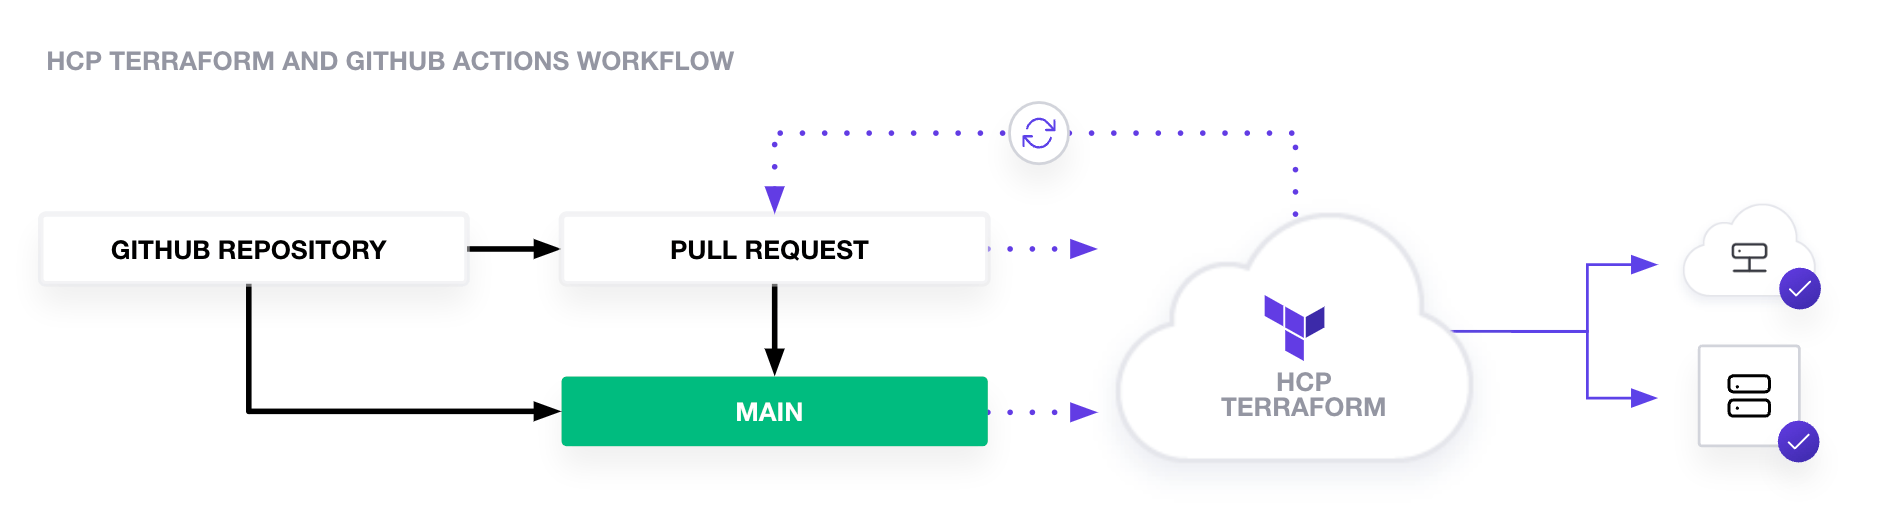
Image courtesy of Terraform
There's an initial setup required for each workspace on Terraform cloud.
We are going to approach learning about the infrastructure setup in two steps, the first will be somewhat manual where you can see each cog working on it's own and then we will be able to automate the process.
The files are structures for logical reasons alone. Terraform will merge the contents of all files with the .tf extension. terraform.vars is the name of the default input variables file.
| File | Description |
|---|---|
| main.cf | The main configuration file, this is where you will define your infrastructure |
| k8s.tf | The Kubernetes configuration file, this is where you will define your Kubernetes infrastructure |
| providers.tf | The provider configuration file, this is where you will define your providers e.g Linode + Kubernetes |
| variables.tf | The variables configuration file, this is where you will define your Terraform input variables |
| redis.tf | The redis configuration file, this is where you will define your redis infrastructure |
| loadbalancer.tf | The loadbalancer configuration file, this is where you will define your loadbalancer infrastructure, our example uses traefik |
| dns.tf | The dns configuration file, this is where you will define your dns infrastructure |
| terraform.tfvars | The Terraform variables file, this is where you will define your Terraform variables, this is versioned for demonstration purposes |
Input variables are defined in the variables.tf file. You must provide a value (unless a default is provided and you are happy with it) for each of these via either:
- defining it in the
terraforms.tfvarsfile - provide it as a an environment variable
export TF_VAR_token=70a1416a9.....d182041e1c6bd2c40eebd - via keyboard input when prompted by the Terraform CLI
The finished version of our setup will use Terraform Cloud to managed these.
Our setup uses the Linode, Kubernetes, Kubectl and Helm providers. The Linode provider will create the cluster and all following steps depend on the Cluster being available.
The other three providers require the host, cluster_ca_certificate, and token parameters to communicate with the K8s cluster. Take a look at provider.tf to see how we dynamically parse them out of the state.
With Linode's CLI setup you can get a token for Terraform Cloud using the following command. This will assign the newly generated tokent o a bash variable linode-token.
Our aim here is to handle secrets as securely as possible.
➜ ~ linode_token=`linode-cli profile token-create --json --label="Terraform Cloud" | jq '.[0]["token"]'`variables.tf defines the variable linode_token, if you are managing the state locally (for the purposes to learning or testing) then you can
export TF_VAR_linode_token=`linode-cli profile token-create --json --label="Terraform Cloud" | jq '.[0]["token"]'`Linode's CLI can do everything that Linode has to offer. To create your Terraform configuraiton you will find the following commands handy:
| Command | Description |
|---|---|
linode-cli regions list |
Lists all the regions that Linode operates in, you will require the id of the relevant region |
linode-cli linodes types |
Lists all the types of Linodes that are available, you will require the id of the relevant type |
Setting TF_LOG=TRACE in your environment will enable tracing of Terraform commands.
The central aim of using a tool like Terraform is to describe the infrastructure as code and then have it maintain state. This guide will demonstrate how you can provision use the template to provision and teardown the infrastructure. The initial example keeps the state on your local computer (this is easier to understand when you are getting started, but not ideal or recommended for production).
The later part of the tutorial demostrates how you can use Terraform Cloud to provision and teardown the infrastructure.
export KUBE_VAR=`terraform output kubeconfig` && echo $KUBE_VAR | python -m base64 -d
you can use to unpack the base64 payload
kubectl get secret bucket-credentials-web-client -o jsonpath='{.data}'
The native macOS tools fails to decode base64 complaining about an illegal character which happens to be the quote marks.
https://stackoverflow.com/questions/49032812/how-to-pull-image-from-dockerhub-in-kubernetes
kubectl create secret docker-registry regcred
    --docker-username=<your-name>
    --docker-password=<your-pword>
    --docker-email=<your-email> -n <your-namespace>
Once the
The following portion of the document is no longer relevant, the content will be refactored.
The above guide has been put together from the knowledge available at these web resources. While most practices comes from Hashicorp's guide, there are pearls of wisdom from the team at Linode that have been thrown into the mix.
Terraform also allows you to write modules, but there are selected usecase where you should be using Modules, this repository

Image courtesy of Terraform