| title | name | alias | language | framework | hybrid | image | tags | snippets | ||||||||||||||||||||||||
|---|---|---|---|---|---|---|---|---|---|---|---|---|---|---|---|---|---|---|---|---|---|---|---|---|---|---|---|---|---|---|---|---|
Ionic 2 Tutorial |
Ionic 2 |
|
|
|
true |
/media/platforms/ionic.jpeg |
|
|
::: panel-info System Requirements This tutorial and seed project have been tested with the following:
- NodeJS 4.2.0
- Ionic 2.0.0-beta.1
- Angular 2.0.0-beta.6 :::
<%= include('../_includes/_package', { pkgRepo: 'auth0-ionic2', pkgBranch: 'master', pkgPath: null, pkgFilePath: null, pkgType: 'replace' }) %>
Otherwise, if you already have an existing application, please follow the steps below.
Go to the Application Settings section in the Auth0 dashboard and make sure that Allowed Callback URLs contains the following value:
https://${account.namespace}/mobileAlso, if you are testing your application locally, make sure to add your local URL as an Allowed Callback URL and the following as an Allowed Origin (CORS):
file://\*You can use angular2-jwt to make authenticated HTTP requests.
${snippet(meta.snippets.dependencies)}
After installing angular2-jwt, configure it in the @App decorator.
${snippet(meta.snippets.configure)}
Add the Auth0Lock widget to your index.html file and set the viewport.
${snippet(meta.snippets.setup)}
It's best to set up an injectable authentication service that can be reused across the application. This service needs methods for logging users in and out, as well as checking their authentication status.
This is also where Auth0Lock can be configured with your Auth0 credentials.
${snippet(meta.snippets.use)}
The service can now be injected wherever it is needed.
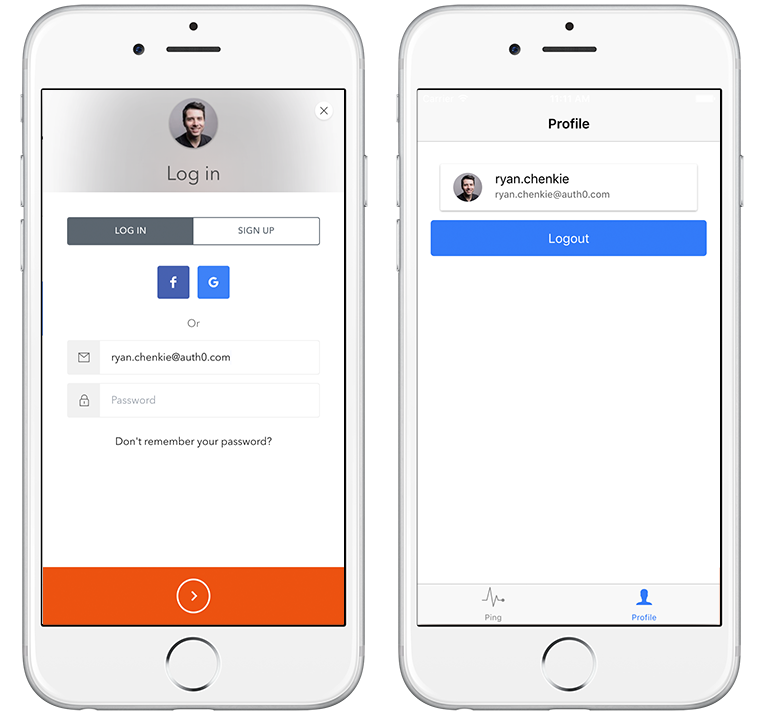
You will likely require some kind of profile area for users to see their information. Depending on your needs, this can also serve as the place for them to log in and out.
For the profile page component, simply inject the AuthService.
${snippet(meta.snippets.profile)}
The AuthService is now accessible in the view and can be used to conditionally hide and show elements depending on whether the user has a valid JWT in local storage.
${snippet(meta.snippets.profiletemplate)}
Refresh tokens are special tokens that are used to retrieve a new JWT for the user so that they can remain authenticated.
In Angular 1.x, obtaining a new JWT with a refresh token can be accomplished using HTTP interceptors. However, Angular 2 doesn't have the concept of HTTP interceptors, so another approach is needed. There are several different ways to implement token refreshing in Angular 2, and one of them is to use observables.
${snippet(meta.snippets.refresh)}
When the user logs in, a refresh gets scheduled with an interval equal to the amount of time their JWT is valid for. If the user closes the application, their state will be lost and the scheduled refresh will no longer exist the next time they open it. We need a slightly different approach for setting up a refresh when the application is first opened again because the amount of time that the JWT is valid for (if there is still an unexpired JWT in local storage) will be less than that of a "fresh" token. We need to first check for an unexpired JWT, and if there is one, schedule a one-time refresh to take place when the JWT expires.
To run the token refresh when the application is started, call the startupTokenRefresh method when the app is ready.
${snippet(meta.snippets.configurerefresh)}
To make HTTP requests to a secure endpoint, simply use AuthHttp which will automatically attach the JWT as an Authorization header.
${snippet(meta.snippets.http)}
Now it's time to sit back and relax. You've implemented authentication with Ionic 2 and Auth0.
This could either mean that you've built the seed project using Ionic 1, or that the device where you are testing it isn't entirely supported by Ionic 2 yet. Be sure to check the console for errors.