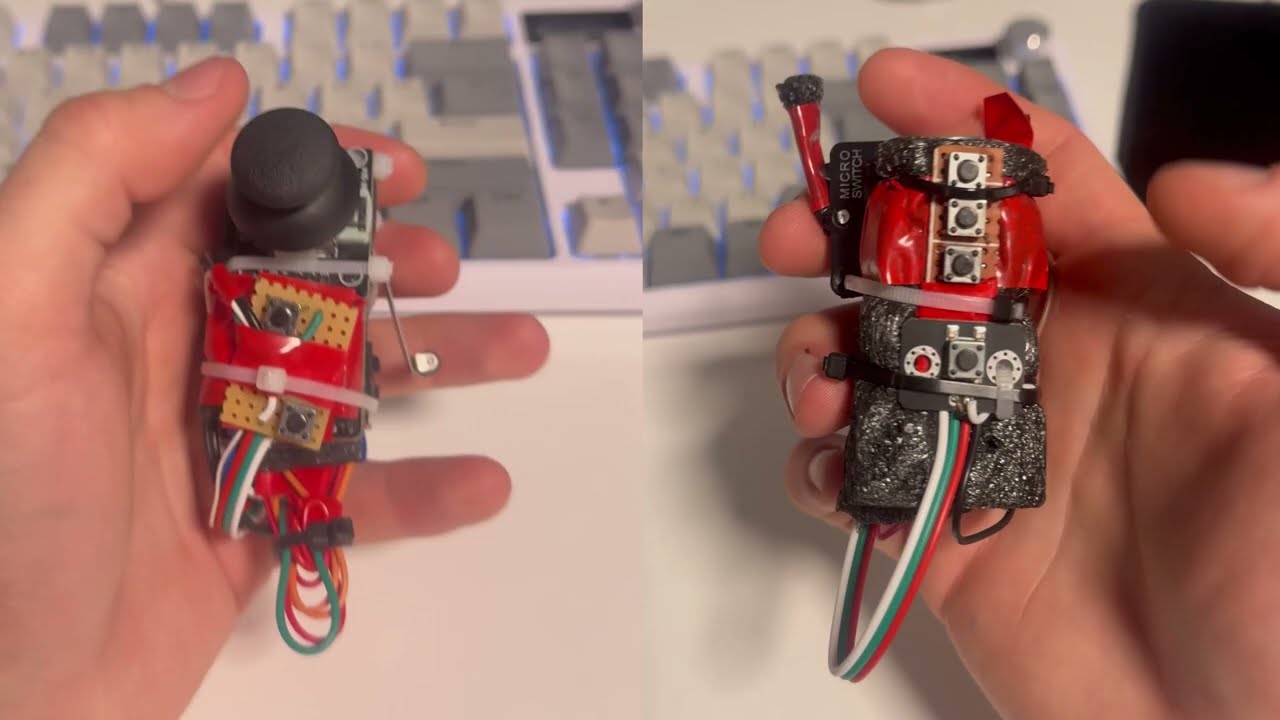
Affordable custom controllers for Quest 2 and other VR headsets purchased without original controllers, or for those looking for open-source VR controllers. Designed using ESP32 and ALVR's API to emulate Quest controllers in SteamVR, this project makes headsets without controllers usable and accessible for VR enthusiasts on a budget.
Note: The full, comprehensive documentation for this project is located in Assets/dokumentace.pdf. Unfortunately, it is currently only available in the Czech language.

The VR equipment market has a paradox: second-hand headsets like Meta Quest are very affordable, but they are often sold without original controllers, which are either unavailable or excessively expensive. NeoGrip was created to break this barrier, utilizing the hidden potential of incomplete VR setups. The goal is to provide a fully functional, open-source hardware and software solution that bridges the physical environment with SteamVR through affordable components.
- ESP32 Dev Module Link
- TP4056 Charging Module Link
- Joystick KY-023 module Link
- Buttons (A, B, X, Y, Menu, Oculus) Link
- End switches Grab and Trigger (KW11-3Z-4-N) Link
- 3D-printed controller parts (STEP files available here)
- Regulator Ultra Low Dropout voltage, 3.3V (RT9183-33GGF)
- Battery 3.7V, 500mAh, Li-Po (You might be able to fit a bigger one) Link
- Transistor Generic PNP or NPN transistor for haptic motor control.
- Haptic Motor, 3.3V Link
- Screws, Springs, 2mm Shaft, Wires
NeoGrip is designed with ergonomics and functionality mirroring the Meta Quest 2/3 controllers:
- Core Controller: ESP32 Dev Module (Dual-core Xtensa LX6 240MHz, Wi-Fi 2.4GHz) for minimal latency and high performance.
- Controls: Standard microswitches (A/X, B/Y, System, Joystick Click), highly reliable end switches KW11-3Z for Trigger and Grip (translated to 0.0/1.0 analog values for OpenXR), and KY-023 analog joysticks for X/Y movement.
- Haptic Feedback: Embedded 3.3V vibration motor driven by PWM via a PNP transistor for tactile responses from SteamVR.
- Power Management: Powered by a 3.7V 500mAh Li-Po battery providing ~6 hours of active playtime. Protected and charged via a TP4056 module (USB-C or Micro-USB). Includes an automatic deep sleep mode after 60 seconds of inactivity to save power, easily wakeable via the System button. An LDO RT9183 regulator provides stable 3.3V.
GPIO 4: System Button / Deep Sleep Wake (RTC GPIO)GPIO 14: Joystick ClickGPIO 16: PWM Motor OutputGPIO 18: B ButtonGPIO 19: Trigger (KW11-3Z)GPIO 21: A ButtonGPIO 27: Squeeze/Grip (KW11-3Z)GPIO 34: Joystick X-Axis (ADC 0-4095)GPIO 35: Joystick Y-Axis (ADC 0-4095)
Designed in Autodesk Fusion 360, printable via FDM. Recommended settings:
- Material: PLA (PETG optional for more durable triggers).
- Layer Height: 0.2mm for the main body, 0.15mm for finer button details.
- Infill: 65% Gyroid for high structural integrity and low weight.
- Temperature: 210°C for optimal layer adhesion.
- Supports: Tree-type supports recommended.

The architecture consists of the ESP32 hardware and a multi-threaded Python-based proxy server on the PC.
Every 40ms, the ESP32 reads analog and digital inputs and formats them into a lightweight 15-character UDP broadcast packet (e.g., L00010204720470):
- Char 1: Side identifier (
LorR). - Chars 2-6: Button states (
A/X,B/Y,SYS,Trigger,Grip) as0or1. - Chars 7-10: Joystick X-axis analog value (
0000-4095). - Chars 11-14: Joystick Y-axis analog value (
0000-4095). - Char 15: Joystick Click state (
0or1).
To prevent blocking, the proxy server uses multiple threads:
- Main Thread: Receives UDP packets from the ESP32 on port
9999. - ALVR Thread: Forwards processed controller data to ALVR's REST API (
POST http://127.0.0.1:8082/api/set-buttons). - WebSocket Thread: Listens to
ws://localhost:8082/api/eventsfor haptic feedback triggers from SteamVR. - Start Signal Thread: Broadcasts a "START" UDP packet to wake controllers from deep sleep.
The proxy translates raw values into standardized OpenXR paths (e.g., /user/hand/left/input/trigger/value), allowing the controllers to work natively with SteamVR. Instead of built-in positional tracking, the project relies on Meta Quest Hand Tracking. SteamVR binds the controller inputs directly onto the tracked hands in VR.
The WebSocket thread captures haptic events, parsing the target controller (path), vibration duration, and amplitude. It maps amplitude (0.0-1.0) to PWM duty cycles (0-255) and converts the duration to milliseconds. It then sends a 7-character UDP packet back to the ESP32 on port 8888 (e.g., R255100 -> Right controller, 255 duty cycle, 100ms duration).
- Hardware: ESP32 flashed with NeoGrip firmware (can be built using PlatformIO).
- Software:
- SteamVR
- ALVR (Recommended version: V20.11.1)
- Python 3.10+
- NeoGrip Proxy Script
- Download the
NeoGrip.pyproxy script. - Install the required Python dependencies:
pip install requests websocket-client
For ALVR to accept inputs from the proxy server and track the controllers properly via headset cameras, you must adjust the following settings in ALVR:
- Presets tab: Turn off "Hand tracking interaction" (we want to use the controller buttons, not gesture interactions).
- Headset tab: Ensure the following are enabled/on:
ControllersTrackedMultimodal trackingHaptics
- Ensure that "SteamVR Input 2.0" and "Hand tracking interaction" (under Headset) are disabled.
Note: A detailed visual guide for the ALVR configuration, alongside screenshots, is available in the documentation PDF as well as in the Config directory.
- Start SteamVR and ALVR. Verify configuration.
- Run the proxy server via terminal:
The terminal will indicate that it's broadcasting the "START" signal.
python NeoGrip.py
- Press the System button on your NeoGrip controllers to wake them up. They will connect to Wi-Fi and vibrate briefly upon a successful connection.
- Put on your headset. Your controllers are now ready to use in SteamVR!
- To stop, simply press
Ctrl+Cin the terminal. The proxy server will send a "STOP" signal, putting the controllers back to deep sleep.
- Latency: The system provides extremely low latency, averaging under 50ms from physical button press to VR action, which is well within comfortable limits for fast-paced VR games.
- Reliability: The 2.4GHz Wi-Fi UDP connection provides robust data transmission with negligible packet loss (<1%). Missing packets are instantly superseded by the 25Hz refresh rate.
- Battery Life: ~6 hours of continuous playtime. The TP4056 module charges the 500mAh Li-Po battery at a rate of 1A, allowing a full recharge from 0 to 100% in approximately 45 minutes.
Note: The demo video below is older. Both the hardware, firmware, and software layers have improved significantly since it was recorded. An updated video will be made in the future showcasing the current state.