



A Home Assistant integration for local TCP control of AECC-platform home batteries. No cloud, no latency, no external dependencies.
Works with any battery built on the AECC platform: Lunergy, Sunpura, Voltdeer, AEG Solarcube, AFERIY, AccuMate, JET, Oscal, Fossibot, TSUN, and others.
| Setup | Sensors | Controls | Energy Dashboard |
|---|---|---|---|
 |
 |
 |
 |
- 100% local: communicates directly with your battery over TCP (port 8080)
- 5-second polling: near real-time updates with intelligent failure tolerance
- Physics-aware sensor cleaning: rejects sensor glitches (
SOC=0during active discharge, impossible rate-of-change spikes) before they reach Home Assistant or pollute the Energy Dashboard. Tuned per brand. - Hybrid availability: entities hold their last known value through brief sensor blips, then transition to
unavailableafter a sustained outage so automations and dashboards see an honest signal. - Write-back verification: every control command is re-read after writing; mismatches are logged so silent firmware drops become visible.
- Energy Dashboard ready: accumulated kWh sensors (
total_increasing) for the HA Energy Dashboard - Modbus telemetry: temperatures, lifetime energy counters, a Fault sensor, alarm flags and the unit's nominal power, read over Modbus on the same connection. Appears only on devices that answer the Modbus map
- Full battery control: one signed power setpoint (positive charges, negative discharges), per-direction power limits (up to 2400W), SOC limits
- Honest controls: a command the battery never confirmed raises an error in the interface instead of leaving a value on screen that was never accepted
- Work mode selector: Self-Consumption (AI), Custom/Manual
- Multi-brand: select your brand during setup; DeviceInfo shows correct manufacturer and model
- Multi-unit: master/slave stacks get one device per battery with per-unit telemetry, plus whole-system totals. Manual control reaches the master only, see Multi-unit setups
- Multi-language: English, Dutch, German, French
This integration works with batteries built on the AECC platform (ai-ec.cloud). The AECC platform is white-labeled by multiple battery brands that share the same local TCP protocol.
If your battery uses the AECC app (or a white-labeled version), connects to an ai-ec.cloud server, and has TCP port 8080 open on your local network, this integration should work.
| Brand | Model | Status | Notes |
|---|---|---|---|
| Sunpura | S2400 | Fully tested | PV input and multi-battery setups confirmed working |
| Lunergy | Hub 2400 AC | Fully tested | TCP link can be flaky; the integration reconnects automatically |
| AEG | Solarcube | Community confirmed | Monitoring and control confirmed working |
| Voltdeer | SR5000 | Community confirmed | Works out of the box |
| AFERIY | PS240 | Community confirmed | Works out of the box |
| AccuMate | Plug-In Battery | Community confirmed | Works out of the box |
| JET | GreenARK Pro | Fully tested | Tested on a loan unit |
| Oscal | Power Storage 2000 | Community confirmed | Per-string PV sensors read 0 W on this firmware |
| Fossibot | FBP 1200 | Community confirmed | Per-unit charging power and per-string PV read 0 W on this firmware |
| TSUN | PowerTrunk MAU5000 | Fully tested | Supports 2500 W; reconnect needs a device restart (details) |
| Humsienk | NOVA All-in-One | Community confirmed | Supports 2500 W |
| Brand | Model | Notes |
|---|---|---|
| Other AECC brands | : | Any battery using the AECC / ai-ec.cloud platform may work |
Have a different AECC brand? We'd love to hear from you. Install the integration, try it out, and open an issue to let us know if it works (or doesn't). Your feedback helps us expand the tested battery list.
- Home Assistant 2024.1.0 or newer
- Battery on the same local network as Home Assistant
- Battery's static IP address and TCP port (typically 8080)

Click the badge, then Download, then restart Home Assistant.
Adding it by hand instead:
- Open HACS in Home Assistant
- Go to Integrations
- Click the three-dot menu > Custom repositories
- Add
https://github.com/StekkerDeal/aecc-battery-localas an Integration - Search for AECC Battery and click Download
- Restart Home Assistant
Risky changes are published as pre-releases first, so they can be tried on real hardware before everyone gets them. To install one, open the integration's page in HACS, choose Redownload from the three-dot menu, expand Need a different version? and pick the beta from the Release list.
- Download the latest release from GitHub Releases
- Copy the
custom_components/aecc_batteryfolder into your Home Assistantconfig/custom_components/directory - Restart Home Assistant
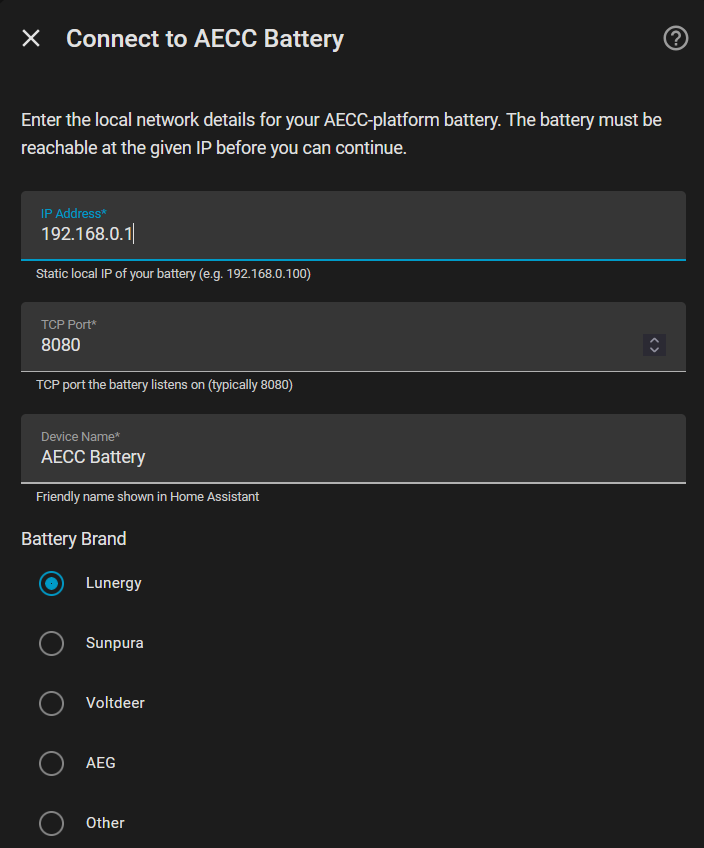
- Go to Settings > Devices & Services > Add Integration
- Search for AECC Battery (Local TCP)
- Enter your battery's IP address, TCP port (default 8080), and a friendly name
- Select your battery brand from the dropdown (pick Other if yours is not listed)
- Optionally enter the model name (e.g. Hub 2400 AC, S2400, SR)
You can update all settings at any time via the integration's Configure button.
By default, the integration limits both charging and discharging to 800W. Most AECC hardware supports up to 2400W, and since charging and discharging have different constraints (feed-in rules and house wiring apply to output only), the limits are configured per direction via the integration's Configure button:
- Max charge power (100-2400W): the highest charging power the integration will command. Charging draws from the grid, so no feed-in limits apply.
- Max discharge power (100-2400W): the highest discharging power the integration will command.
The ceiling follows the selected brand. Brands rated above 2400W accept more (TSUN and Humsienk: 2500W); asking for more than the selected brand is rated for is refused in the Configure dialog, so a 2400W unit cannot be set to 2500W by picking the wrong brand.
All control paths enforce these limits: the Power Setpoint entity gets matching bounds (e.g. -800 to +2400 for an 800W discharge / 2400W charge configuration), and out-of-range slider or automation commands are clamped with a warning in the log.
Two caps govern output. The integration's discharge limit bounds what gets commanded (plus register 3039, the device's local power cap, which the integration raises automatically when either limit exceeds 800W). Separately, the AECC app has an "On Grid Output" setting (under Operating Mode Settings, factory default 800W) that caps what the inverter will actually deliver. That setting is not accessible via local TCP; for discharging above 800W it must be raised in the app once, per device.
Tip for limited circuits: to charge fast while keeping discharge safe, set Max charge power to 2400W, Max discharge power to 800W, and leave "On Grid Output" at 800W in the app. The integration then never commands more than 800W output, and the device itself enforces the same cap at the hardware level.
Disclaimer: Only raise the discharge limit above 800W when the battery is connected to its own dedicated circuit.
Configurations from before v1.5.2 migrate automatically: entries with the old "Extended power range" switch enabled get 2400W in both directions, all others keep 800W.
The AECC TCP protocol on some devices (notably Lunergy) occasionally returns sensor values that are physically impossible, for example SOC=0 while the battery is actively discharging at hundreds of watts. The underlying datalog gateway loses sync with the BMS and the JSON response defaults missing fields to 0 rather than marking them unavailable. Without protection these readings would pollute the Energy Dashboard accumulators and trigger automations on bogus thresholds.
The integration applies a small physics-aware filter before publishing readings to Home Assistant:
| Check | What it rejects |
|---|---|
| Zero-during-active-flow | SOC=0 (or power=0 on Lunergy) while the battery is clearly cycling |
| Rate-of-change | SOC changes faster than physically possible from one poll to the next |
| Unconfirmed zero at startup | SOC=0 in the first few polls after a reload, before there is any accepted reading to weigh it against |
When a reading is rejected, the entity holds its last known good value for up to 2 minutes so brief blips don't break charts or automations. After that window the entity transitions to unavailable so prolonged sensor failures surface honestly. As soon as the cleaner accepts a reading again, the entity returns to normal.
The startup check exists because the first frame after a reload sometimes arrives with the battery reported idle and every field at zero, which no physics check can contradict. Publishing that 0 would make it the baseline for the rate check and hide the true SOC for minutes afterwards. A pack that really is empty keeps reporting 0 and publishes within a few polls.
Per-brand thresholds. The brand you select during setup determines the cleaning sensitivity. Lunergy gets the strictest profile (the SOC-stuck-at-zero pattern is documented on this device). Sunpura, Voltdeer, and AEG get a permissive profile that only catches obvious physical impossibilities. Other uses a conservative middle setting. No user-facing configuration is needed.
Modbus values (temperatures, lifetime counters, fault, nominal power) do not pass through these cleaners. When a Modbus refresh fails they keep their last reading, and a refresh failure never affects the regular sensors.
Every control command (direction, power, work mode, SOC limits) is automatically re-read 0.5 seconds after writing. If the device reports a value that differs from what was requested, the integration logs a WARNING so silent firmware drops become visible. The write itself still returns success based on the SET response, the verification is best-effort and does not change the public API.
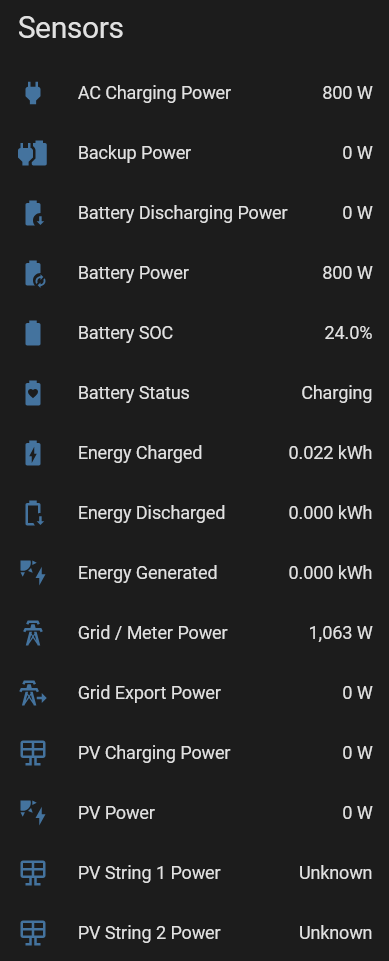
| Entity | Type | Description |
|---|---|---|
| Battery SOC | Sensor (%) | State of charge |
| Battery Power | Sensor (W) | Signed: positive = charging, negative = discharging |
| Battery Status | Sensor | Charging, Discharging, or Idle |
| Energy Charged | Sensor (kWh) | Accumulated charge energy (AC + PV), total_increasing |
| Energy Discharged | Sensor (kWh) | Accumulated discharge energy, total_increasing |
| Energy Generated | Sensor (kWh) | Accumulated PV energy, total_increasing |
| AC Charging Power | Sensor (W) | AC grid charging power |
| Battery Discharging Power | Sensor (W) | Discharge power |
| PV Power | Sensor (W) | Total solar power |
| PV Charging Power | Sensor (W) | Solar power charging battery |
| Grid / Meter Power | Sensor (W) | Smart meter reading |
| Grid Export Power | Sensor (W) | Power exported to grid |
| Backup Power | Sensor (W) | Backup/off-grid load power |
| PV String 1 Power | Sensor (W) | Individual PV string |
| PV String 2 Power | Sensor (W) | Individual PV string |
| Firmware Version | Sensor | Diagnostic; available on some AECC devices |
| WiFi Signal | Sensor (dBm) | Diagnostic; datalogger WiFi signal strength, available on some AECC devices. Refreshes about once a minute |
| PV Radiator / Inverter / Transformer Temperature | Sensor (°C) | Diagnostic; the three points the vendor app reports, in register order. A unit without PV shows the PV radiator around -17 °C. Modbus, refreshes every 30 s |
| Lifetime Energy Charged | Sensor (kWh) | Device's own counter, measured at the battery behind the inverter. total_increasing. Modbus |
| Lifetime Energy Discharged | Sensor (kWh) | Device's own counter, measured at the battery behind the inverter. total_increasing. Modbus |
| Lifetime Energy to Grid | Sensor (kWh) | Device's own export counter; needs an external meter or CT, reads 0 without one. Modbus |
| Available Charge Power | Sensor (W) | How much charge power the battery will accept right now. Modbus |
| Nominal Power | Sensor (W) | Diagnostic; the unit's rated power as it reports it. Modbus |
| Nominal Battery Power | Sensor (W) | Diagnostic; the battery's rated charge/discharge power as it reports it. Modbus |
| Alarm Flags | Sensor | Diagnostic; raw alarm bitfield, 0 when nothing is wrong. Bit meanings are not documented. Modbus |
| Fault | Binary sensor | On when the device reports a fault. Modbus |
Modbus entities exist only on devices that answer the Modbus map on port 8080. The integration probes once at setup; on a device that does not answer, nothing changes.
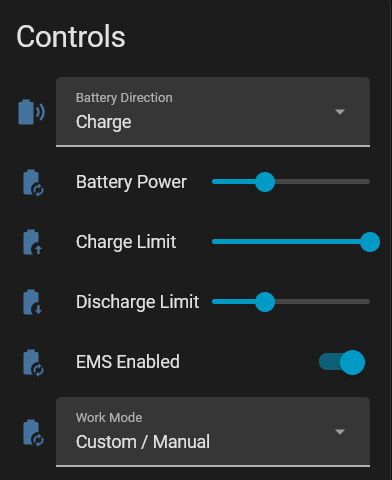
| Entity | Type | Description |
|---|---|---|
| Power Setpoint | Number (box) | Signed one-write control: positive = charge, negative = discharge, 0 = idle. Bounds follow the per-direction power limits. The control to use |
| Battery Direction | Select | Charge, Discharge, or Idle. Deprecated, removal in 2.0.0 |
| Battery Power | Number (slider) | Power target magnitude, up to the higher of the two power limits. Deprecated, removal in 2.0.0 |
| Discharge Limit | Number (slider) | Min SOC before discharge stops (5-50%) |
| Charge Limit | Number (slider) | Max SOC before charging stops (50-100%) |
| Work Mode | Select | Self-Consumption (AI), Custom/Manual |
Some AECC systems stack multiple batteries in a master/slave configuration. Add the integration once, pointing at the master's IP: the master reports data for the whole stack, and the slave does not serve the local API at all.
With 2 or more units, the integration creates:
- The main device with whole-system sensors (totals as computed by the master itself) and all controls
- One child device per battery ("Battery 1", "Battery 2", ...) with per-unit SOC, charging/discharging power, PV, backup power, and status
Manual control reaches the master only. The AECC local protocol has no per-unit control, and the master does not forward a locally written setpoint to the other units. On a paired stack the secondary keeps executing whatever schedule the vendor app last gave it. This was established on AEG Solarcube stacks in #16: every register the integration writes is confirmed applied and matches the state the app leaves behind, yet only the master responds. The app drives the other units through the cloud, which this integration deliberately does not use. Monitoring of every unit is unaffected.
If you need to control both units, register each battery separately in the vendor app instead of pairing them, so each gets its own IP and answers on port 8080. Add the integration once per battery and send each entry its share of the target. One owner runs this with an automation writing half the target to each unit (#16). Totals then come from Home Assistant rather than from the master. This is the supported way to control a multi-unit system today.
Keep both units in Custom / Manual with your automation as the only thing deciding power. Never leave two separately registered units in Self-Consumption on the same meter: each tries to zero the same reading without knowing the other exists, and they end up charging and discharging against each other at full power.
Single-unit systems are unaffected (no child devices). If you add or remove a battery from the stack, reload the integration to refresh the device list.
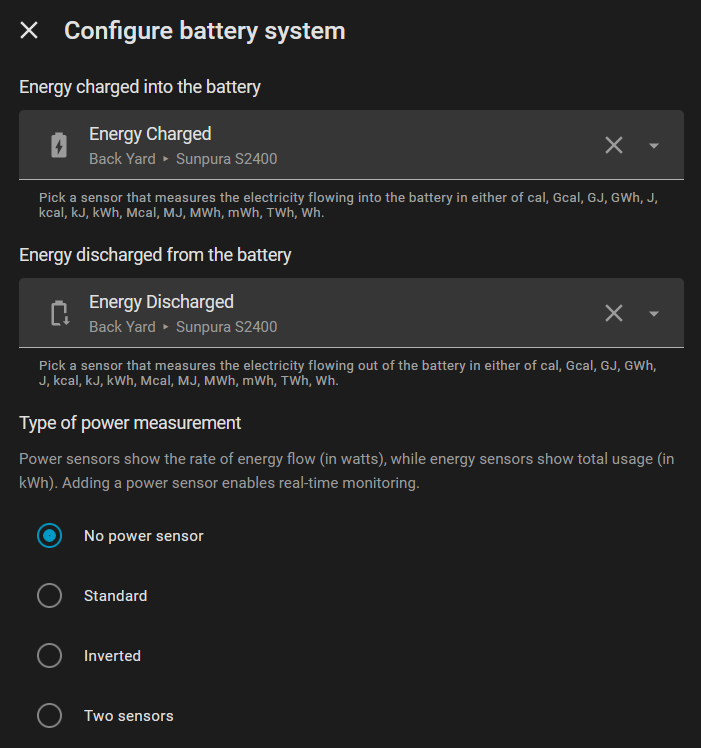
- Go to Settings > Dashboards > Energy
- In Battery Systems, click Add Battery System
- Energy going in: select
Energy Charged - Energy coming out: select
Energy Discharged - Click Save
Energy sensors use Riemann sum integration and persist across restarts. The Lifetime Energy counters read over Modbus count at the battery, behind the inverter, so they leave out the inverter losses the house actually pays. They are not Energy Dashboard inputs; keep using Energy Charged and Energy Discharged there. Lifetime Energy to Grid needs an external meter or CT and reads 0 without one.
Power Setpoint is a single signed number: positive = charge, negative = discharge, 0 = idle, in watts. One write says what you mean, including the switch to Custom mode, so an automation can never race between two entities. Setting it to 0 clears the schedule slot and leaves the AI off, so nothing is driving the battery. That is how you stop it. There is no separate "Disabled" mode, because turning EMS off does not reliably stop the battery (it hands control back to the device's own logic).
If a write does not reach the battery, Home Assistant now shows an error and the entity keeps the value the battery actually has, instead of quietly displaying a command that never landed.
Two older entities do the same job in two writes:
- Battery Direction (select): Charge, Discharge, or Idle
- Battery Power (slider): 0 up to the higher of the two configured power limits
They still work, and all control entities stay in sync whichever you use, but an unsigned magnitude is meaningless without the direction next to it, and keeping two entities synchronized is work that the sign in Power Setpoint does for free. Both will be removed in 2.0.0; using them logs a deprecation warning. Automations that write number.<name>_battery_power plus select.<name>_battery_direction become one number.set_value call on number.<name>_power_setpoint.
| Mode | Description |
|---|---|
| Self-Consumption (AI) | Automatic charge/discharge based on solar and consumption |
| Custom / Manual | Manual control via the Power Setpoint |
- Discharge Limit: stops discharging at this SOC (default 10%)
- Charge Limit: stops charging at this SOC (default 98%)
This integration deliberately contains no planner: a home energy management system (HEMS) computes when to charge or discharge (from dynamic prices, PV forecast, load), and this integration executes it. Any HEMS that can call Home Assistant services works; EMHASS is the most complete open-source option, evcc (which can read HA entities directly) is a simpler threshold-based alternative.
Mind the sign conventions. The Power Setpoint entity uses positive = charge; EMHASS publishes its battery schedule (sensor.p_batt_forecast) with positive = discharge. Flip the sign in the automation:
automation:
  - alias: "EMHASS: apply battery setpoint"
    triggers:
      - trigger: state
        entity_id: sensor.p_batt_forecast
    conditions:
      - condition: template
        value_template: "{{ trigger.to_state.state not in ('unknown', 'unavailable') }}"
    actions:
      - action: number.set_value
        target:
          entity_id: number.my_battery_power_setpoint
        data:
          # EMHASS: + = discharge. Setpoint: + = charge. Hence the minus.
          value: "{{ -(states('sensor.p_batt_forecast') | float(0)) | round(0) }}"

  - alias: "EMHASS: kill-switch (stale plan -> idle)"
    triggers:
      - trigger: state
        entity_id: sensor.p_batt_forecast
        to: ["unknown", "unavailable"]
        for: "00:30:00"
    actions:
      - action: number.set_value
        target:
          entity_id: number.my_battery_power_setpoint
        data:
          value: 0
The kill-switch matters: without it, a crashed optimizer leaves the last setpoint running indefinitely.
Configuration tips:
- Set EMHASS's battery bounds to match this integration:
battery_discharge_power_max/battery_charge_power_max= your Max discharge power / Max charge power settings, and keepbattery_minimum_state_of_charge/battery_maximum_state_of_chargein sync with the Discharge Limit / Charge Limit entities. - The device's own protection still applies: the battery stops at its SOC limits regardless of the commanded setpoint.
If you have an AECC-platform battery from a brand not yet listed as tested:
- Install the integration and select your brand (or "Other")
- Start with monitoring only, check that sensors return data and values look correct
- Only try control features after confirming sensors work
- Open an issue or PR to let us know your results
The integration writes the same registers as the official AECC app, but different devices may have firmware variations.
Entities show "Unavailable"
- Verify the battery IP and port:
ping <battery-ip>from your HA host - Check Home Assistant logs for connection errors
Controls have no effect
- The integration automatically sets Custom mode when you pick a direction
- Check logs for
SET battery_controlentries
Discharge/charge power capped below requested value
- Check the "On Grid Output" setting in the AECC app (Operating Mode Settings). This is a firmware-level cap that limits the maximum power the inverter delivers, regardless of what the integration requests. The factory default is 800W. Set it to your desired maximum (e.g. 2400W) in the app.
Energy sensors show 0 kWh after restart
- On first install, sensors start at 0 and accumulate
- After restart, last known values are restored automatically
Entities stay "Unavailable" after a reload, a Home Assistant restart, or a battery reboot
- Some firmware hands out its single local session only during a short window, roughly 30 seconds, after the device's own datalogger restarts. Outside that window it still completes TCP handshakes but answers nobody, so the integration connects and then waits forever for a reply.
- This is a device limitation, not something the integration can retry its way out of: once the connection drops for any reason, the next attempt needs a fresh device restart to land. The retry backoff grows to 30 to 80 seconds, which almost never falls inside the window.
- Recovery is to restart the device and reload the integration inside the window, rather than waiting: trigger the restart, then within about 20 seconds use Settings → Devices & Services → AECC Battery → ⋮ → Reload.
- Confirmed on the TSUN PowerTrunk MAU5000 (firmware 1.4.9.9.5). The other brands listed above reconnect normally, so treat this as per-firmware rather than a property of the platform.
Updating the battery firmware
- Disable the integration before starting a firmware update in the vendor app, and enable it again once the update has finished. This is good practice for any integration that talks to a device being updated, not something specific to this one.
When opening an issue, please attach a diagnostics export so we can see your device state without round-tripping for logs:
- Settings → Devices & Services → AECC Battery → ⋮ → Download Diagnostics
- Attach the resulting JSON file to the issue
The export contains the integration version, device model and firmware, configured brand profile, the last raw poll response, a fresh dump of control registers 3000-3130, and the last 20 control writes with their verify outcomes. Serial numbers and the local IP are redacted automatically.
If the bug involves a specific control flow (e.g. switching between work modes), capture one diagnostics file per step - the diff tells us which registers behave unexpectedly.
Based on Mathieuleysen/Sunpura-Local-TCP. Extended with multi-brand AECC support, energy dashboard sensors, battery control, and multi-language translations.
Maintained by StekkerDeal.
MIT, see LICENSE