A four-legged spider robot powered by an Arduino Nano. This project utilizes a PCA9685 servo driver to control 8 servo motors, enabling a variety of movements that can be controlled via Bluetooth using a smartphone.
Here are some images, GIFs, and videos of the spider robot in action:
Video Demo:
Click the image above to watch the full demonstration video on YouTube.
Example:

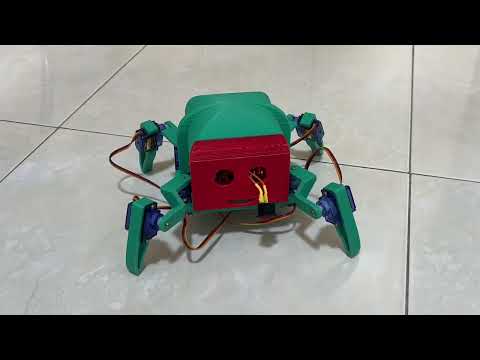
Caption: The spider robot in its default idle position.
Example GIF:

Caption: The spider is happy.
- Bluetooth Control: Wirelessly control the robot using the Dabble app on a smartphone.
- Dynamic Movements: Capable of walking forward and turning left or right.
- Special Actions: Pre-programmed actions like a "happy dance," "defense mode," and a "pull-up" motion.
- Scalable Design: The PCA9685 driver supports up to 16 channels, leaving room for future expansion.
| Component | Quantity | Purpose |
|---|---|---|
| Arduino Nano | 1 | Main microcontroller for processing commands. |
| PCA9685 Servo Driver | 1 | Manages PWM signals for all 8 servo motors. |
| JDY-33 Bluetooth Module | 1 | Enables wireless communication (SPP & BLE). |
| Servo Motors | 8 | Actuators for hip and knee joints. |
| liPo Battery | 2 | 3.7V LiPo Battery. |
| 3D Printed | * | 3D printed for the spider. |
| JDY-33 Pin | Connects to |
|---|---|
TX |
Arduino Nano D4 |
RX |
Arduino Nano D5 |
VCC |
3.3V or 5V |
GND |
GND |
| PCA9685 Pin | Connects to |
|---|---|
VCC |
Arduino Nano 5V |
GND |
GND |
SDA |
Arduino Nano A4 |
SCL |
Arduino Nano A5 |
V+ |
External 5V Power Supply |
| Channel | Joint | Channel | Joint |
|---|---|---|---|
| 0 | Front Left Hip | 4 | Back Left Hip |
| 1 | Front Left Knee | 5 | Back Left Knee |
| 2 | Front Right Hip | 6 | Back Right Hip |
| 3 | Front Right Knee | 7 | Back Right Knee |
This project relies on the Arduino IDE and several libraries.
- Arduino IDE: Download here
- Required Libraries:
Wire(Built-in)SoftwareSerial(Built-in)- Adafruit PWM Servo Driver Library
- Dabble Library
-
Assemble Hardware: Connect all components as shown in the wiring diagram. Ensure the external power supply for the servos is correctly connected.
-
Install Libraries: Open the Arduino IDE and install the required libraries via the Library Manager.
-
Upload Code: Flash the main control code to your Arduino Nano.
spider-robot/main/main.ino
-
Install Dabble App: Install the Dabble application on your smartphone.
-
Pair Bluetooth: Power on the robot and pair your smartphone with the
JDY-33Bluetooth module. -
Connect in App: Open the Dabble app, connect to the robot, and select the Gamepad module.
- Power On: Turn on the robot. It will assume its default idle position.
- Connect: Launch the Dabble app and establish a connection with the robot.
- Control: Use the gamepad interface to control the robot's movements and actions.
| Dabble Input | Robot Action | Function Called |
|---|---|---|
| Up Arrow | Move Forward | moveForward() |
| Left Arrow | Turn Left | turnLeft() |
| Right Arrow | Turn Right | turnRight() |
| Triangle | Happy Dance | happyAction() |
| Cross | Defense Mode | defenseAction() |
| Circle | Pull-up | pullUpAction() |
| (No Input) | Idle Position | idle() |
If the robot's movements are erratic, you may need to calibrate the servos.
- Upload Debug Sketch: Flash the
debug/debug.inofile to the Arduino Nano. - Open Serial Monitor: Set the baud rate to
9600. - Send Commands: Test each servo individually by sending commands in the format
<servo_number> <angle>.- Example:
1 90sets servo 1 to a 90-degree angle. - Use command
8to reset all servos to the idle position (45°).
- Example:
| Servo Number | Joint Assignment |
|---|---|
0 |
FRONT_LEFT_HIP |
1 |
FRONT_LEFT_KNEE |
2 |
FRONT_RIGHT_HIP |
3 |
FRONT_RIGHT_KNEE |
4 |
BACK_LEFT_HIP |
5 |
BACK_LEFT_KNEE |
6 |
BACK_RIGHT_HIP |
7 |
BACK_RIGHT_KNEE |
Contributions are welcome! If you have ideas for improvements or have found a bug, please feel free to:
- Fork the repository.
- Create a new branch (
git checkout -b feature/your-feature-name). - Commit your changes (
git commit -m 'Add some feature'). - Push to the branch (
git push origin feature/your-feature-name). - Open a Pull Request.
Alternatively, you can open an issue with the "bug" or "enhancement" tag.
This project is open-source. See the LICENSE file for more details.
- A big thank you to the creators of the libraries used in this project.
- Inspiration from the broader Arduino and robotics communities.
If you have questions or would like to connect:
- Email: vantaingo.056@gmail.com
- LinkedIn: Tai Ngo
- GitHub: TaiVanNgo
- Youtube: taivan130