-
Notifications
You must be signed in to change notification settings - Fork 4
docs: jobs revamp #62
New issue
Have a question about this project? Sign up for a free GitHub account to open an issue and contact its maintainers and the community.
By clicking “Sign up for GitHub”, you agree to our terms of service and privacy statement. We’ll occasionally send you account related emails.
Already on GitHub? Sign in to your account
Merged
Merged
Changes from all commits
Commits
Show all changes
59 commits
Select commit
Hold shift + click to select a range
f39f923
docs: jobs revamp
Hii-Arpit 66ca042
docs: restructure the doc
Hii-Arpit 302807a
docs: create job doc
Hii-Arpit 82f8cba
docs: add create job doc
Hii-Arpit 466b929
docs: Source Code section added
Hii-Arpit f04f5c4
pull
Hii-Arpit cd657e5
New Structure
Hii-Arpit ec5e234
docs:removing CI Pipeline doc
Hii-Arpit fe31384
docs: added images
Hii-Arpit c2be670
docs:added images for environment override and fix file naming
Hii-Arpit 61e1163
docs: added figure captions
Hii-Arpit 5dcce67
fixes broken links
Hii-Arpit 2efc2e2
docs: optimised according to gitbook
Hii-Arpit 2f2c086
docs: refinements and fixes
Hii-Arpit e4f06d6
docs: Added RBAC
Hii-Arpit 0807c38
docs: updated summary.md
Hii-Arpit a51b376
docs: updated RBAC and minor fixes
Hii-Arpit 460bb1b
docs: fixes navigation steps
Hii-Arpit 4c7b9e9
Grammar fixes for README.md
Hii-Arpit 7673518
Grammar fixes for configurations
Hii-Arpit 682d55e
grammar fixes for config map readme
Hii-Arpit 9d6ada2
grammar fixes for configmap-job.md
Hii-Arpit 684bf11
grammar fixes secret-job.md
Hii-Arpit a7ba124
minor fixes in environment-override-job.md
Hii-Arpit d7d017d
fixes in source-code-job.md
Hii-Arpit de92d2e
fixes in workflow-editor-job.md
Hii-Arpit 65e33f2
fixes in create-job.md
Hii-Arpit d5b6800
fixes in overview-job.md
Hii-Arpit 370b545
fixes in run-history-job.md
Hii-Arpit 2c38482
fixes in triggering-job.md
Hii-Arpit 65860d1
fixes in what-is-job.md
Hii-Arpit 4b58a18
Merge branch 'main' of https://github.com/Hii-Arpit/devtron-documenta…
Hii-Arpit 3002608
Merge branch 'main' of https://github.com/Hii-Arpit/devtron-documenta…
Hii-Arpit a27ebb1
Merge branch 'main' of https://github.com/Hii-Arpit/devtron-documenta…
Hii-Arpit 36866c8
docs: incorporated the suggested changes + fixes
Hii-Arpit cfd8ff6
more fixes
Hii-Arpit 57b4b9e
Merge branch 'main' of https://github.com/Hii-Arpit/devtron-documenta…
Hii-Arpit f02da55
docs: implement suggested changes
Hii-Arpit 62d446b
Merge branch 'main' of https://github.com/Hii-Arpit/devtron-documenta…
Hii-Arpit 5129bc1
Merge branch 'main' of https://github.com/Hii-Arpit/devtron-documenta…
Hii-Arpit 0c1fc03
Merge branch 'main' of https://github.com/Hii-Arpit/devtron-documenta…
Hii-Arpit 64a26c4
docs: fixes links
Hii-Arpit db135c0
Merge branch 'main' of https://github.com/Hii-Arpit/devtron-documenta…
Hii-Arpit 26e4b0c
Merge branch 'main' of https://github.com/Hii-Arpit/devtron-documenta…
Hii-Arpit ae82982
docs: added use cases
Hii-Arpit 0ee757a
Merge branch 'main' of https://github.com/Hii-Arpit/devtron-documenta…
Hii-Arpit c8ca8dd
docs: merge
Hii-Arpit 24d0589
Merge branch 'main' of https://github.com/Hii-Arpit/devtron-documenta…
Hii-Arpit 24a8324
docs: merge-reverse
Hii-Arpit eaaa75e
docs: indentation fixes
Hii-Arpit f3dbb79
docs: indentation fixes v2
Hii-Arpit 5f55c15
docs: horizontal line fixes + fixes from pre-post docs
Hii-Arpit e6a4109
docs: added redirects
Hii-Arpit d74c13b
docs: added redirects plus fix inter-links
Hii-Arpit 399d8a1
Merge branch 'main' of https://github.com/Hii-Arpit/devtron-documenta…
Hii-Arpit da8e5a4
Merge branch 'main' of https://github.com/Hii-Arpit/devtron-documenta…
Hii-Arpit 04bb22d
Merge branch 'main' of https://github.com/Hii-Arpit/devtron-documenta…
Hii-Arpit a138b5b
Merge branch 'main' into job-revamp
Hii-Arpit fb56034
Merge branch 'main' into job-revamp
Hii-Arpit File filter
Filter by extension
Conversations
Failed to load comments.
Loading
Jump to
Jump to file
Failed to load files.
Loading
Diff view
Diff view
There are no files selected for viewing
This file contains hidden or bidirectional Unicode text that may be interpreted or compiled differently than what appears below. To review, open the file in an editor that reveals hidden Unicode characters.
Learn more about bidirectional Unicode characters
This file contains hidden or bidirectional Unicode text that may be interpreted or compiled differently than what appears below. To review, open the file in an editor that reveals hidden Unicode characters.
Learn more about bidirectional Unicode characters
This file contains hidden or bidirectional Unicode text that may be interpreted or compiled differently than what appears below. To review, open the file in an editor that reveals hidden Unicode characters.
Learn more about bidirectional Unicode characters
| Original file line number | Diff line number | Diff line change |
|---|---|---|
| @@ -1,18 +1,30 @@ | ||
| # Jobs | ||
|
|
||
| Job allows manual and automated execution of your source code. Job pipeline will not have CI/CD pipeline as the job is limited to your source code only. You can also configure [preset plugins](../creating-application/workflow/pre-post-tasks.md#configure-a-task-using-preset-plugins) in your job pipeline. | ||
| Devtron Jobs provides a streamlined way to execute specific tasks or a set of tasks defined by the user within the user's application environment. | ||
|
|
||
| With job, you can execute your source code quickly and easily without going through CI/CD pipelines, which also optimize time. | ||
| To learn more about how Jobs work, see the sections below | ||
|
|
||
|  | ||
|
|
||
| There are two main steps in executing Job: | ||
| * [What is Jobs](./what-is-job.md) | ||
|
|
||
| * [Configurations](configuration-job.md) | ||
| * [Creating a Job](./create-job.md) | ||
|
|
||
| * [Trigger Job](triggering-job.md) | ||
| * [Configurations](./configurations/README.md) | ||
|
|
||
| In the next section, we will learn on how to create, configure, trigger a job. You can also view the details on the [Overview](overview-job.md) tab and `Run History`. | ||
| * [Source Code](./configurations/source-code-job.md) | ||
|
|
||
| * [Workflow Editor](./configurations/workflow-editor-job.md) | ||
|
|
||
| * [ConfigMaps & Secrets](./configurations/configmap-secret/README.md) | ||
|
|
||
| * [ConfigMaps](./configurations/configmap-secret/configmap-job.md) | ||
|
|
||
| * [Secrets](./configurations/configmap-secret/secret-job.md) | ||
|
|
||
| * [Environments Override](./configurations/environment-override-job.md) | ||
|
|
||
| * [Trigger Job ](./triggering-job.md) | ||
|
|
||
| * [Run History](./run-history-job.md) | ||
|
|
||
| * [Job Overview](./overview-job.md) |
This file was deleted.
Oops, something went wrong.
This file contains hidden or bidirectional Unicode text that may be interpreted or compiled differently than what appears below. To review, open the file in an editor that reveals hidden Unicode characters.
Learn more about bidirectional Unicode characters
| Original file line number | Diff line number | Diff line change |
|---|---|---|
| @@ -0,0 +1,11 @@ | ||
| # Configurations | ||
|
|
||
| After you have created a Job, the next step is to configure the job. This means specifying the source code and using the Workflow Editor to create and configure the job pipeline, which includes defining tasks such as code scanning, vulnerability checks, or data migrations, and configuring the sequence in which these tasks should be executed. | ||
|
|
||
| In the following sections, we will explore how you can configure your Job, which includes, | ||
|
|
||
| 1. Configuring the [Source Code](./source-code-job.md) | ||
|
|
||
| 2. Creating and configuring the job pipeline through [Workflow Editor](./workflow-editor-job.md). | ||
|
|
||
| 3. Defining [ConfigMaps](./configmap-secret/configmap-job.md) & [Secrets](./configmap-secret/secret-job.md), and [Environment Overrides](./environment-override-job.md) for the job. |
15 changes: 15 additions & 0 deletions
15
docs/user-guide/jobs/configurations/configmap-secret/README.md
This file contains hidden or bidirectional Unicode text that may be interpreted or compiled differently than what appears below. To review, open the file in an editor that reveals hidden Unicode characters.
Learn more about bidirectional Unicode characters
| Original file line number | Diff line number | Diff line change |
|---|---|---|
| @@ -0,0 +1,15 @@ | ||
| # ConfigMaps & Secrets | ||
|
|
||
| ## ConfigMaps | ||
|
|
||
| A ConfigMap stores key-value pairs that your jobs can use as environment variables or mounted files. ConfigMaps are meant for non-sensitive data. Moreover, you can update configurations without modifying or rebuilding your container images, thus making the deployments more efficient. | ||
|
|
||
| To configure a ConfigMap for your job pipeline, refer to the [ConfigMaps](./configmap-job) section. | ||
|
|
||
| --- | ||
|
|
||
| ## Secrets | ||
|
|
||
| Secrets and ConfigMaps are both used to store configurations, but there is one major difference between them: ConfigMaps store key-values in normal text format, whereas secrets store them in base64 encrypted form. Devtron hides the data of secrets for the normal users, and it is only visible to the users having edit permission. | ||
|
|
||
| To configure a Secret for your job pipeline, refer to the [Secrets](./secret-job) section. | ||
Hii-Arpit marked this conversation as resolved.
Show resolved
Hide resolved
|
||
197 changes: 197 additions & 0 deletions
197
docs/user-guide/jobs/configurations/configmap-secret/configmap-job.md
This file contains hidden or bidirectional Unicode text that may be interpreted or compiled differently than what appears below. To review, open the file in an editor that reveals hidden Unicode characters.
Learn more about bidirectional Unicode characters
| Original file line number | Diff line number | Diff line change |
|---|---|---|
| @@ -0,0 +1,197 @@ | ||
| # ConfigMaps | ||
|
|
||
| A ConfigMap stores key-value pairs that your jobs can use as environment variables or mounted files. Unlike secrets, ConfigMaps are meant for non-sensitive data. Moreover, you can update configurations without modifying or rebuilding your container images, thus making the deployments more efficient. | ||
|
|
||
| --- | ||
|
|
||
| ## Add ConfigMap | ||
|
|
||
| {% hint style="warning" %} | ||
| ### Who Can Perform This Action? | ||
| Users need to have the **Admin role** or the **Super Admin role**. | ||
| Refer the [User permissions](../../../global-configurations/authorization/user-access.md#roles-available-for-jobs). | ||
| {% endhint %} | ||
|
|
||
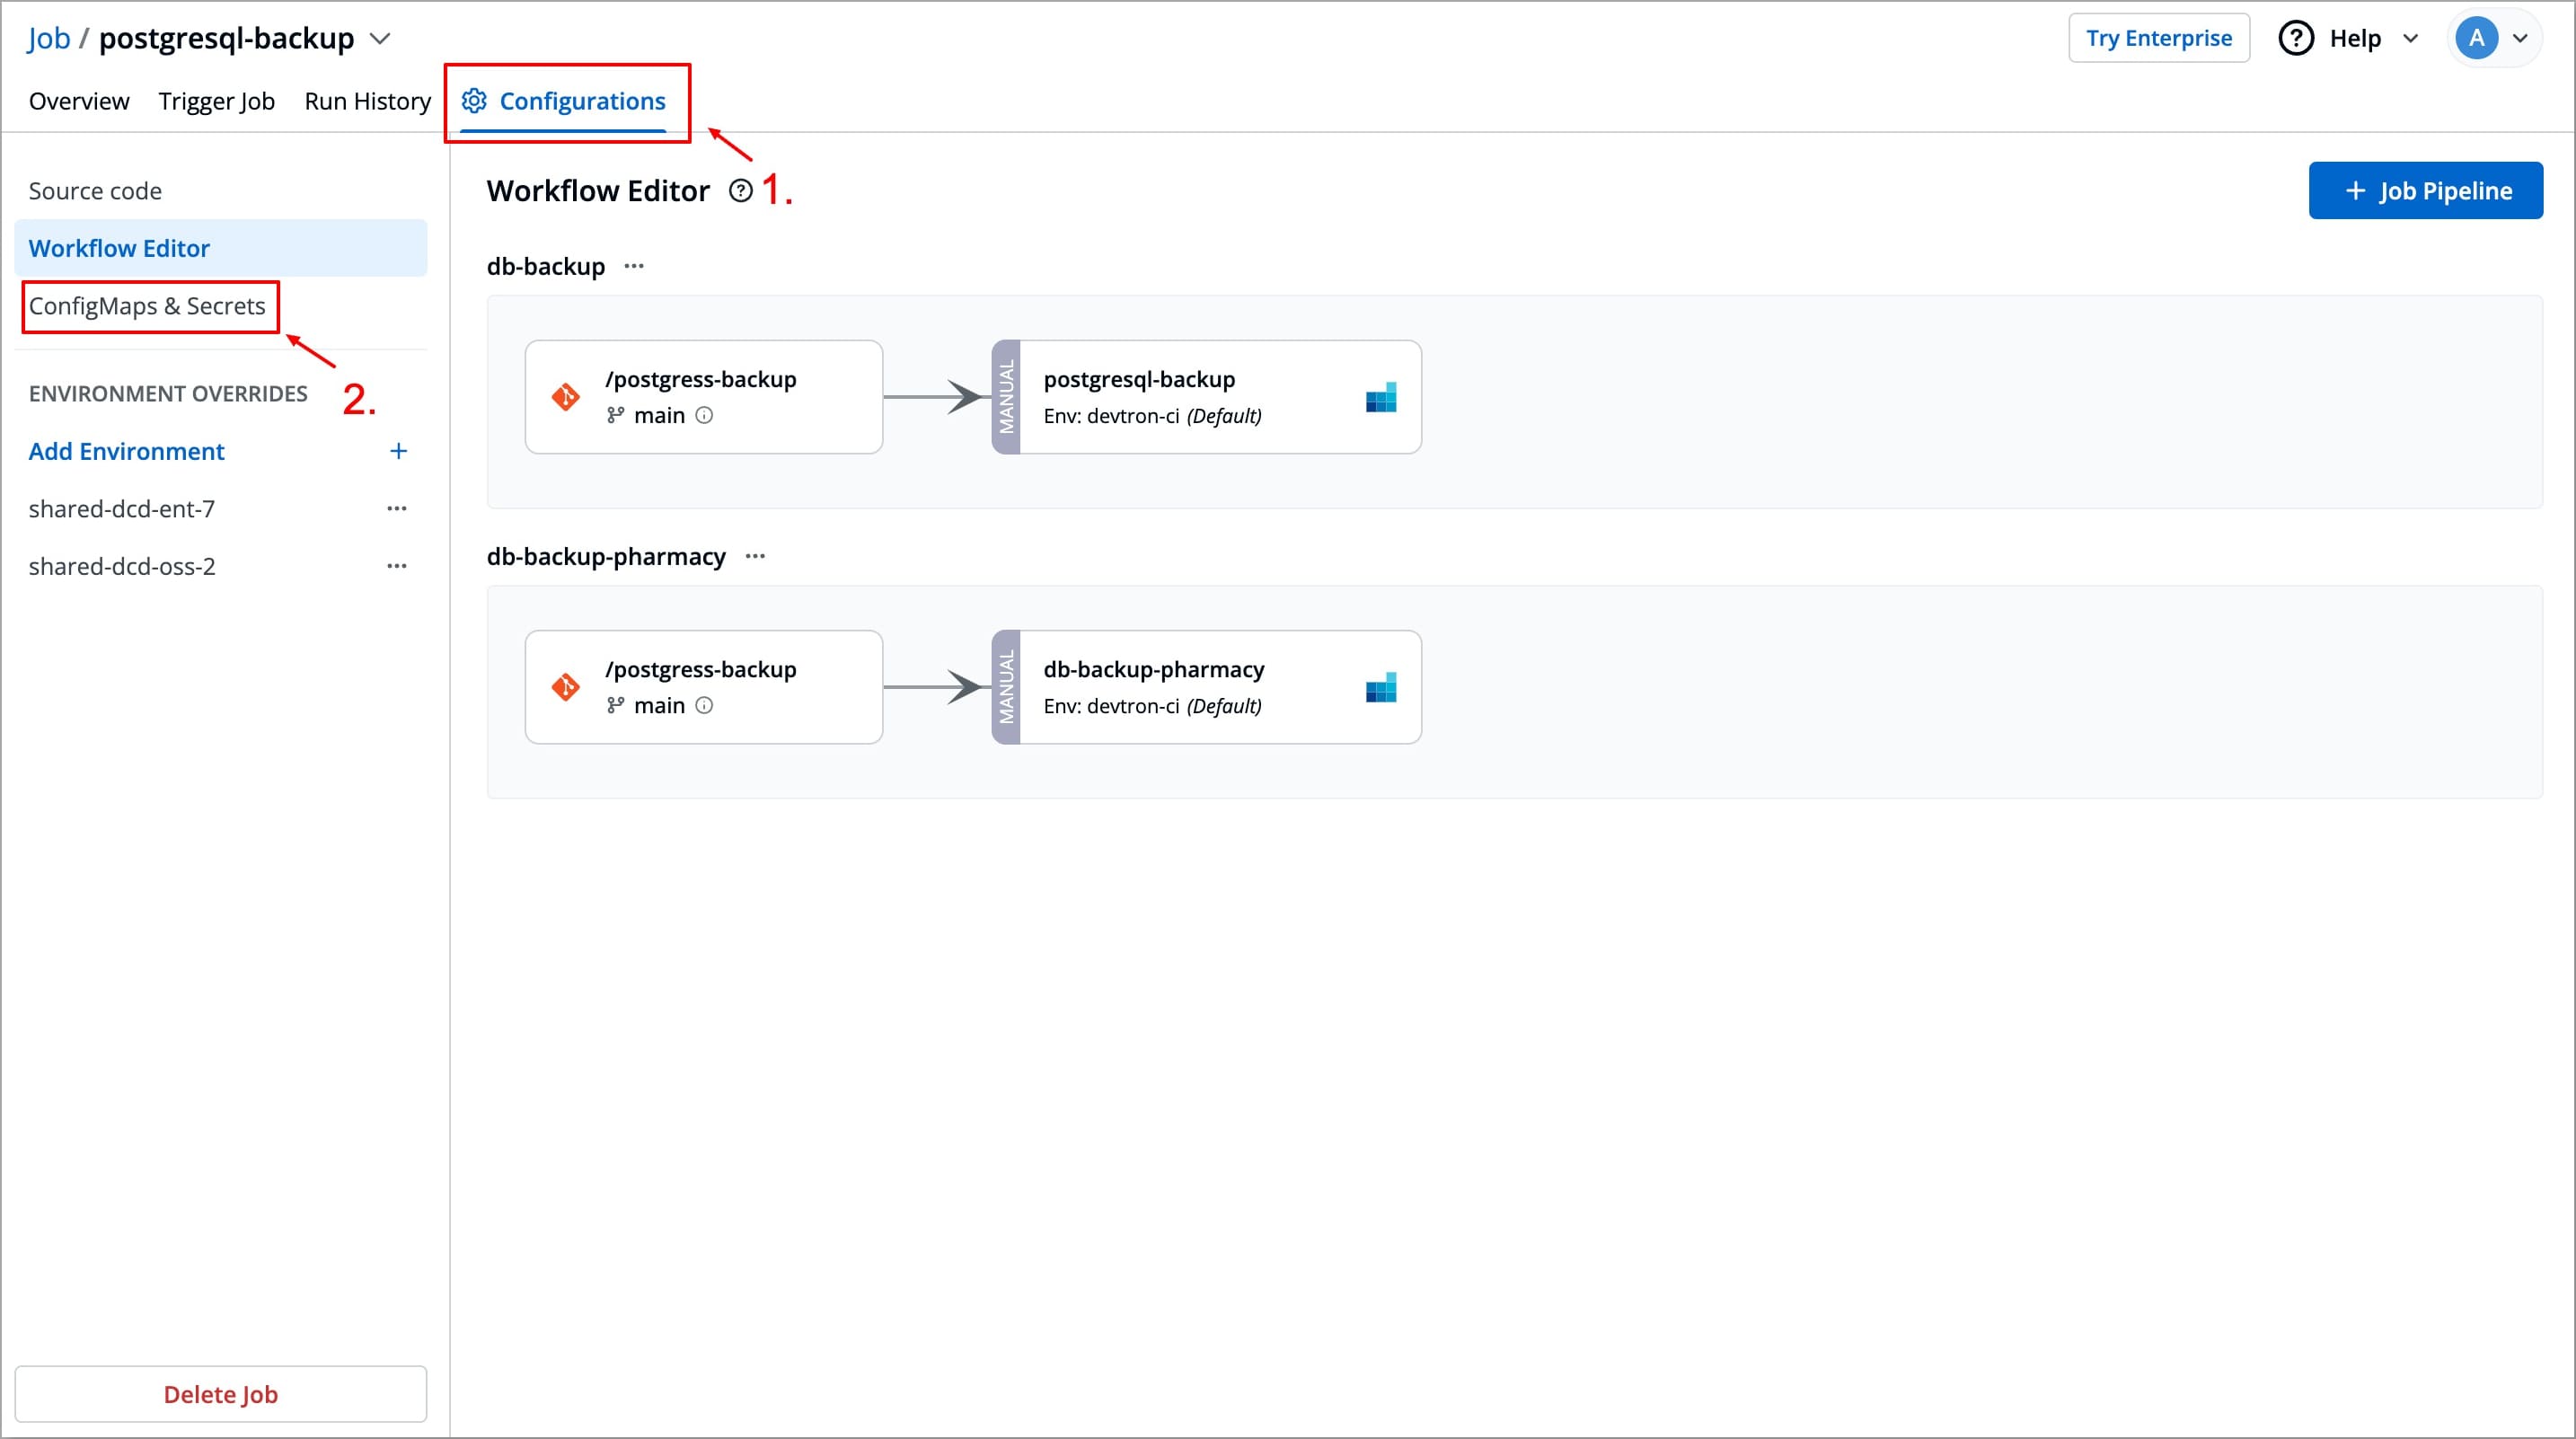
| 1. Go to **Configurations** → **ConfigMaps & Secrets**. | ||
|
|
||
|  | ||
|
|
||
| 2. Click the **+** button next to **ConfigMaps**. | ||
|
|
||
|  | ||
|
|
||
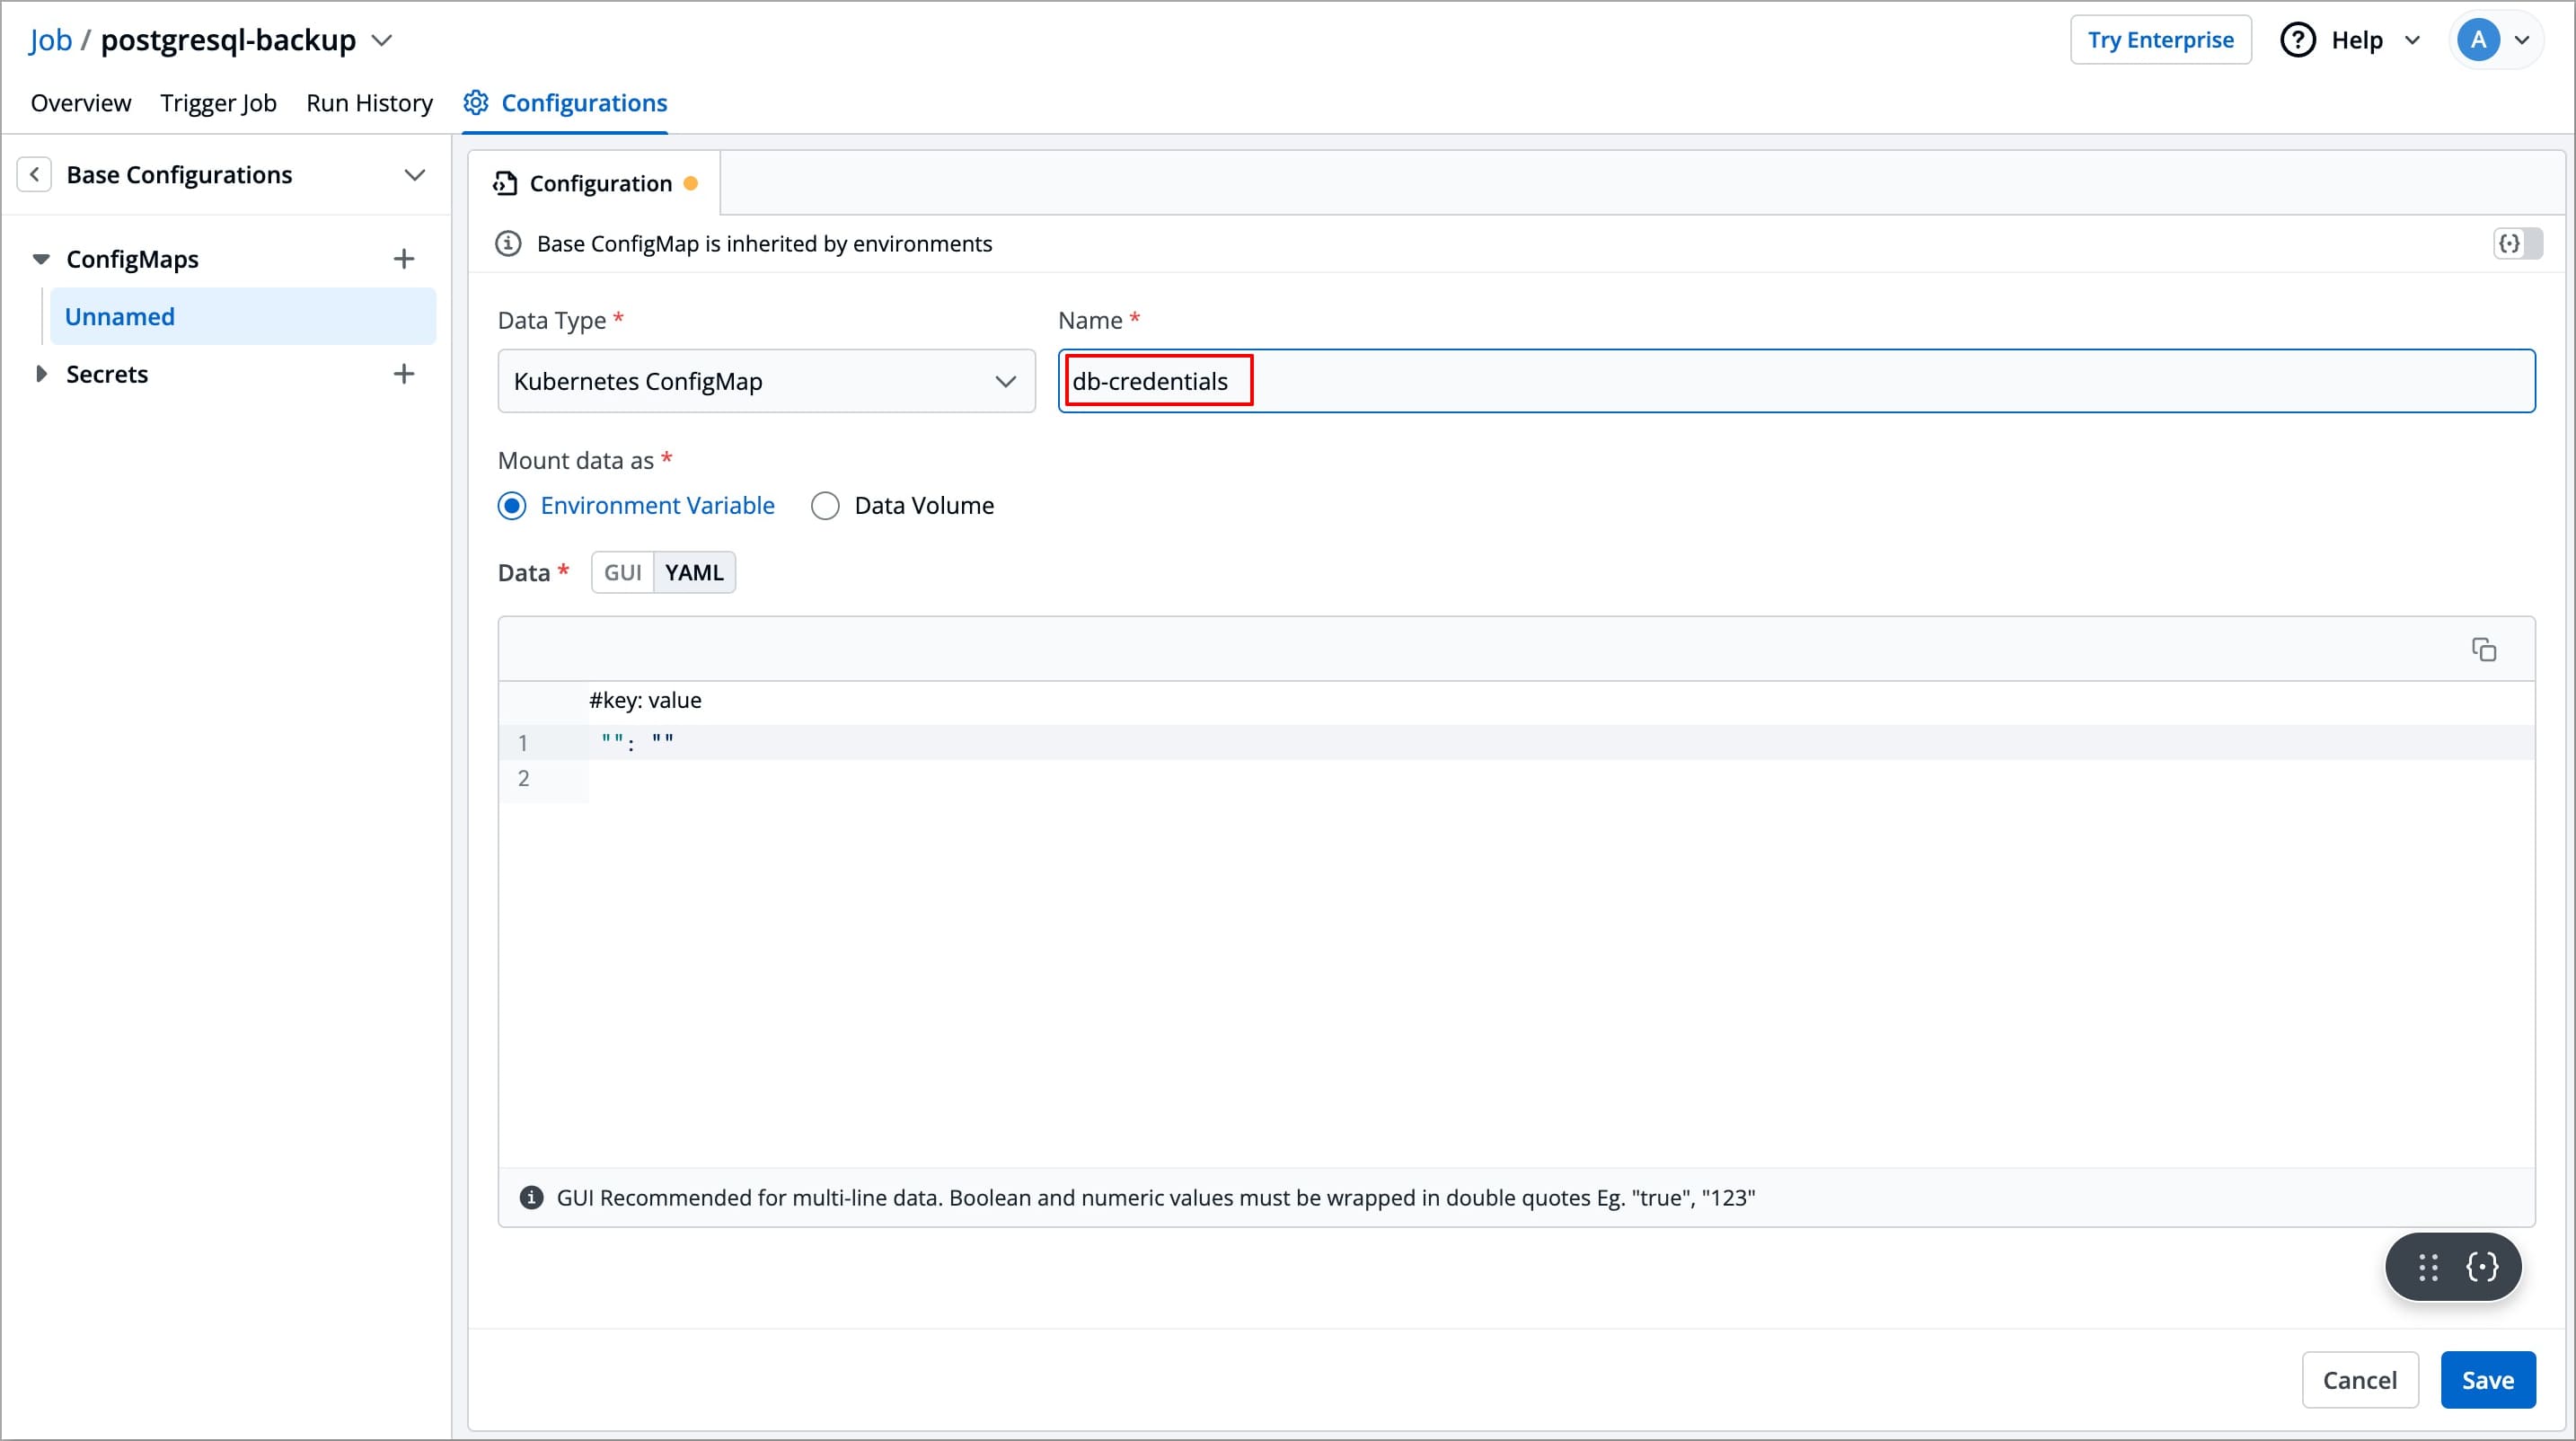
| 3. Enter a name for the ConfigMap (Once defined, the name cannot be changed later). | ||
|
|
||
| **Note**: In case you are using an External Kubernetes ConfigMap, the name should be exactly the same as the name given using the `kubectl create configmap <configmap-name> <data source>` command. | ||
|
|
||
|  | ||
|
|
||
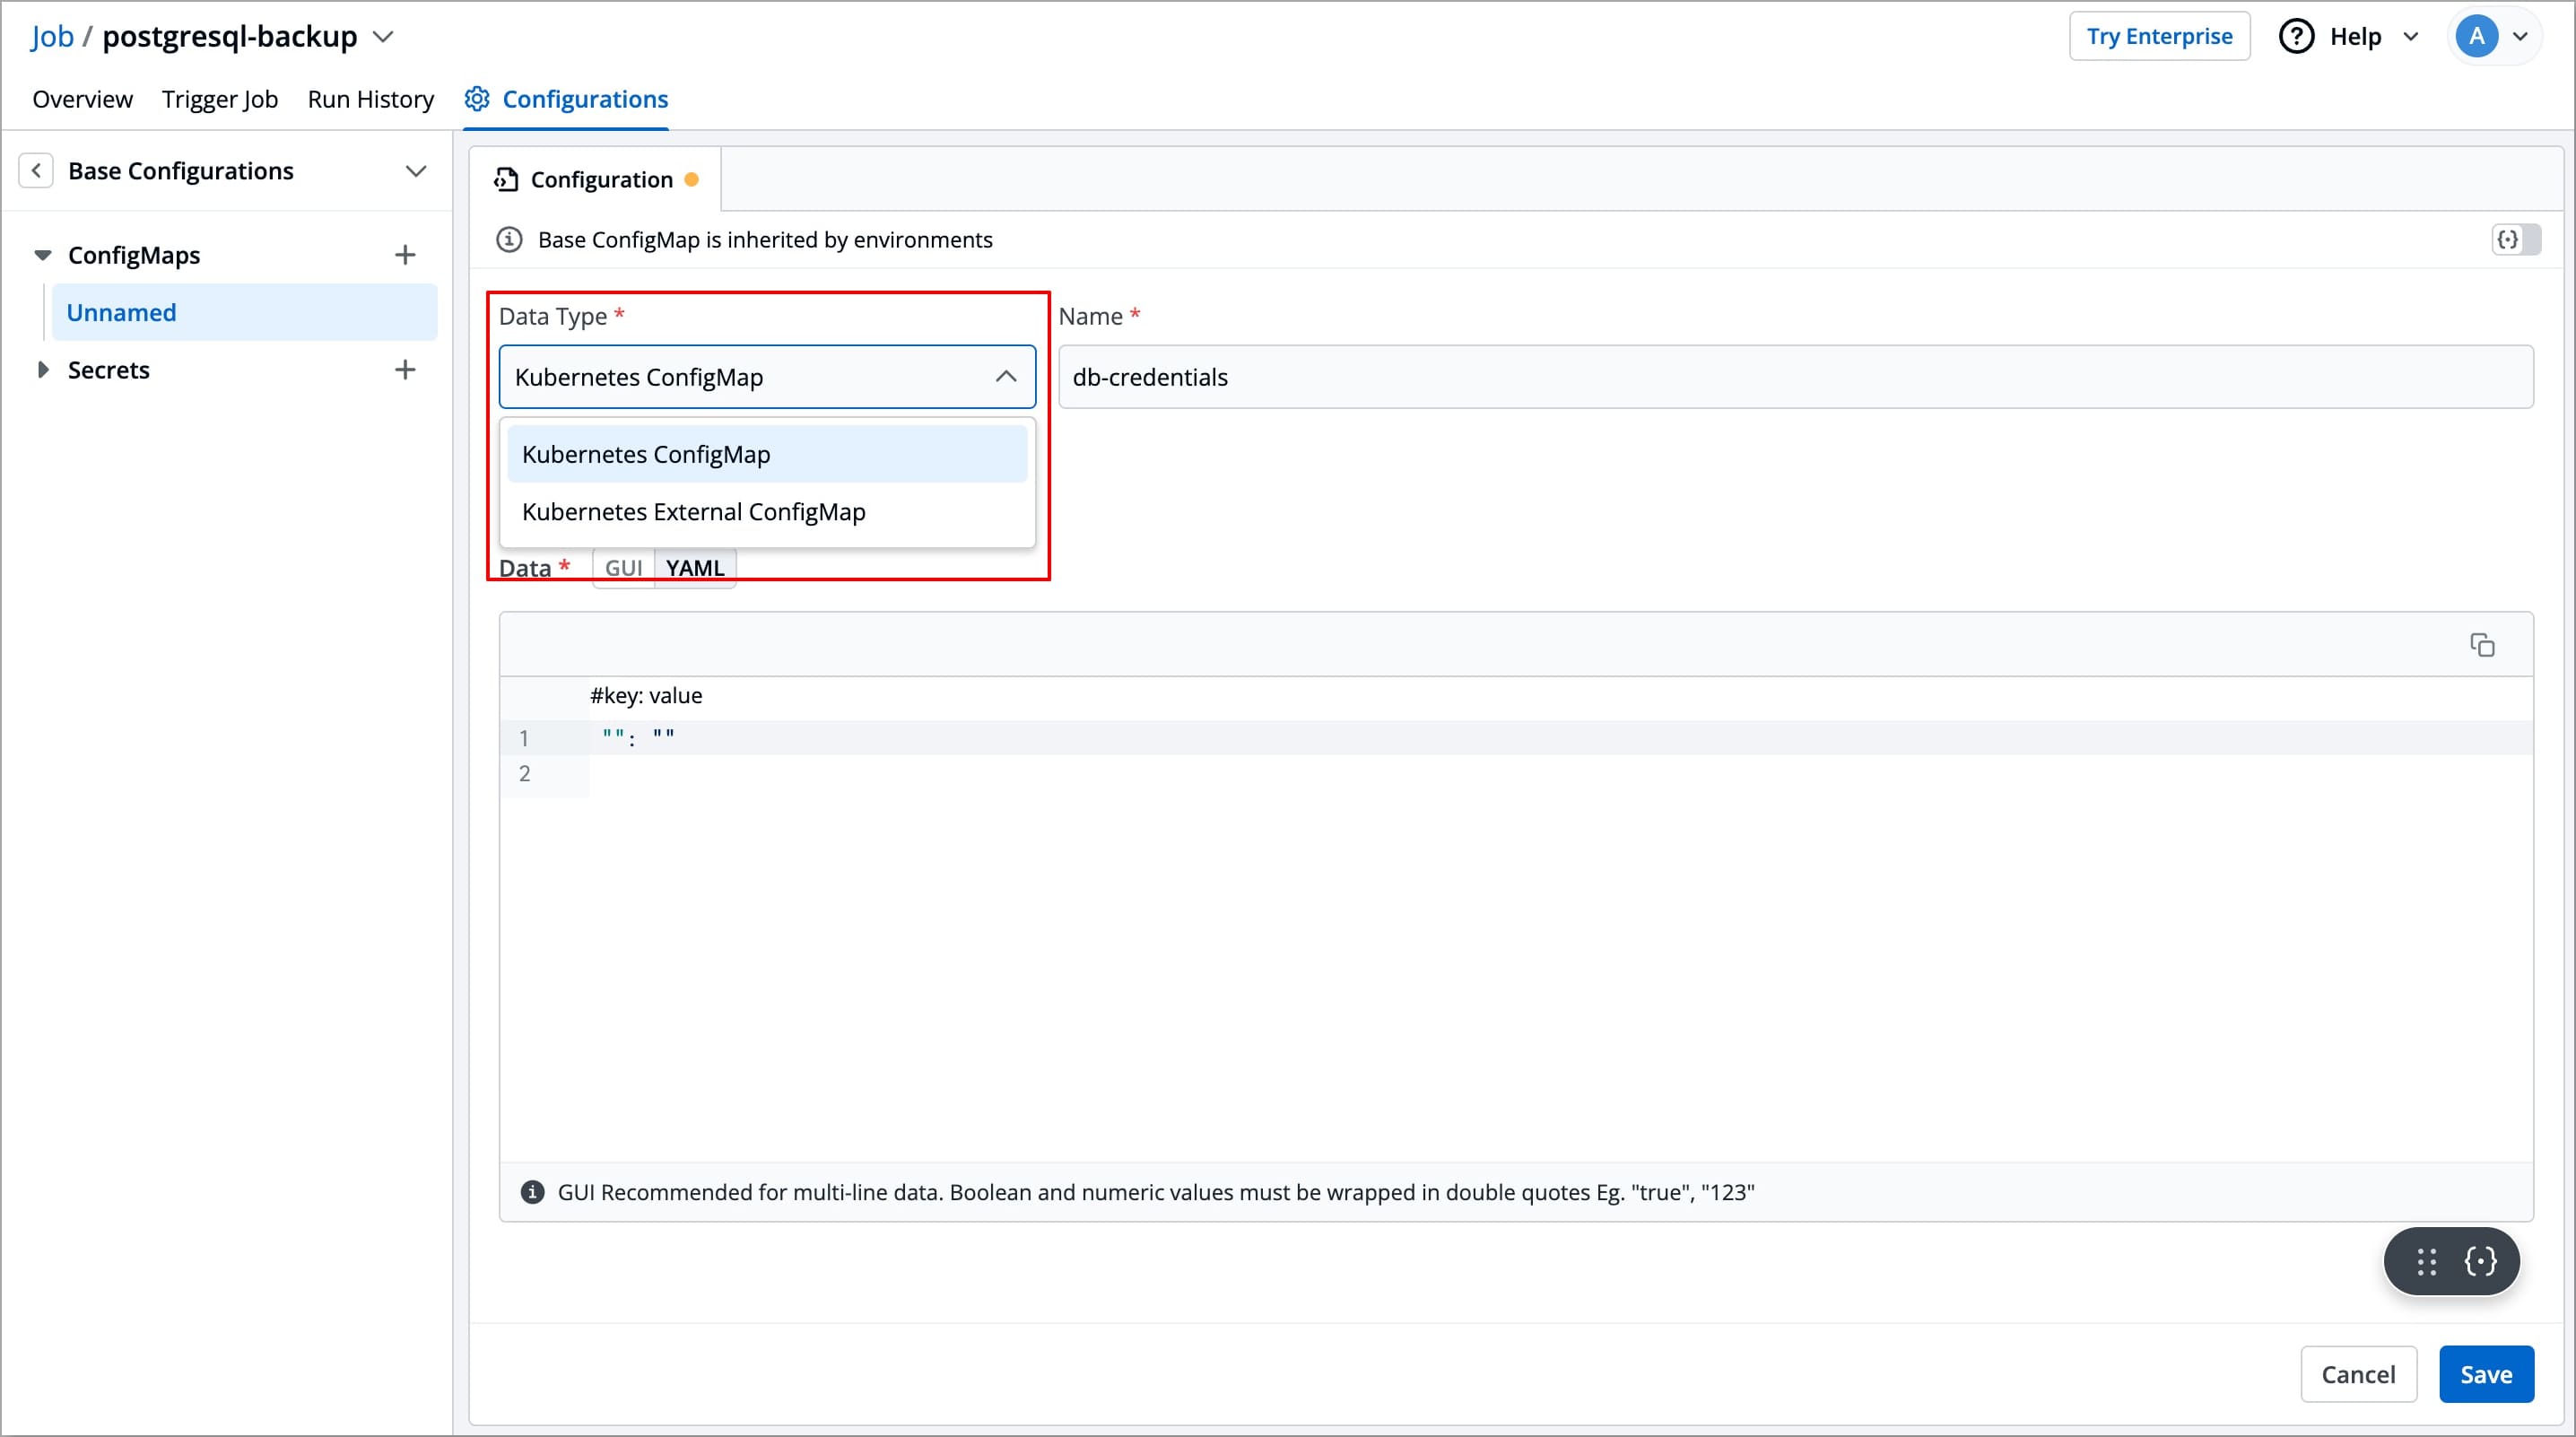
| 4. **Data Type** - Choose between the following data types: | ||
|
|
||
| * **Kubernetes ConfigMap**: Select the Data Type as Kubernetes ConfigMap, if you wish to create and use the ConfigMap using Devtron. | ||
|
|
||
| * **Kubernetes External ConfigMap**: Select the Data Type as Kubernetes External ConfigMap if you have already created a ConfigMap using the kubectl command and want to use that in Devtron. | ||
|
|
||
|  | ||
|
|
||
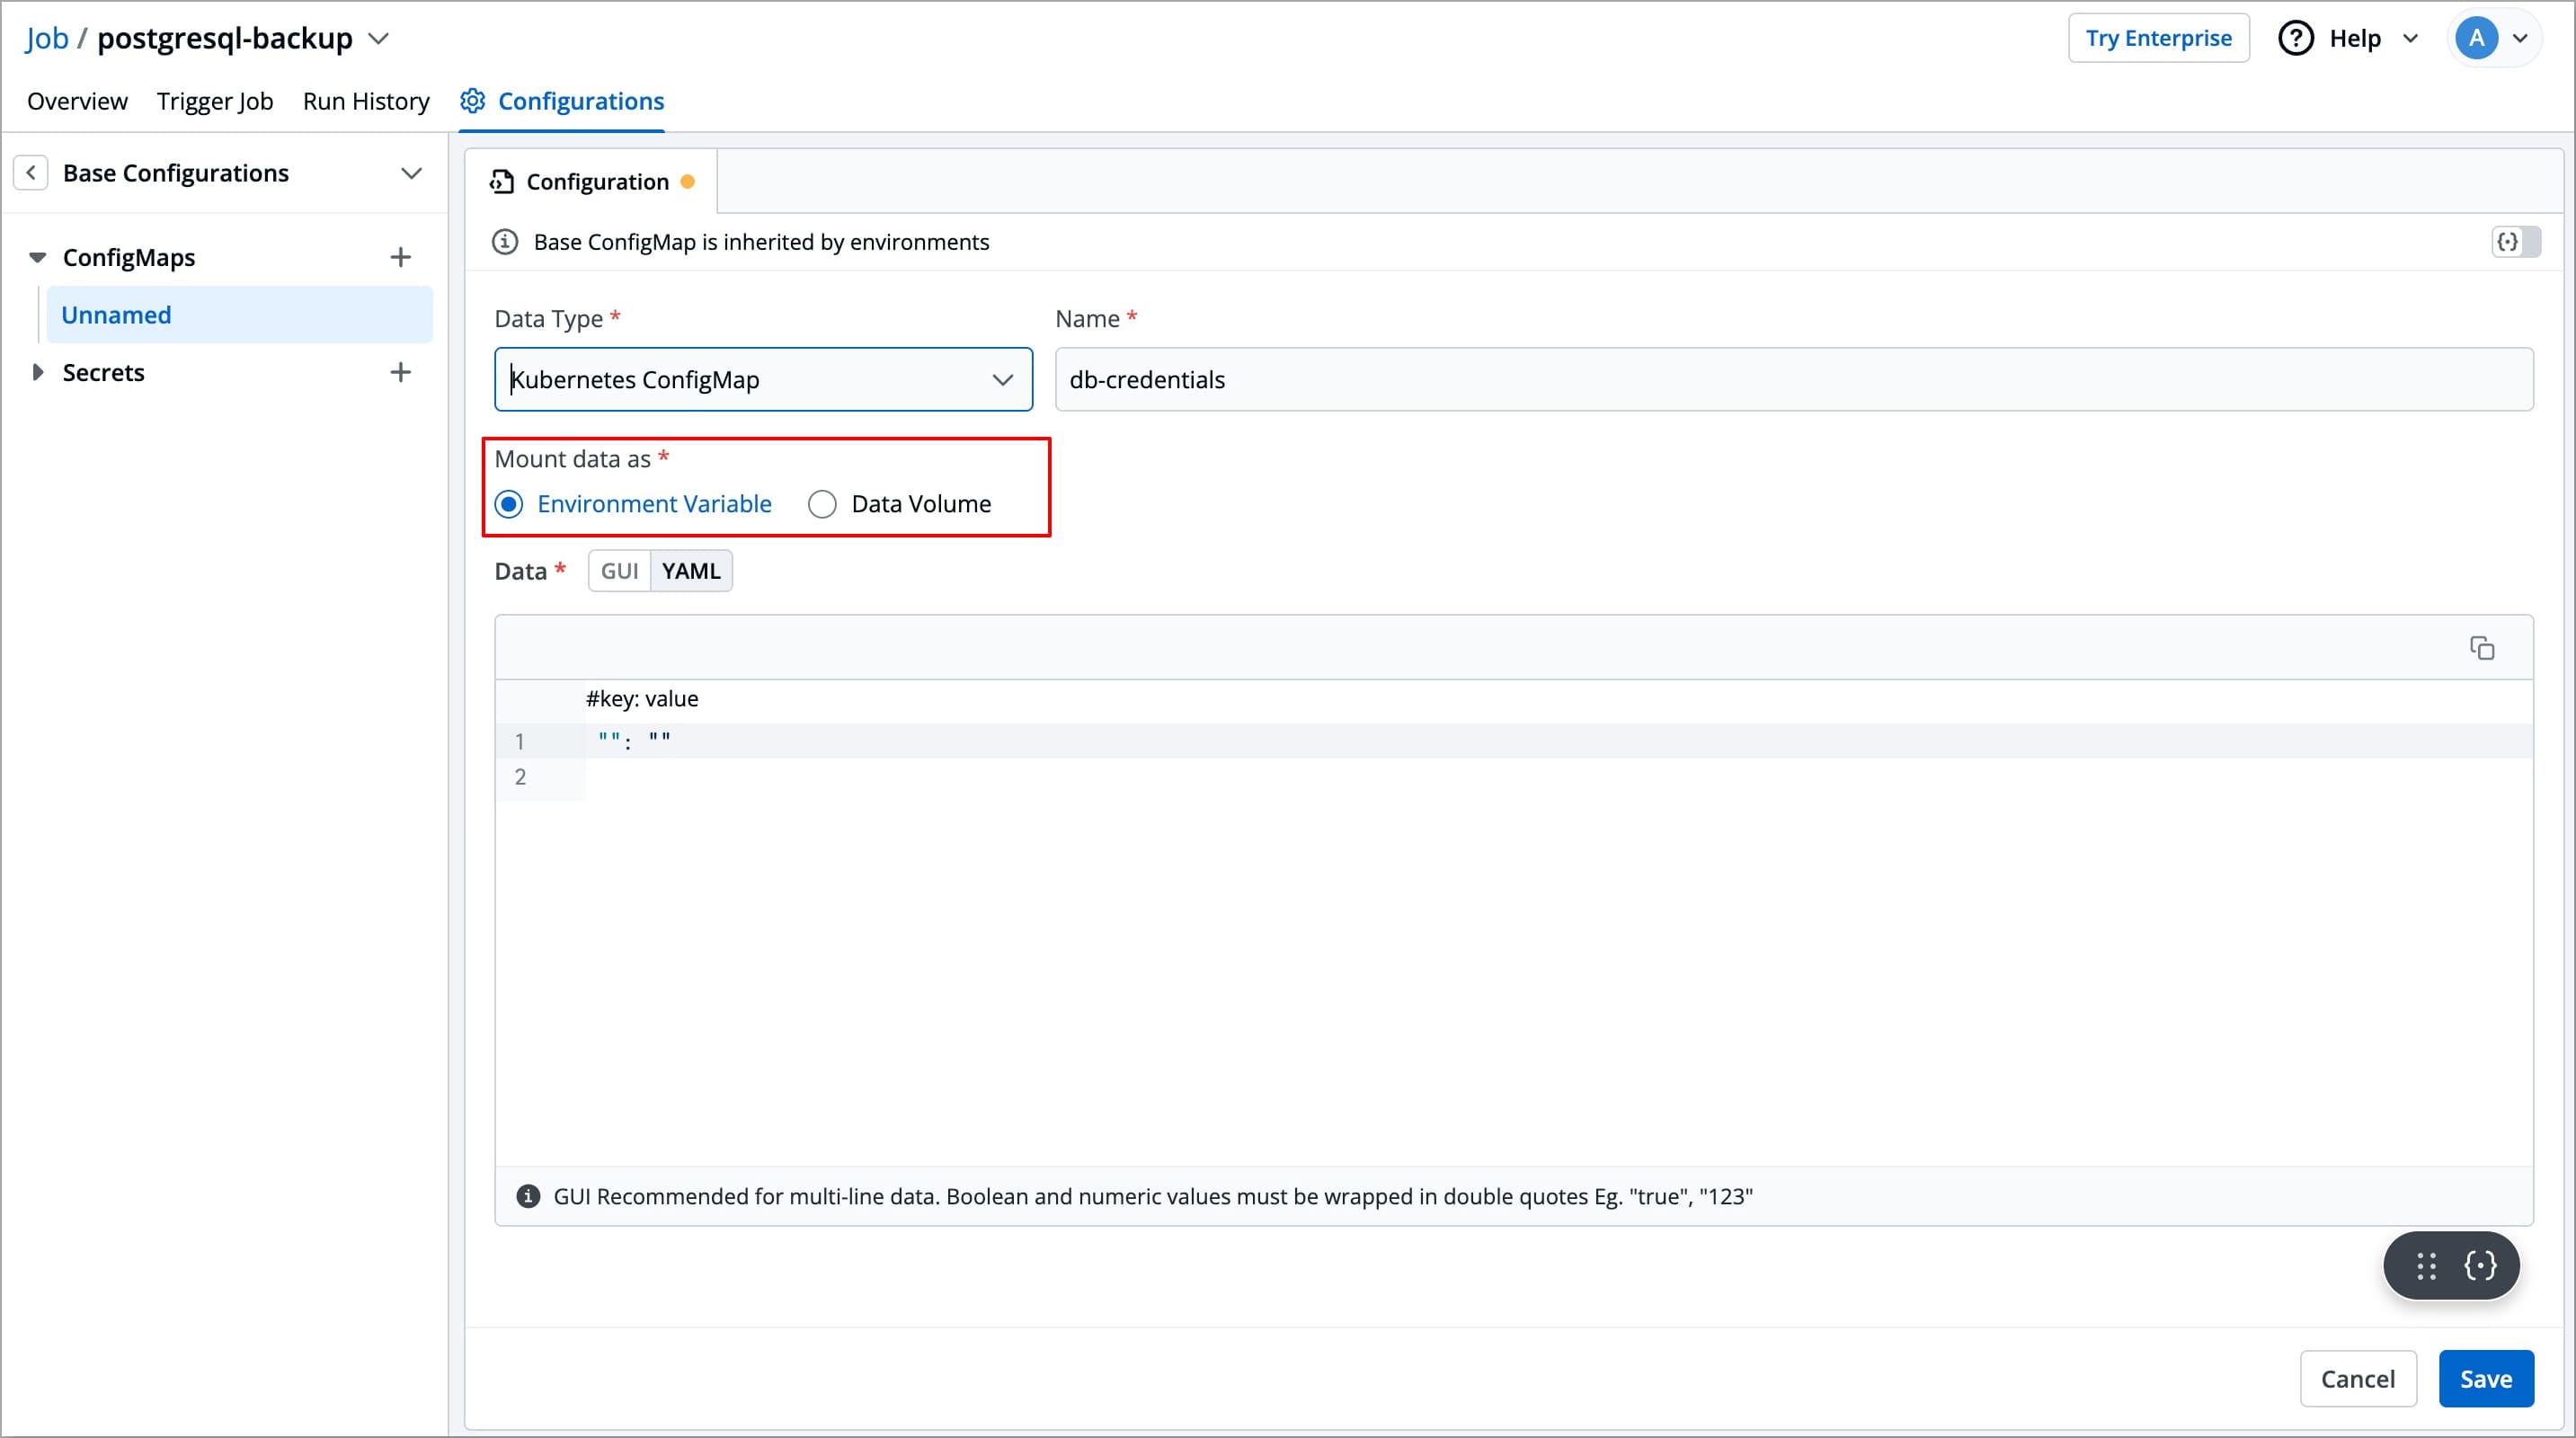
| 5. After selecting the data type, you can choose how to mount the data of your ConfigMap. Devtron allows you to mount ConfigMap Data in the following ways: <br><br> **Mount data as** - Select how you want to mount the ConfigMap: | ||
|
|
||
| * [**Environment Variable**](#mount-data-as-environment-variables) – Select this option if you want to inject Environment Variables in pods using ConfigMap. | ||
|
|
||
| * [**Data Volume**](#mount-data-as-data-volume) – Select this option if you want to configure a Data Volume that is accessible to Containers running in a pod and provide a Volume mount path. Go to [Data Volume](#mount-data-as-data-volume) to know more. | ||
|
|
||
|  | ||
|
|
||
| 6. Select **Save** to create a ConfigMap. | ||
|
|
||
| ### Mount Data as Environment Variables | ||
|
|
||
| This will pass your ConfigMap data into your Job pod as environment variables, thus making the configuration values directly accessible by your job. | ||
|
|
||
| #### For Kubernetes ConfigMap | ||
|
|
||
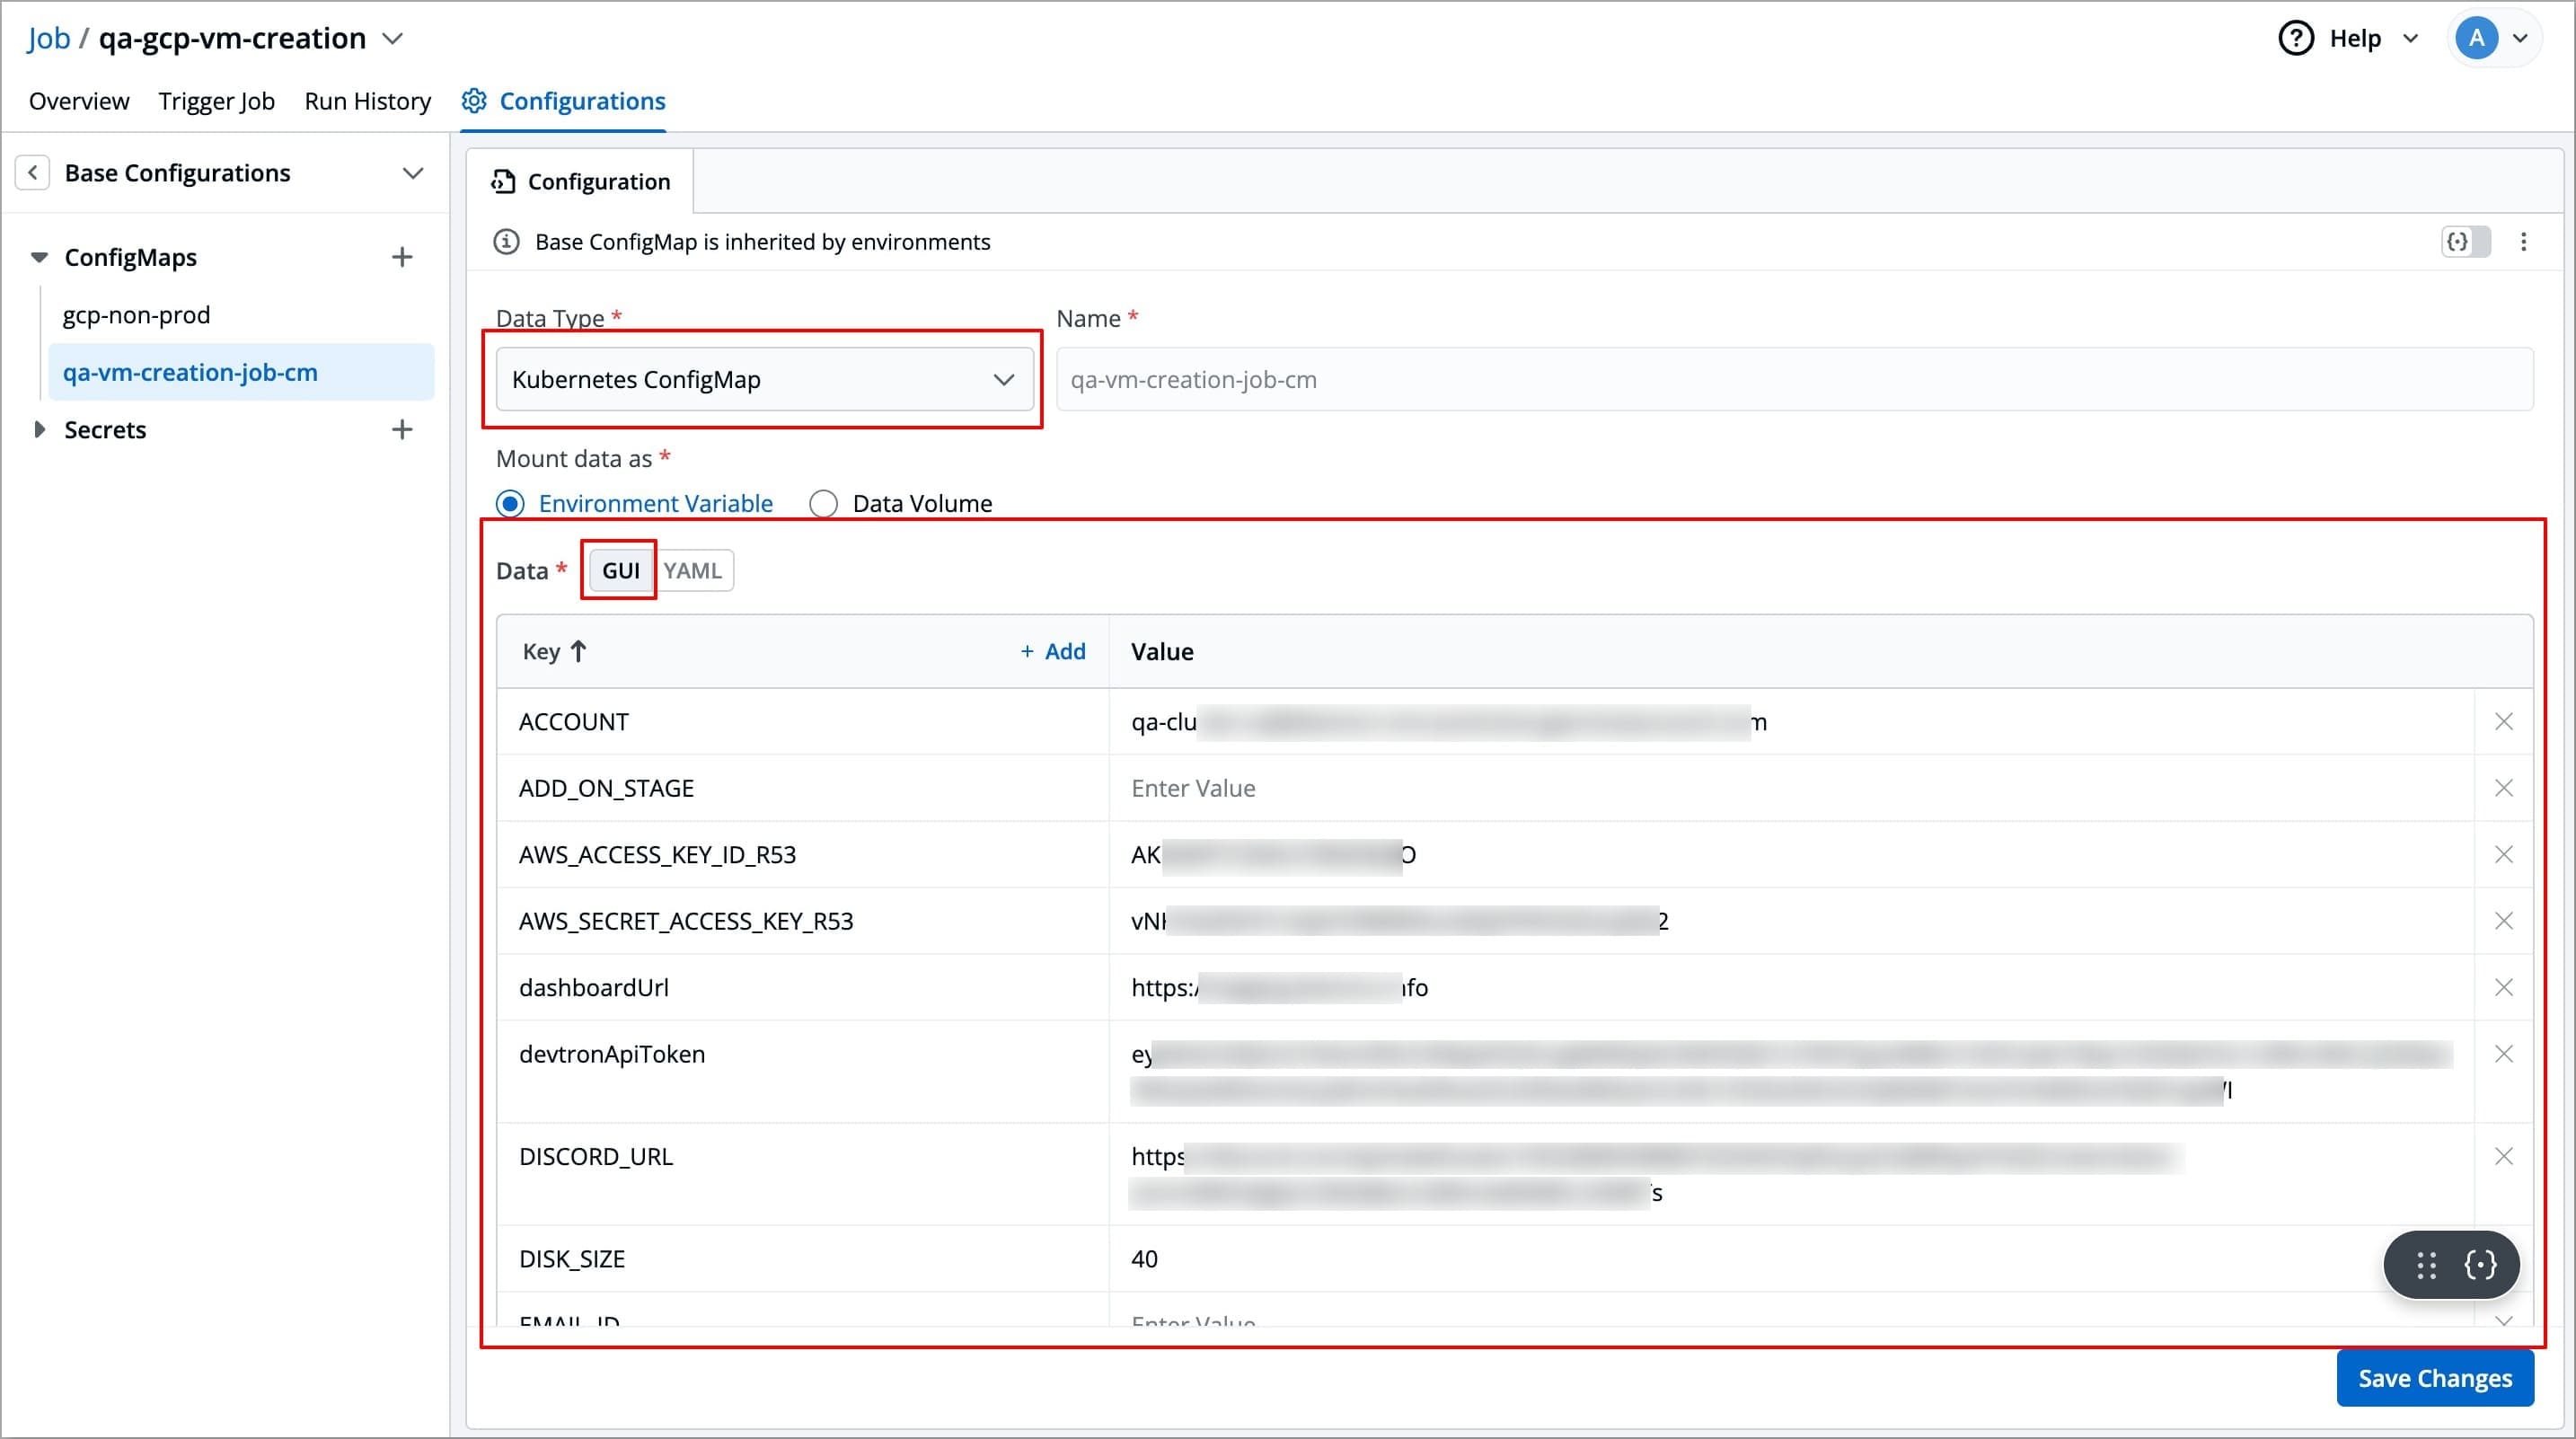
| If you have selected Data type as `Kubernetes ConfigMap` and mount data as `Environment Variable`, then you also need to enter the required data (key-value pairs) in the **Data** field<br><br>Enter data in: | ||
|
|
||
| * **GUI mode** – User-friendly interface. Click the **+Add** button and enter the **Key** and **Value** fields without quotes. | ||
|
|
||
|  | ||
|
|
||
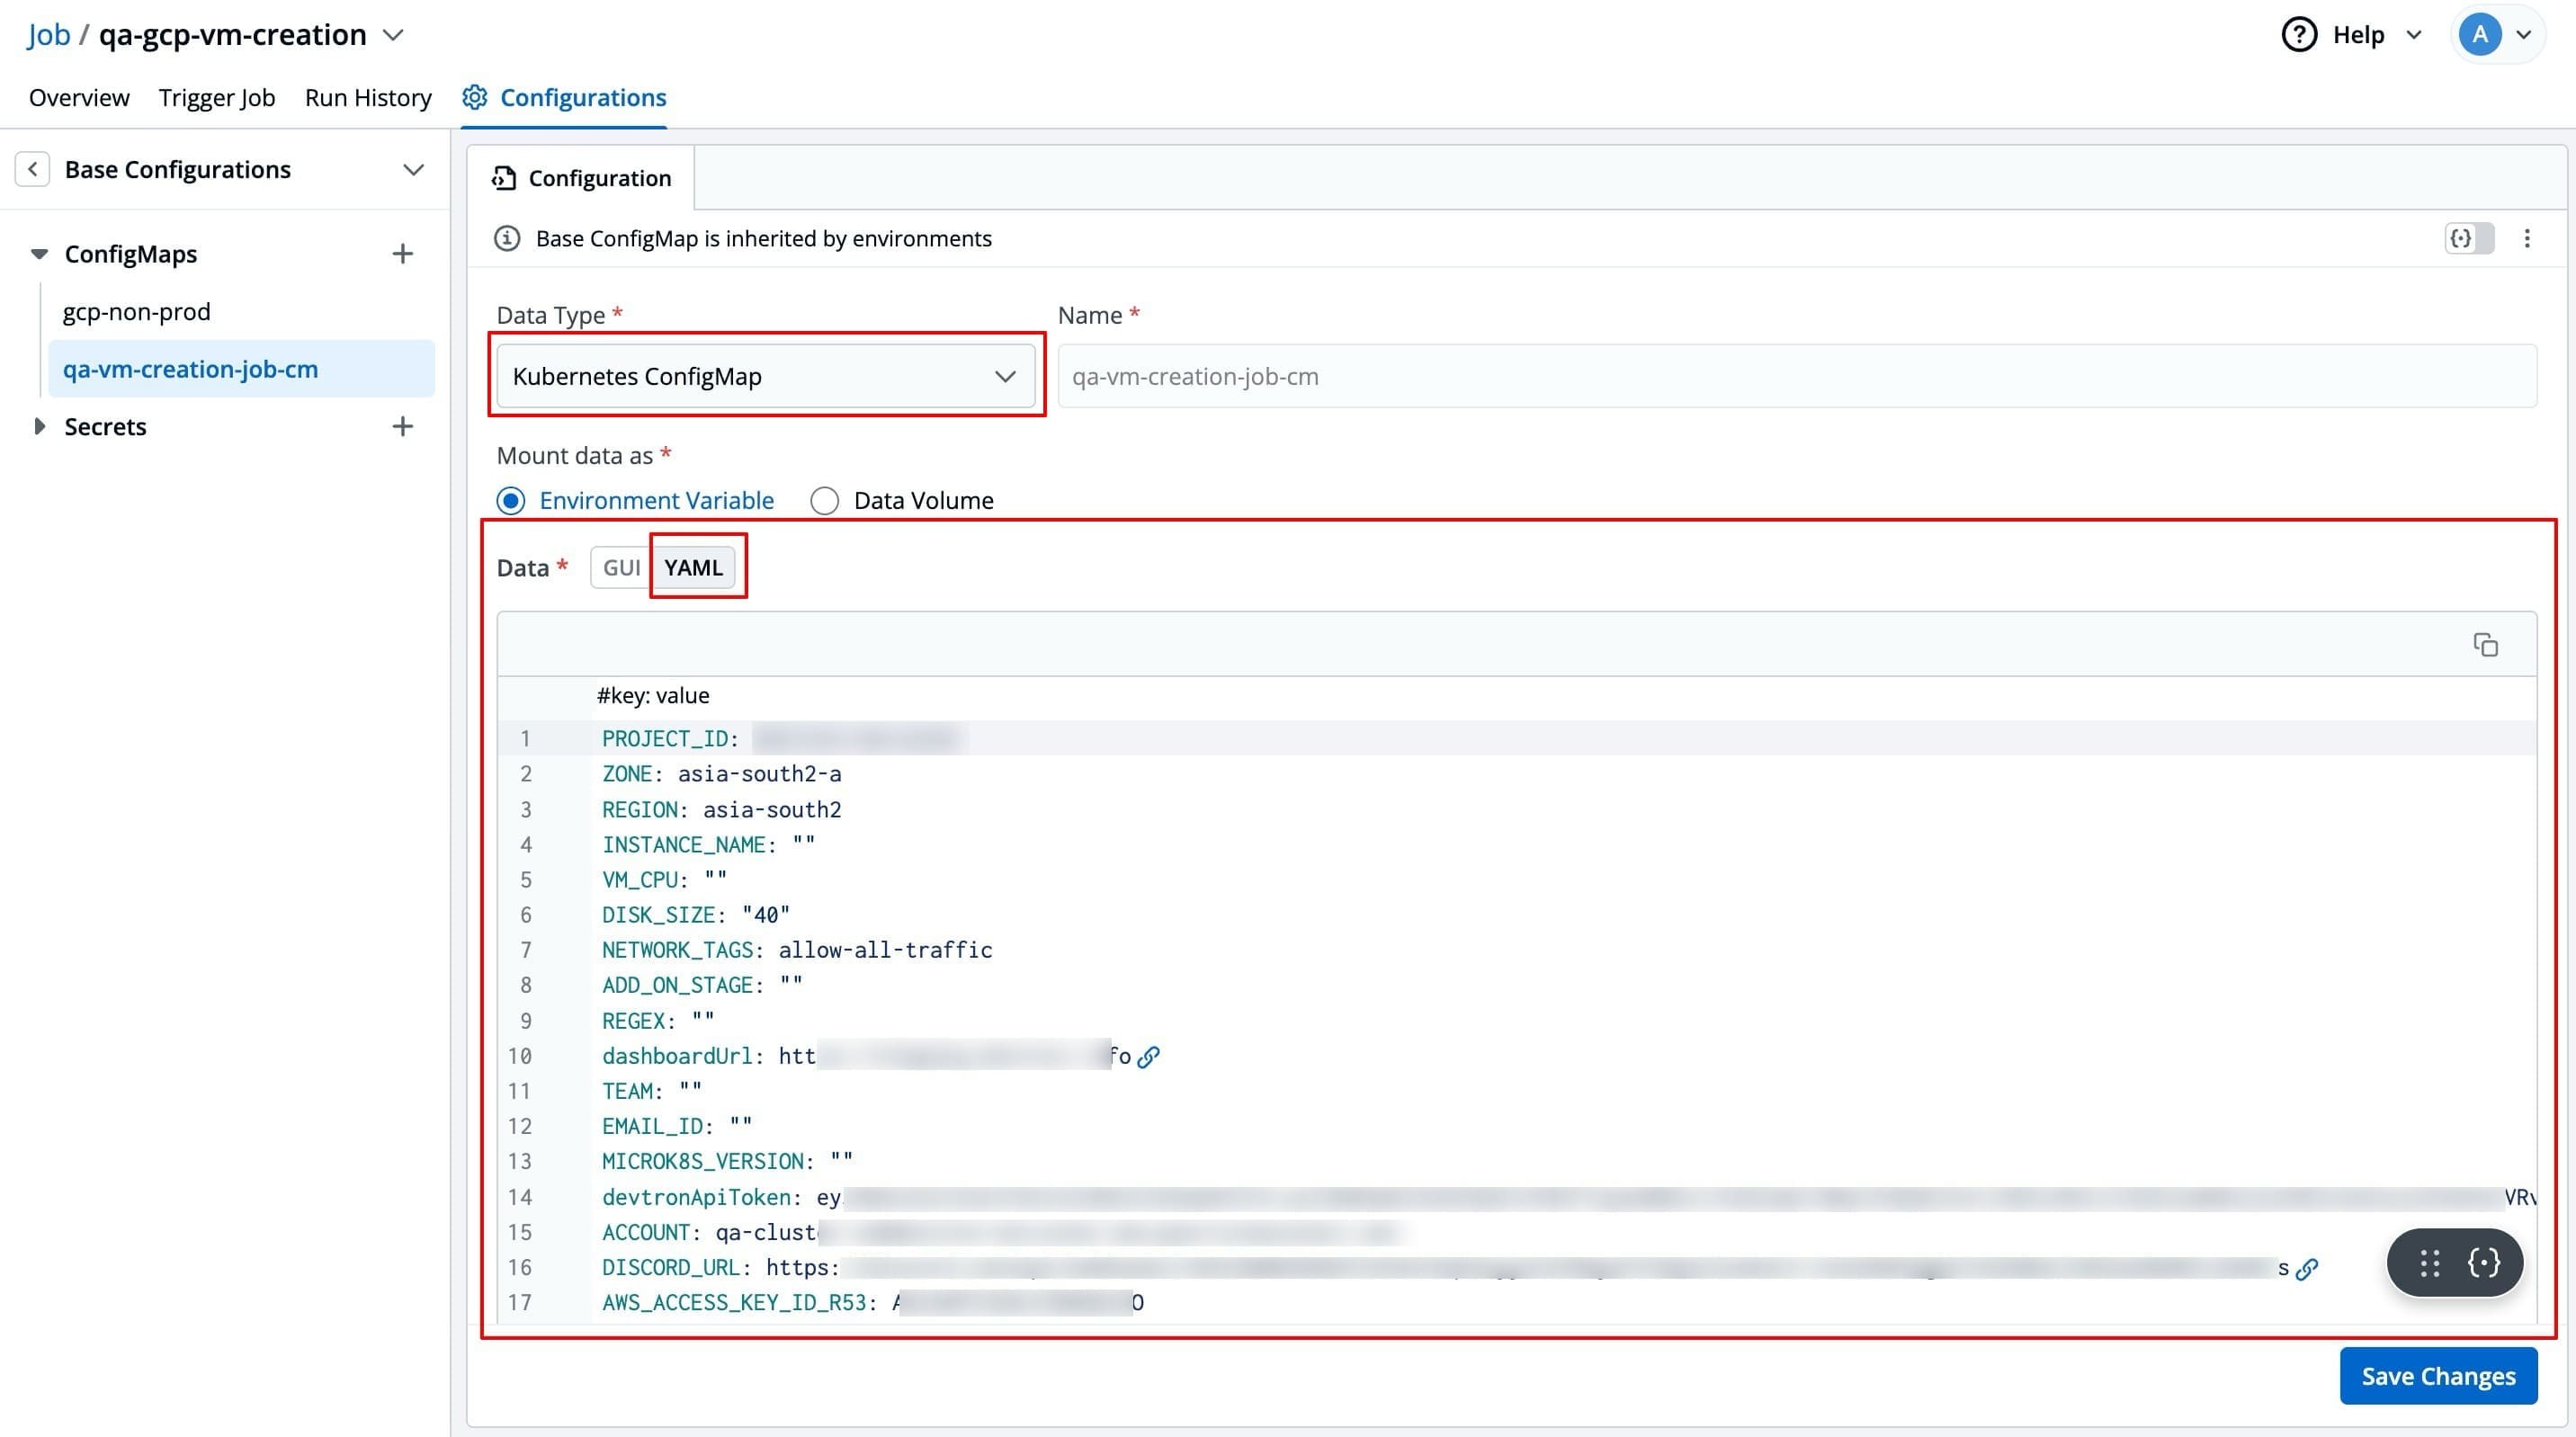
| * **YAML mode** – Raw YAML for entering key-value pairs in the format **`key: value`**. Boolean and numeric values must be wrapped in double quotes. | ||
|
|
||
|  | ||
|
|
||
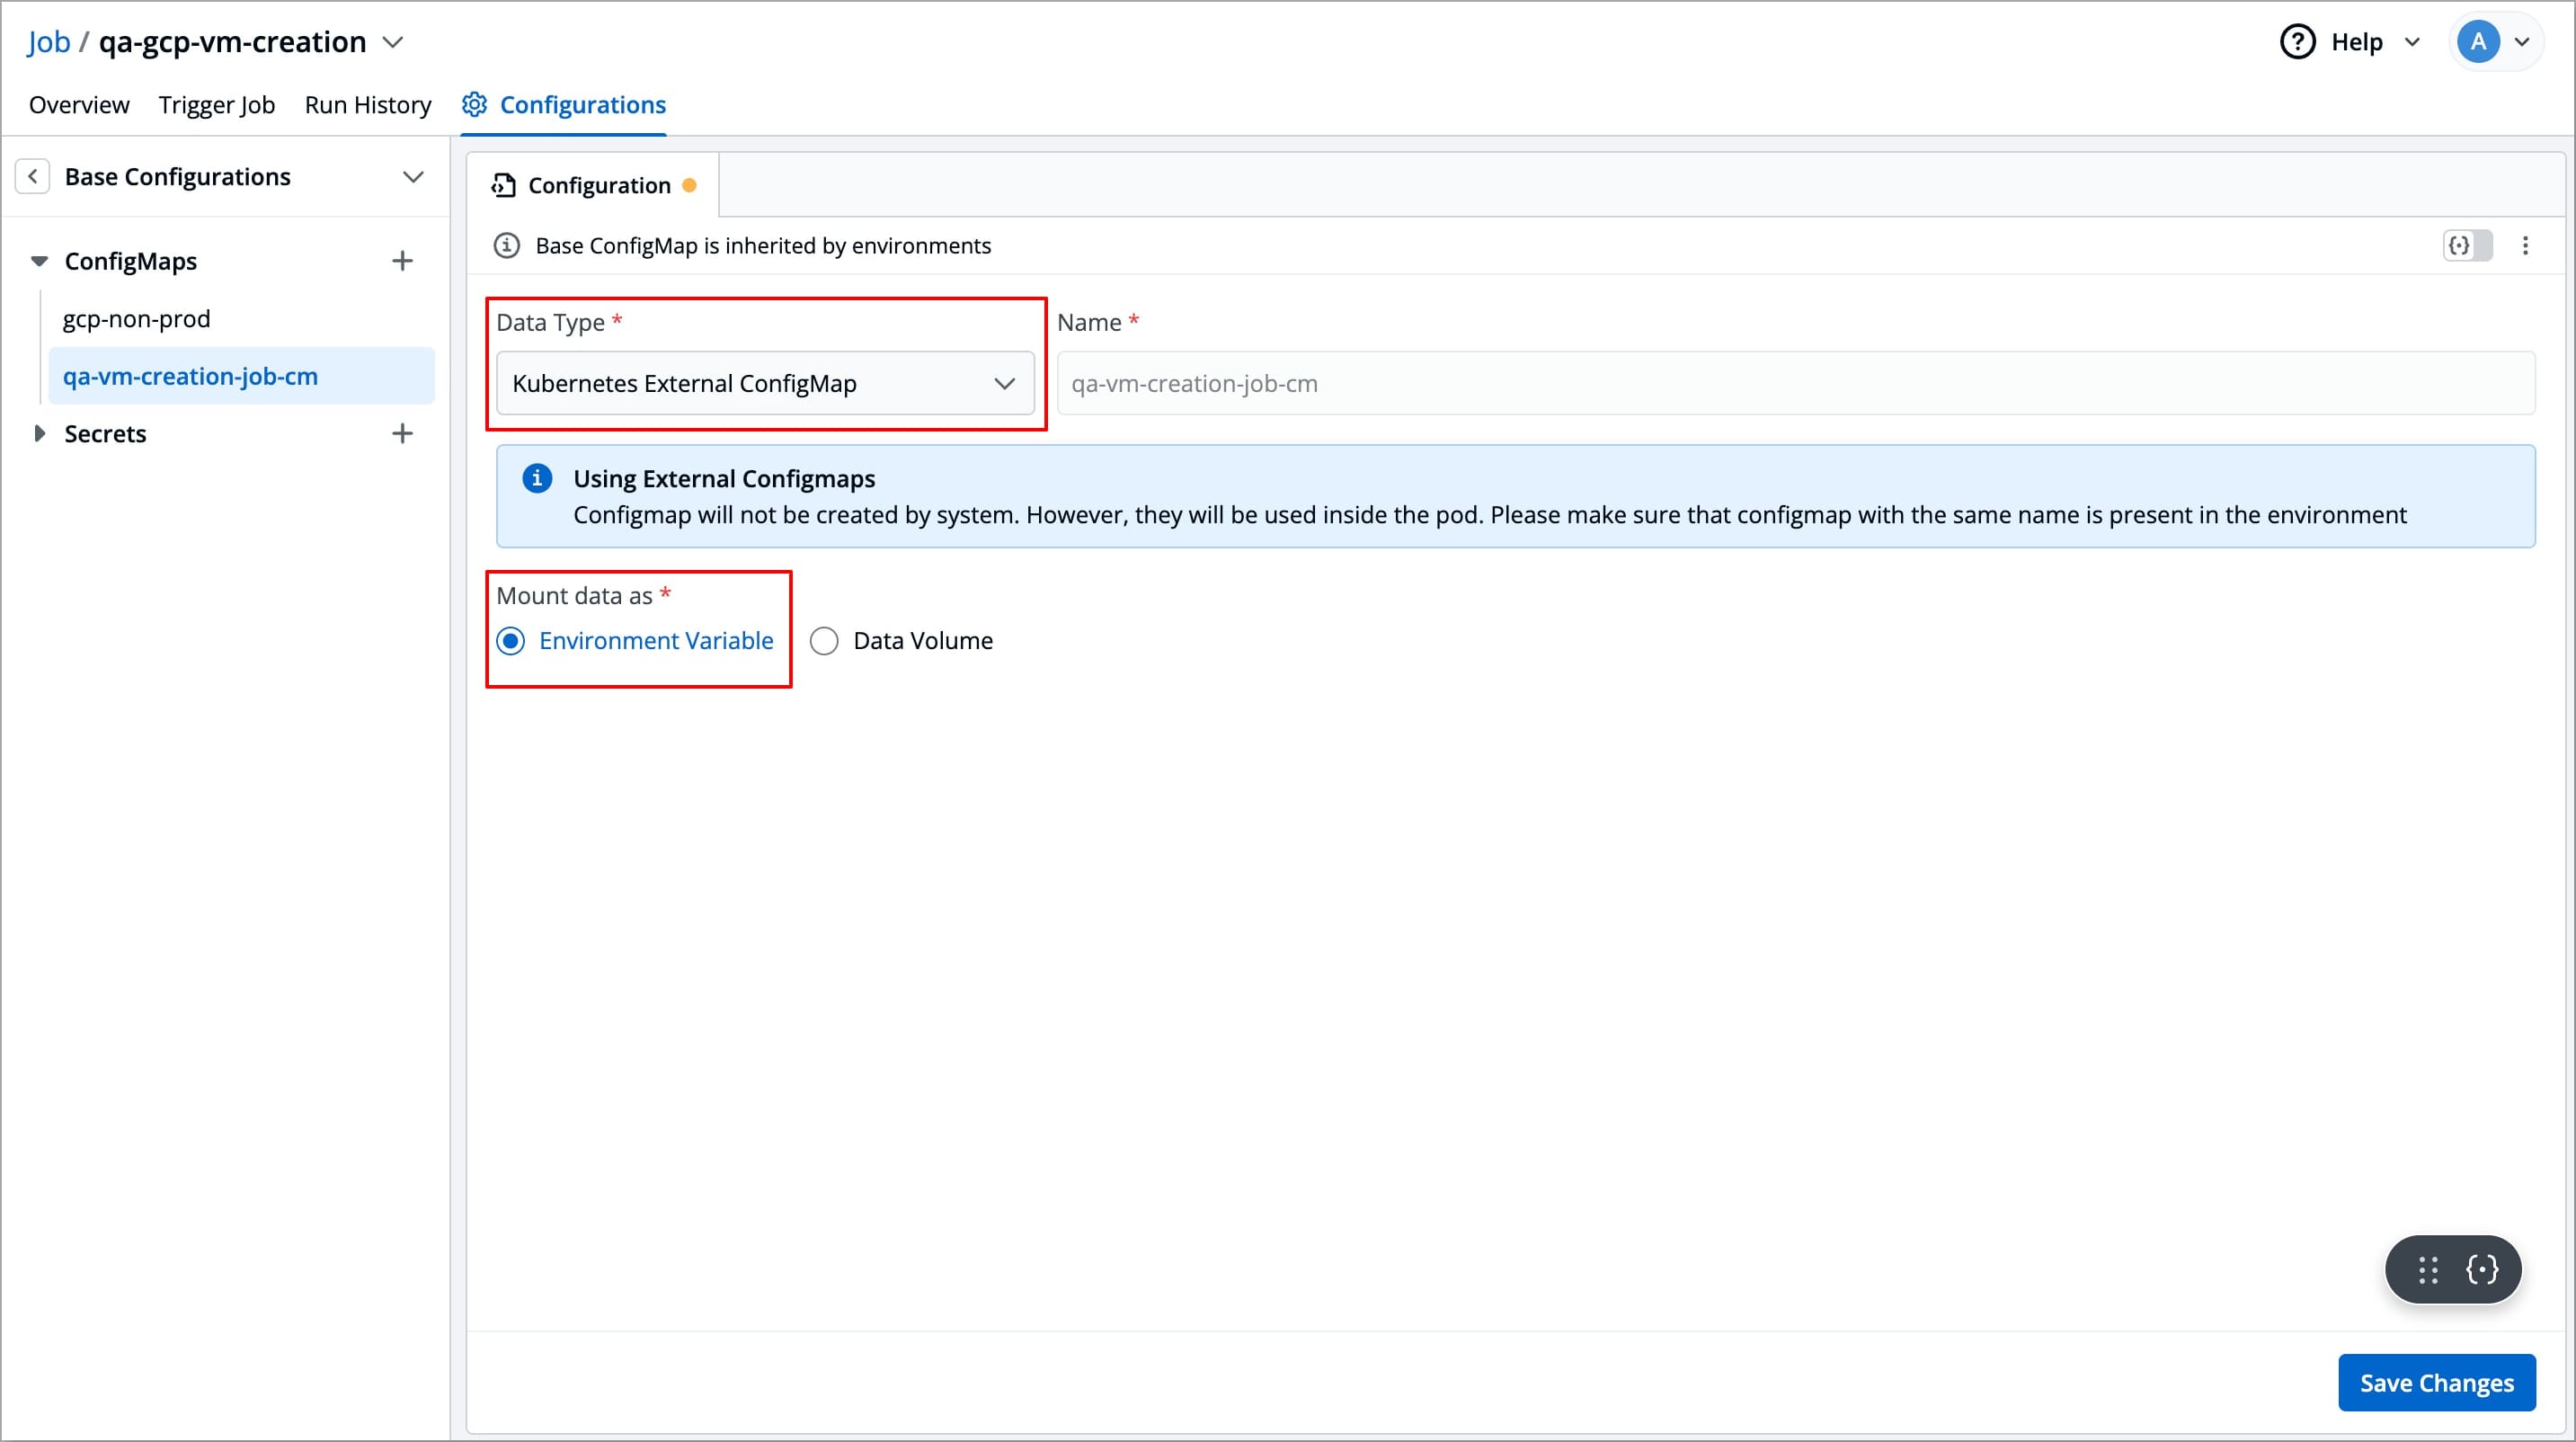
| #### For Kubernetes External ConfigMap | ||
|
|
||
| If you have selected Data type as `Kubernetes External ConfigMap`, then no data is required, as devtron will fetch the external ConfigMap data and use it to create a ConfigMap. | ||
|
|
||
|  | ||
|
|
||
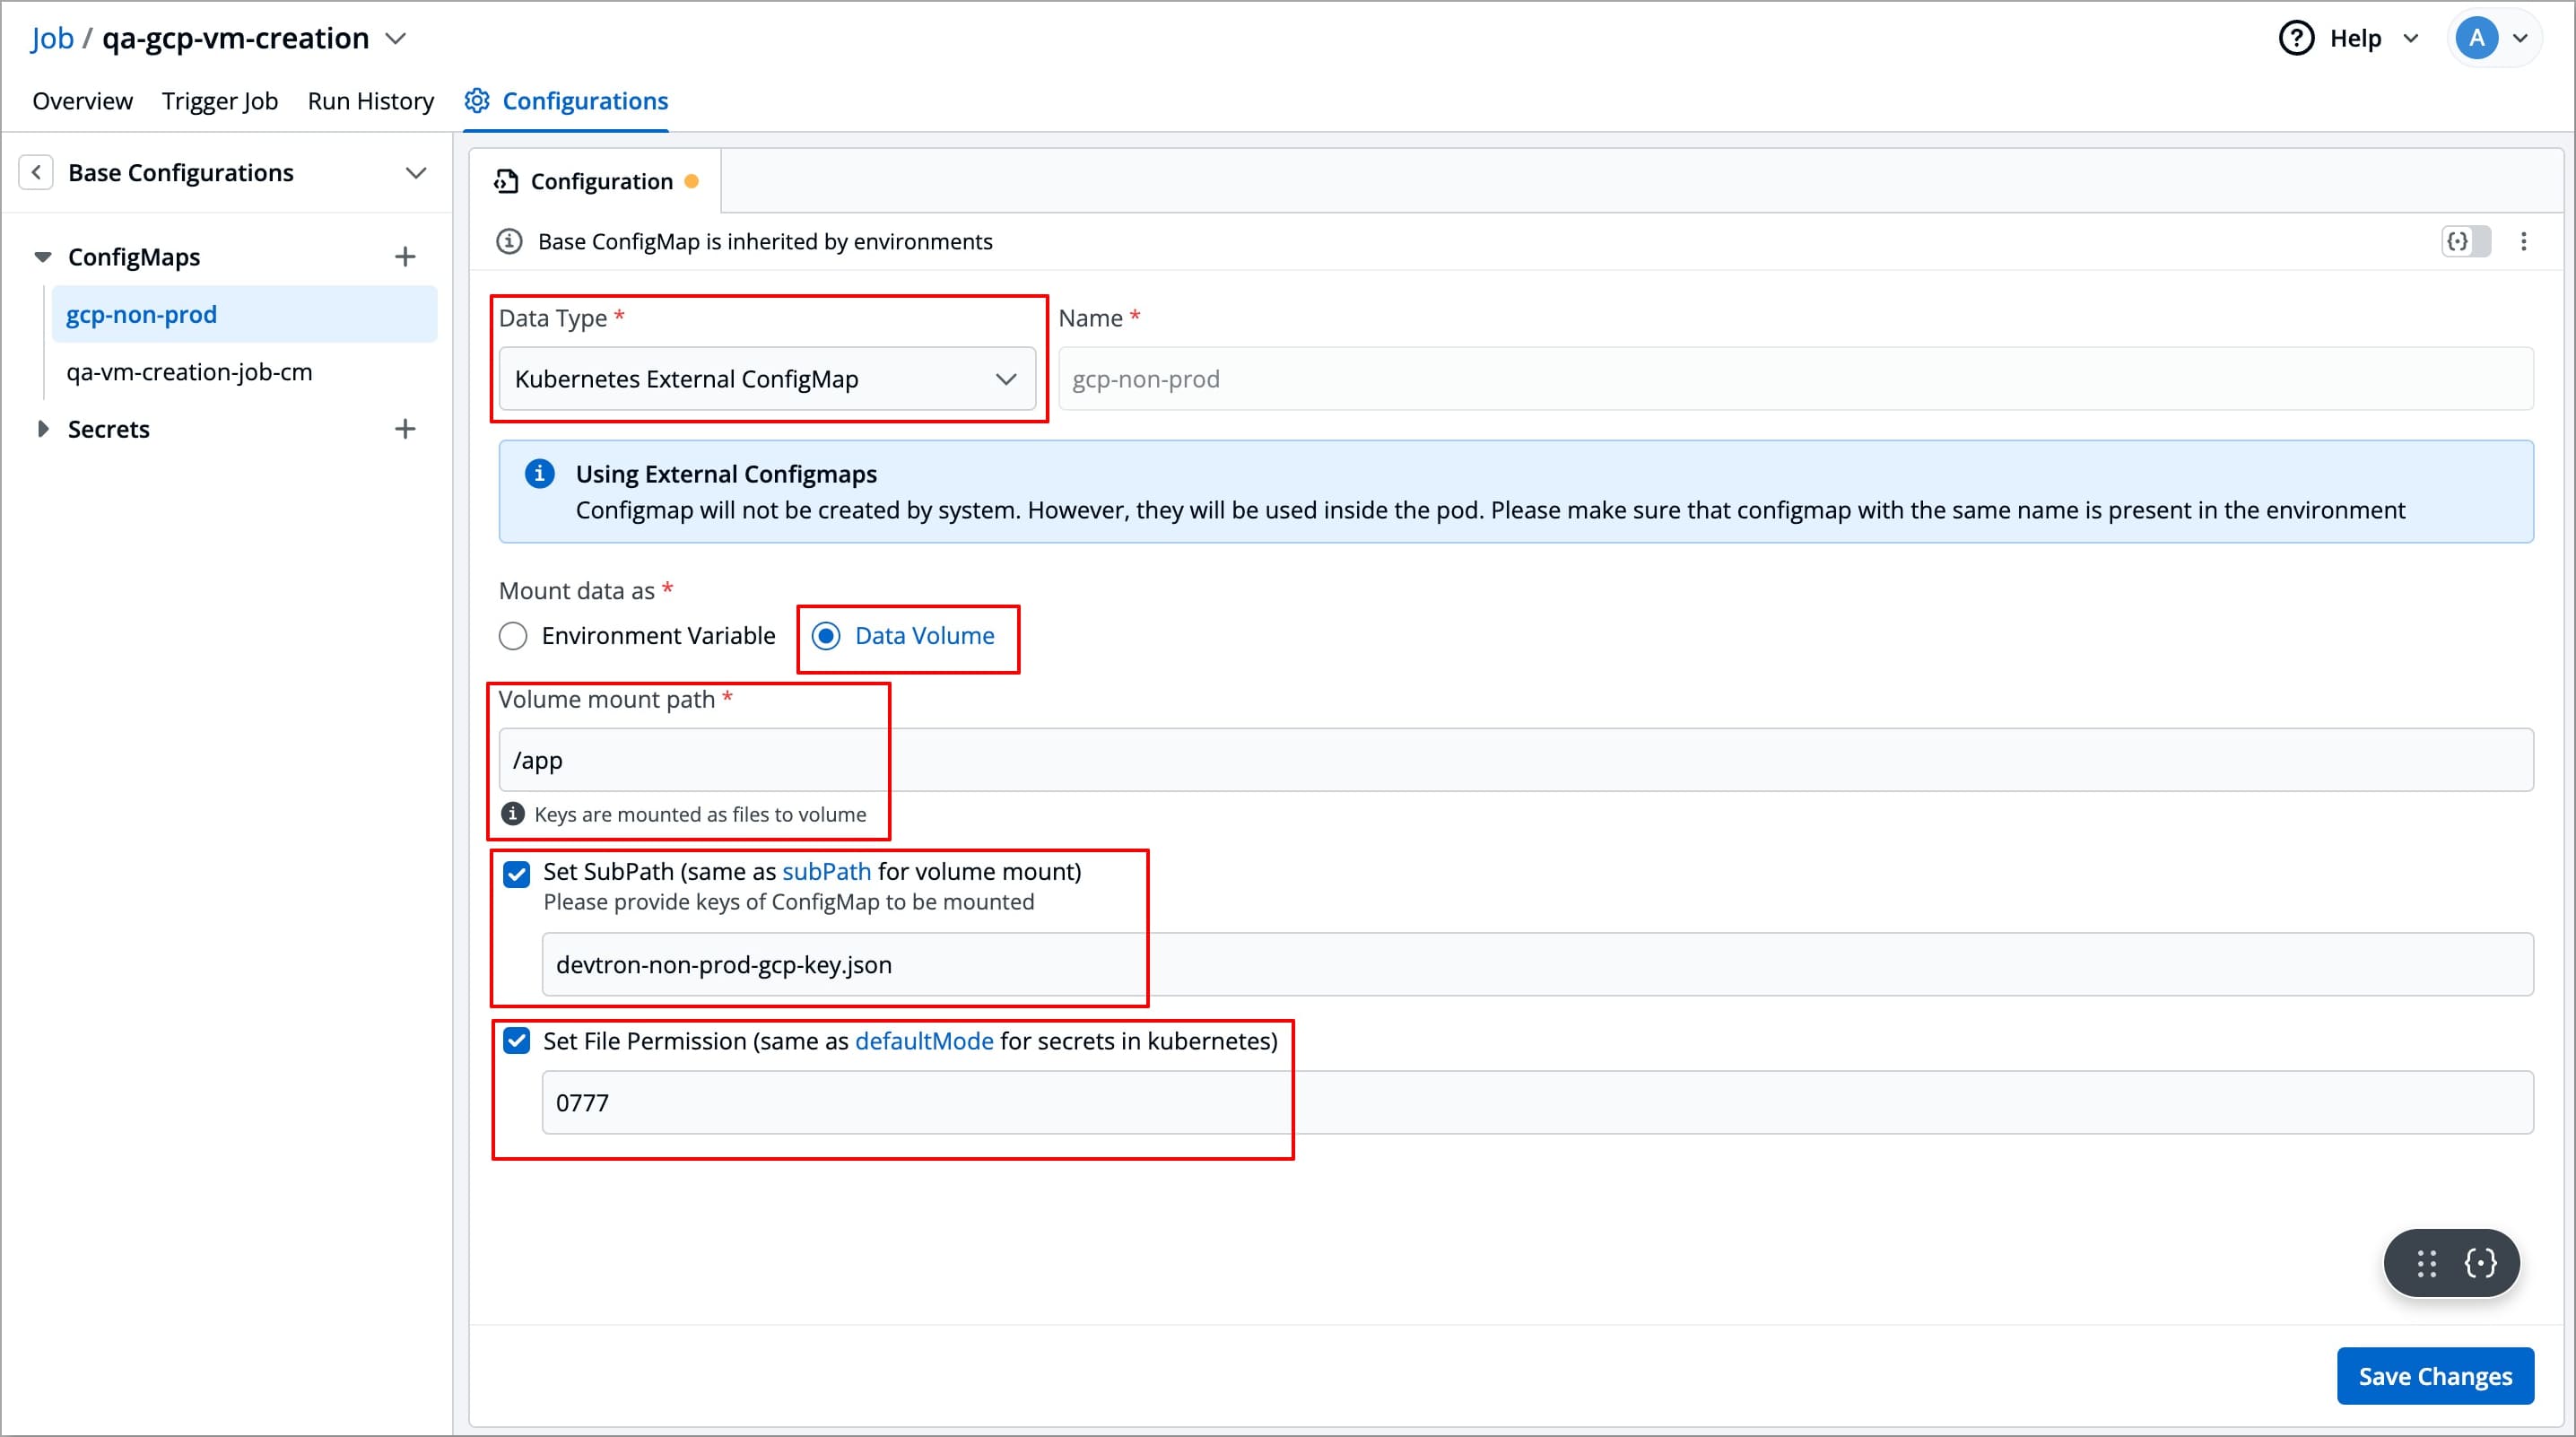
| ### Mount Data as Data Volume | ||
|
|
||
| This option allows you to create a ConfigMap by passing the content of a file. The content could be plain text, json, yaml, bash script, etc. | ||
|
|
||
|  | ||
|
|
||
| ### Volume Mount Path | ||
|
|
||
| Enter the folder path where the data volume should be mounted for it to be accessible to the containers running in a pod. Your keys will be mounted as files to that volume. | ||
|
|
||
|  | ||
|
|
||
| ### Set Sub Path | ||
|
|
||
| When mounting multiple files to the same location, you can use the **Set Sub Path** option to control how the files are handled. This setting allows you to control whether existing files are overwritten or preserved when mounting new files. | ||
|
|
||
| * If **Set Sub Path** is enabled, the system will preserve existing files in the [specified path](#volume-mount-path) and append the new file using the file name as a sub-path. | ||
|
|
||
| * If **Set Sub Path** is disabled (unchecked), the system will delete any files already present in the [specified path](#volume-mount-path) and then mount the new files. | ||
|
|
||
| 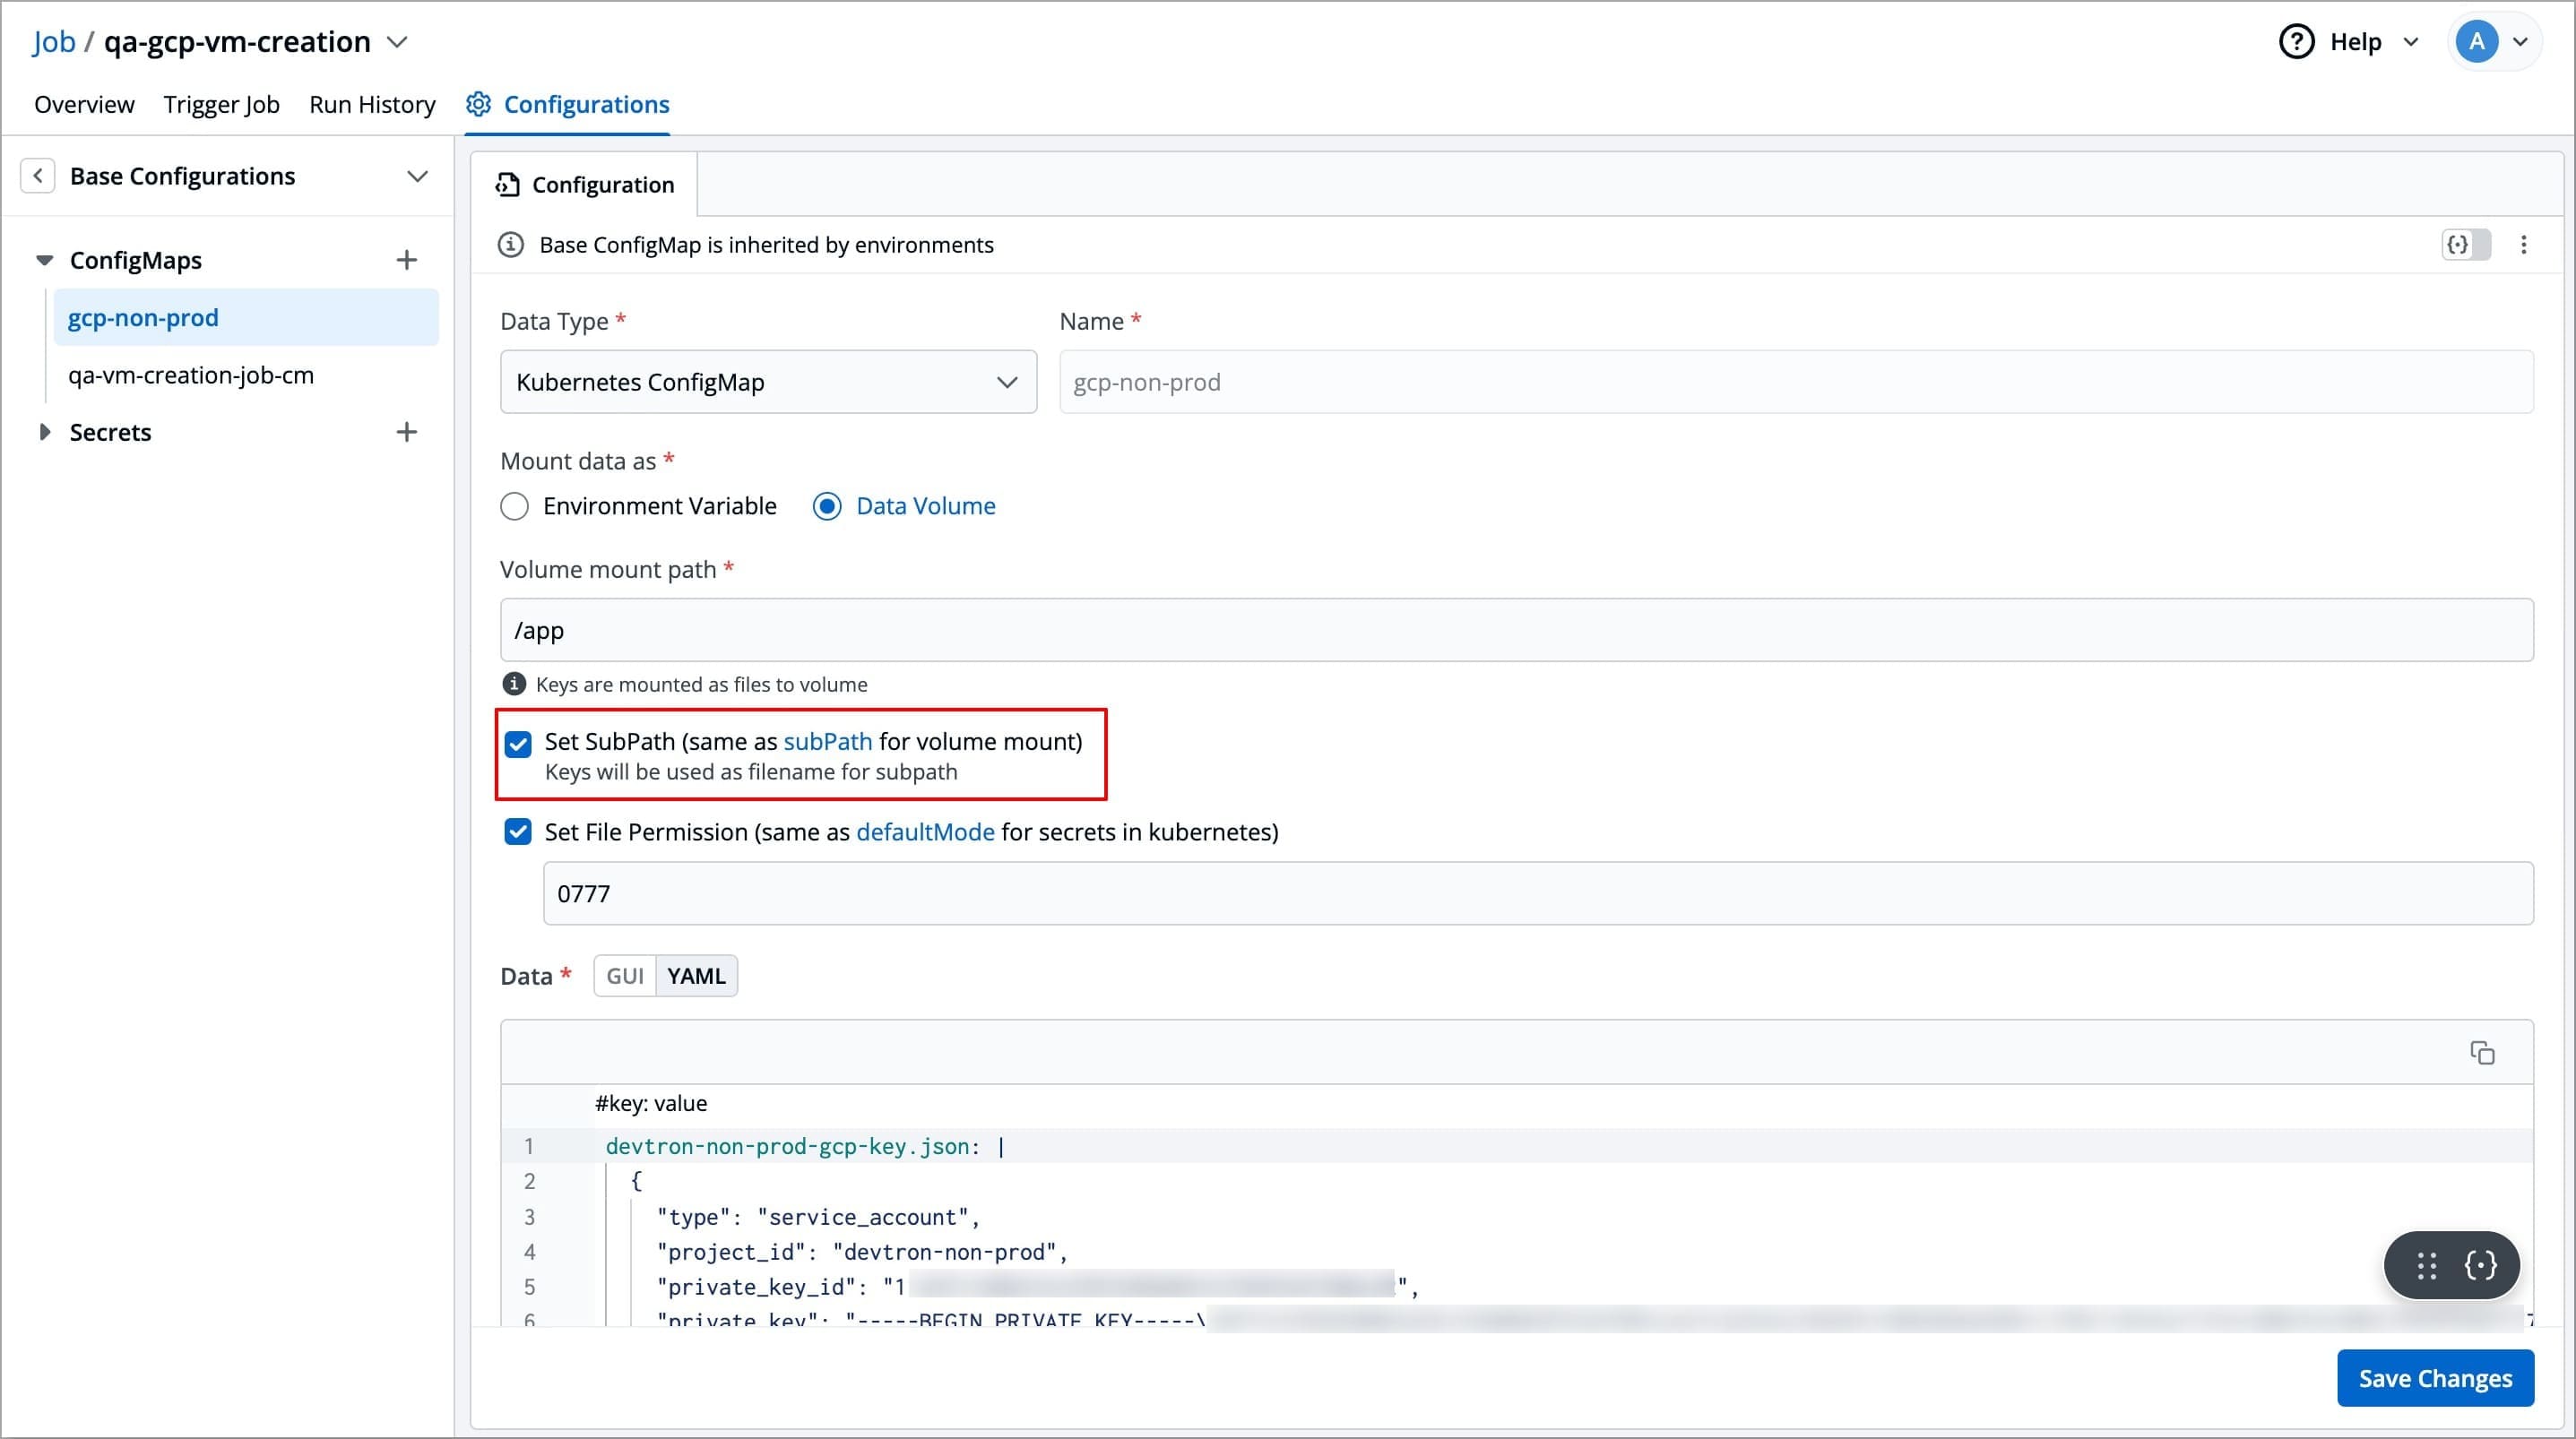 | ||
|
|
||
| {% hint style="info" %} | ||
| ### Note | ||
| In case of Kubernetes ConfigMap, all keys will be mounted as files on the specified path. | ||
| In case of Kubernetes External ConfigMap, manually specify the keys that should be mounted as files. | ||
| {% endhint %} | ||
|
|
||
| ### Set File Permission | ||
|
|
||
| The **Set File Permission** option applies permissions at the ConfigMap level, not to individual keys within the ConfigMap. Enabling this option will let you enter a 3-digit standard permission value to control access to the file. | ||
|
|
||
| 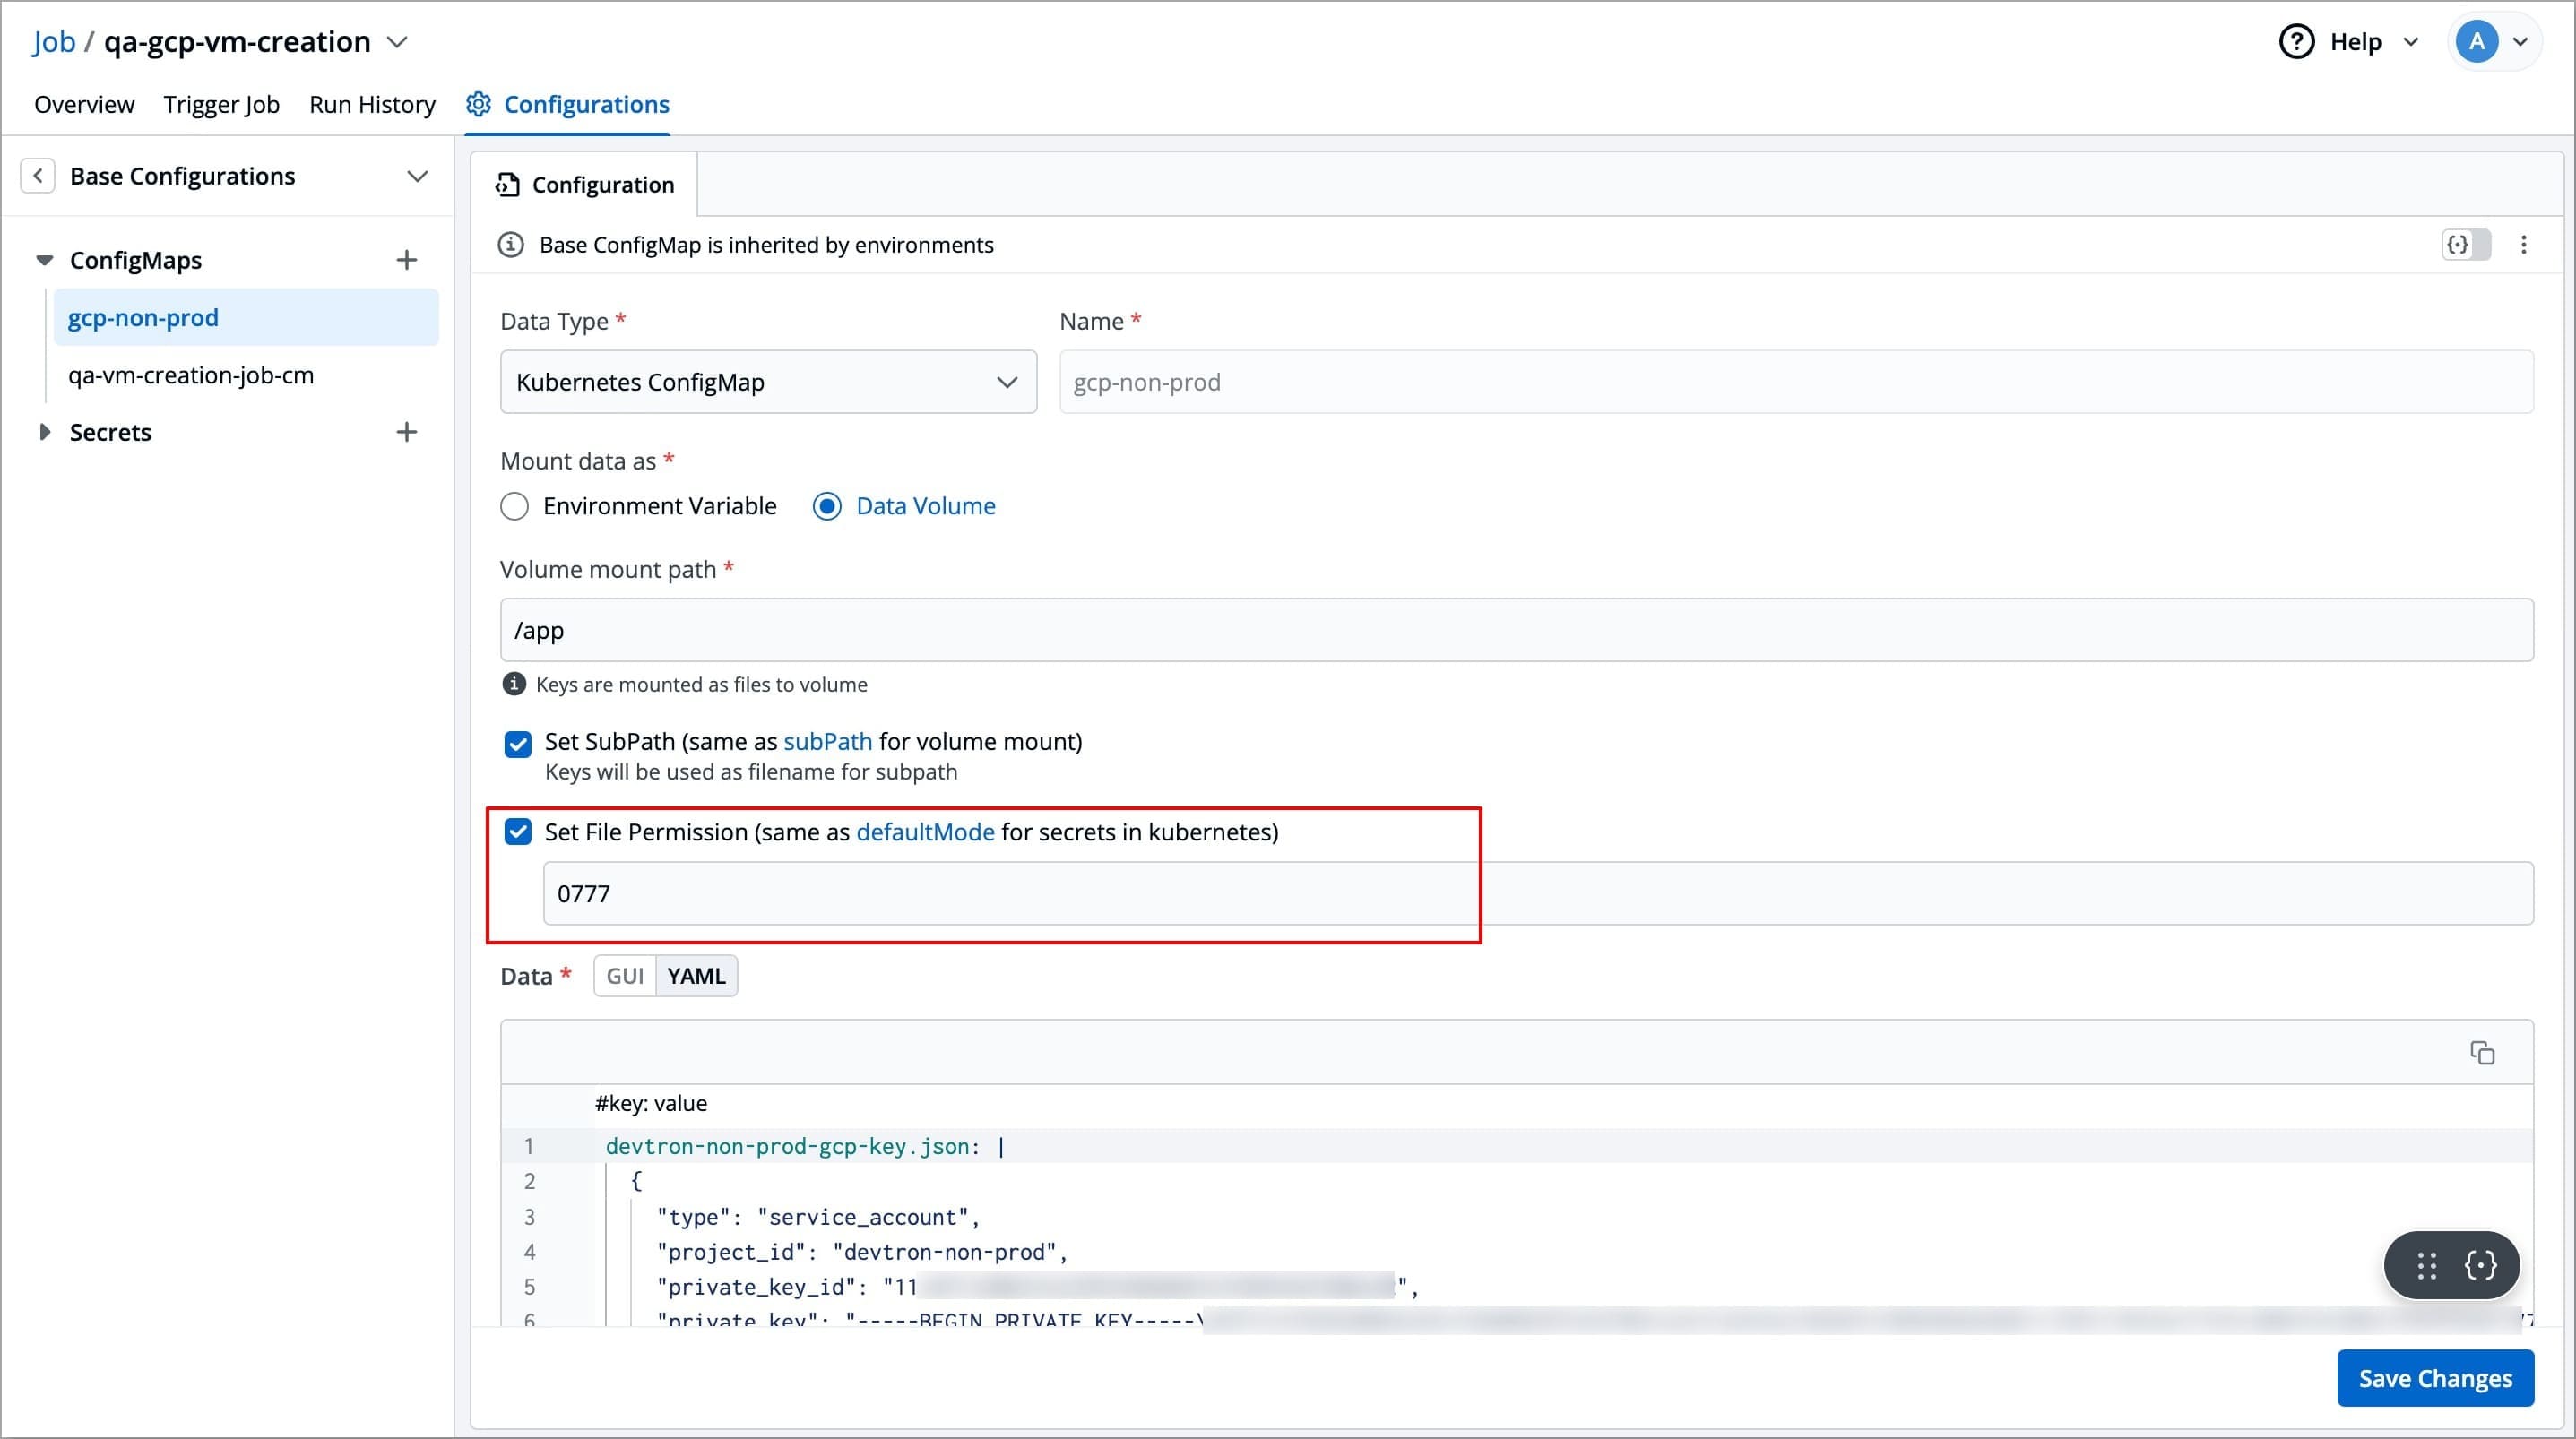 | ||
|
|
||
| The 3-digit numeric value represents the permission settings for the file: | ||
|
|
||
| * **First digit**: Owner permissions (user). | ||
| * **Second digit**: Group permissions. | ||
| * **Third digit**: Other users' permissions. | ||
|
|
||
| | **Permission** | **Description** | | ||
| |----------------|------------------------------------------------| | ||
| | **r** (read) | Grants the ability to read the file. | | ||
| | **w** (write) | Grants the ability to modify the file. | | ||
| | **x** (execute)| Grants the ability to execute the file as a program. | | ||
|
|
||
| For example, **755** means: | ||
| * Owner can read, write, and execute (7), | ||
| * Group can read and execute (5), | ||
| * Others can read and execute (5). | ||
|
|
||
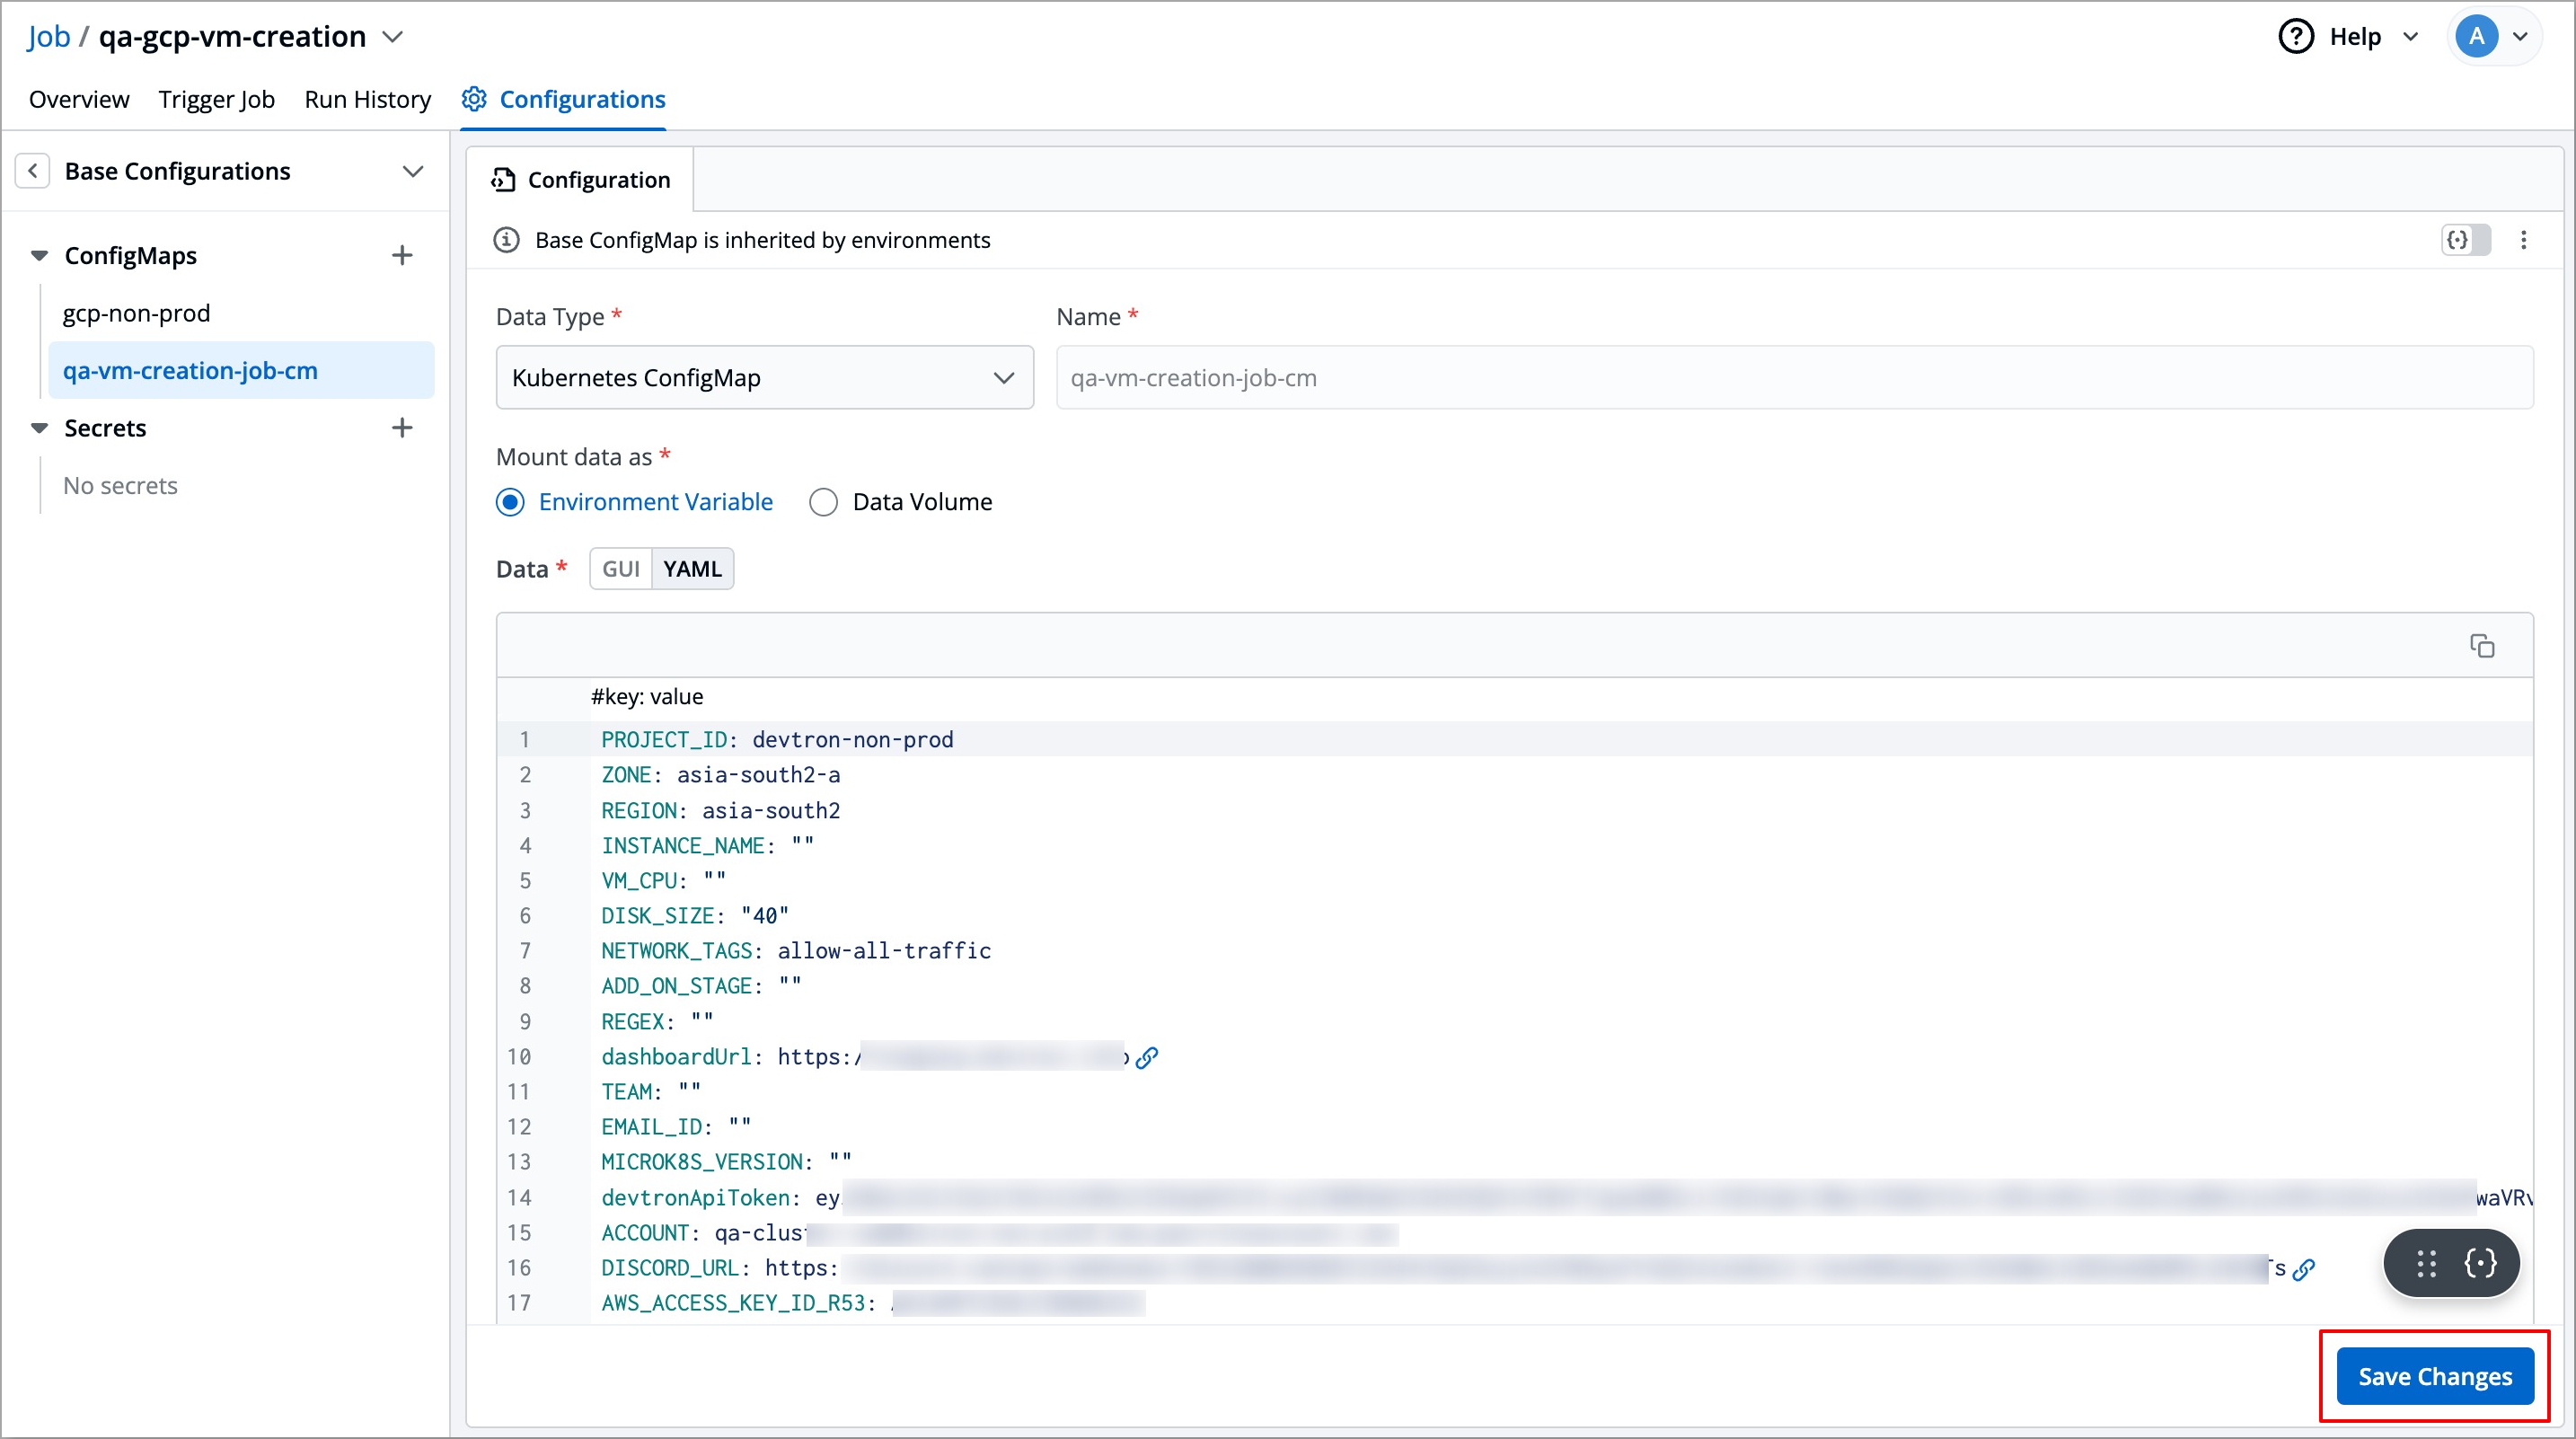
| ### Data | ||
|
|
||
| #### For Kubernetes ConfigMap | ||
|
|
||
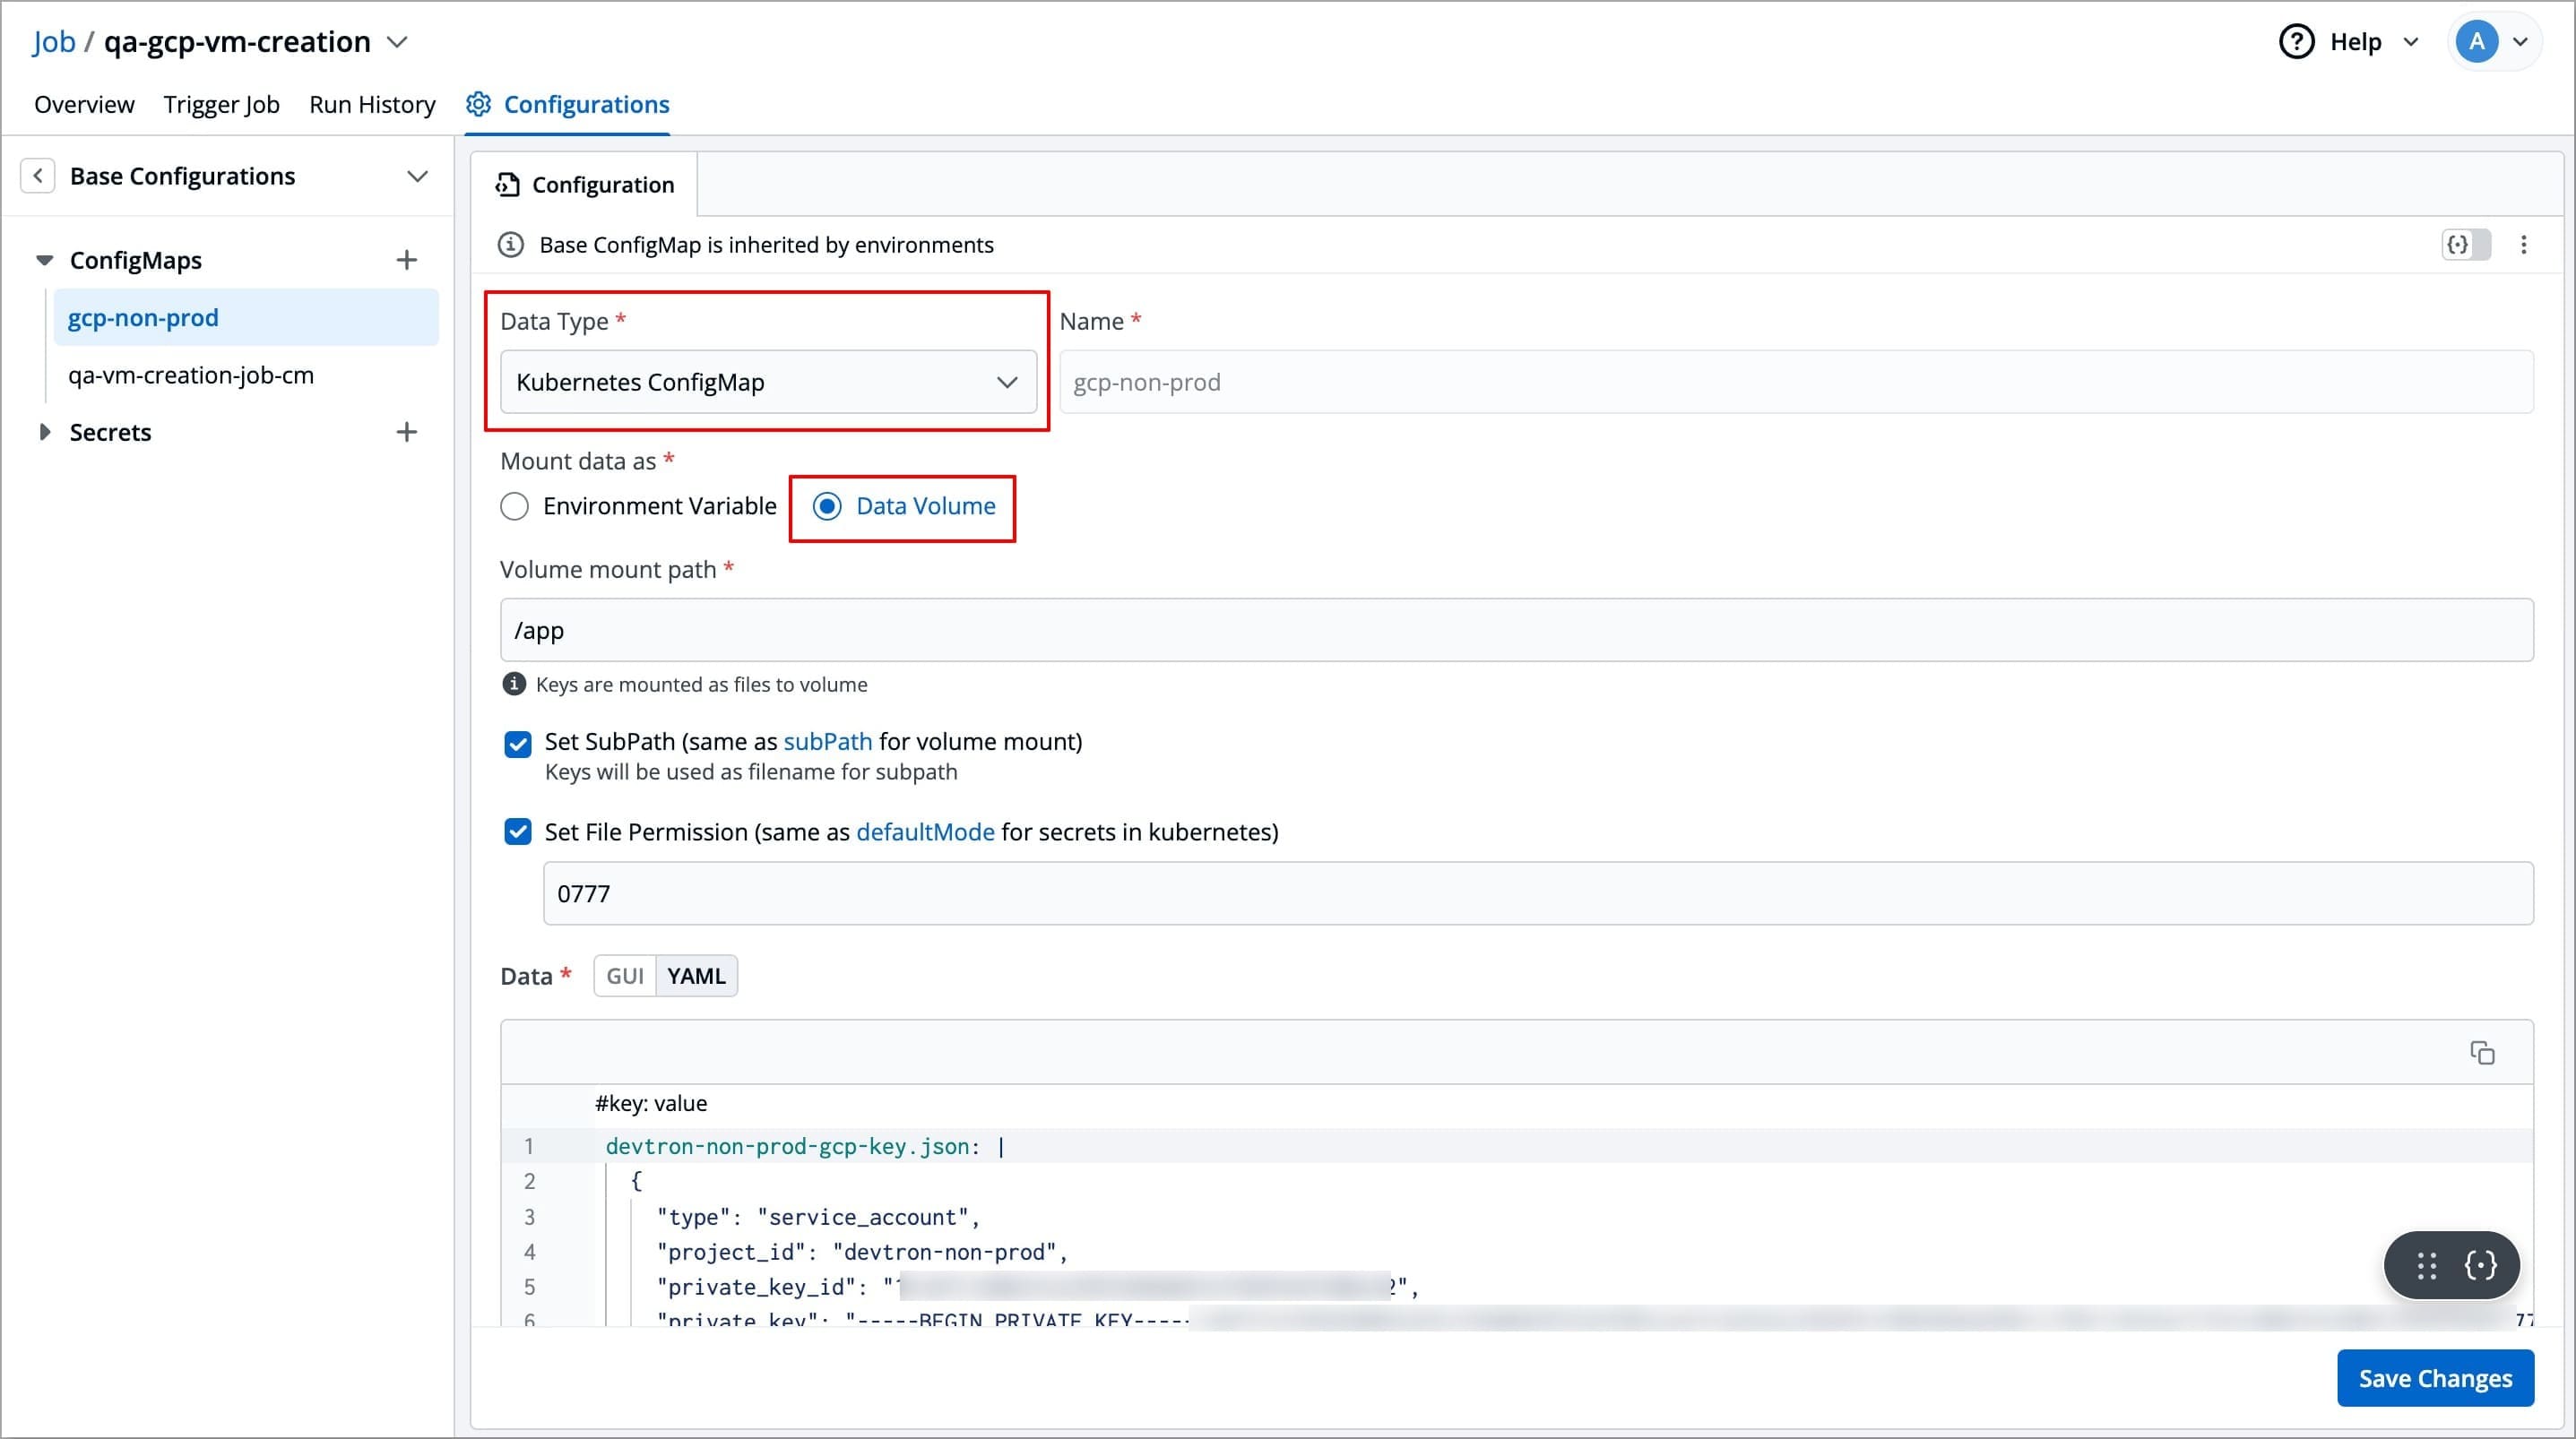
| If you have selected Data type as `Kubernetes ConfigMap` and mount data as `Data Volume`, then you also need to enter the required data (key-value pairs) in the **Data** field. | ||
|
|
||
| The key of the ConfigMap should be your filename, and the value of the ConfigMap should be your file content. In the below example, your `file.json` is the key, and the JSON content is the value of that ConfigMap (below the pipe (**|**) symbol). This file will be created on your specified [volume mount path](#volume-mount-path). | ||
|
|
||
| Enter data in: | ||
|
|
||
| * **GUI mode** – User-friendly interface. Click the **+Add** button and enter the **Key** and **Value** fields without quotes. | ||
|
|
||
| 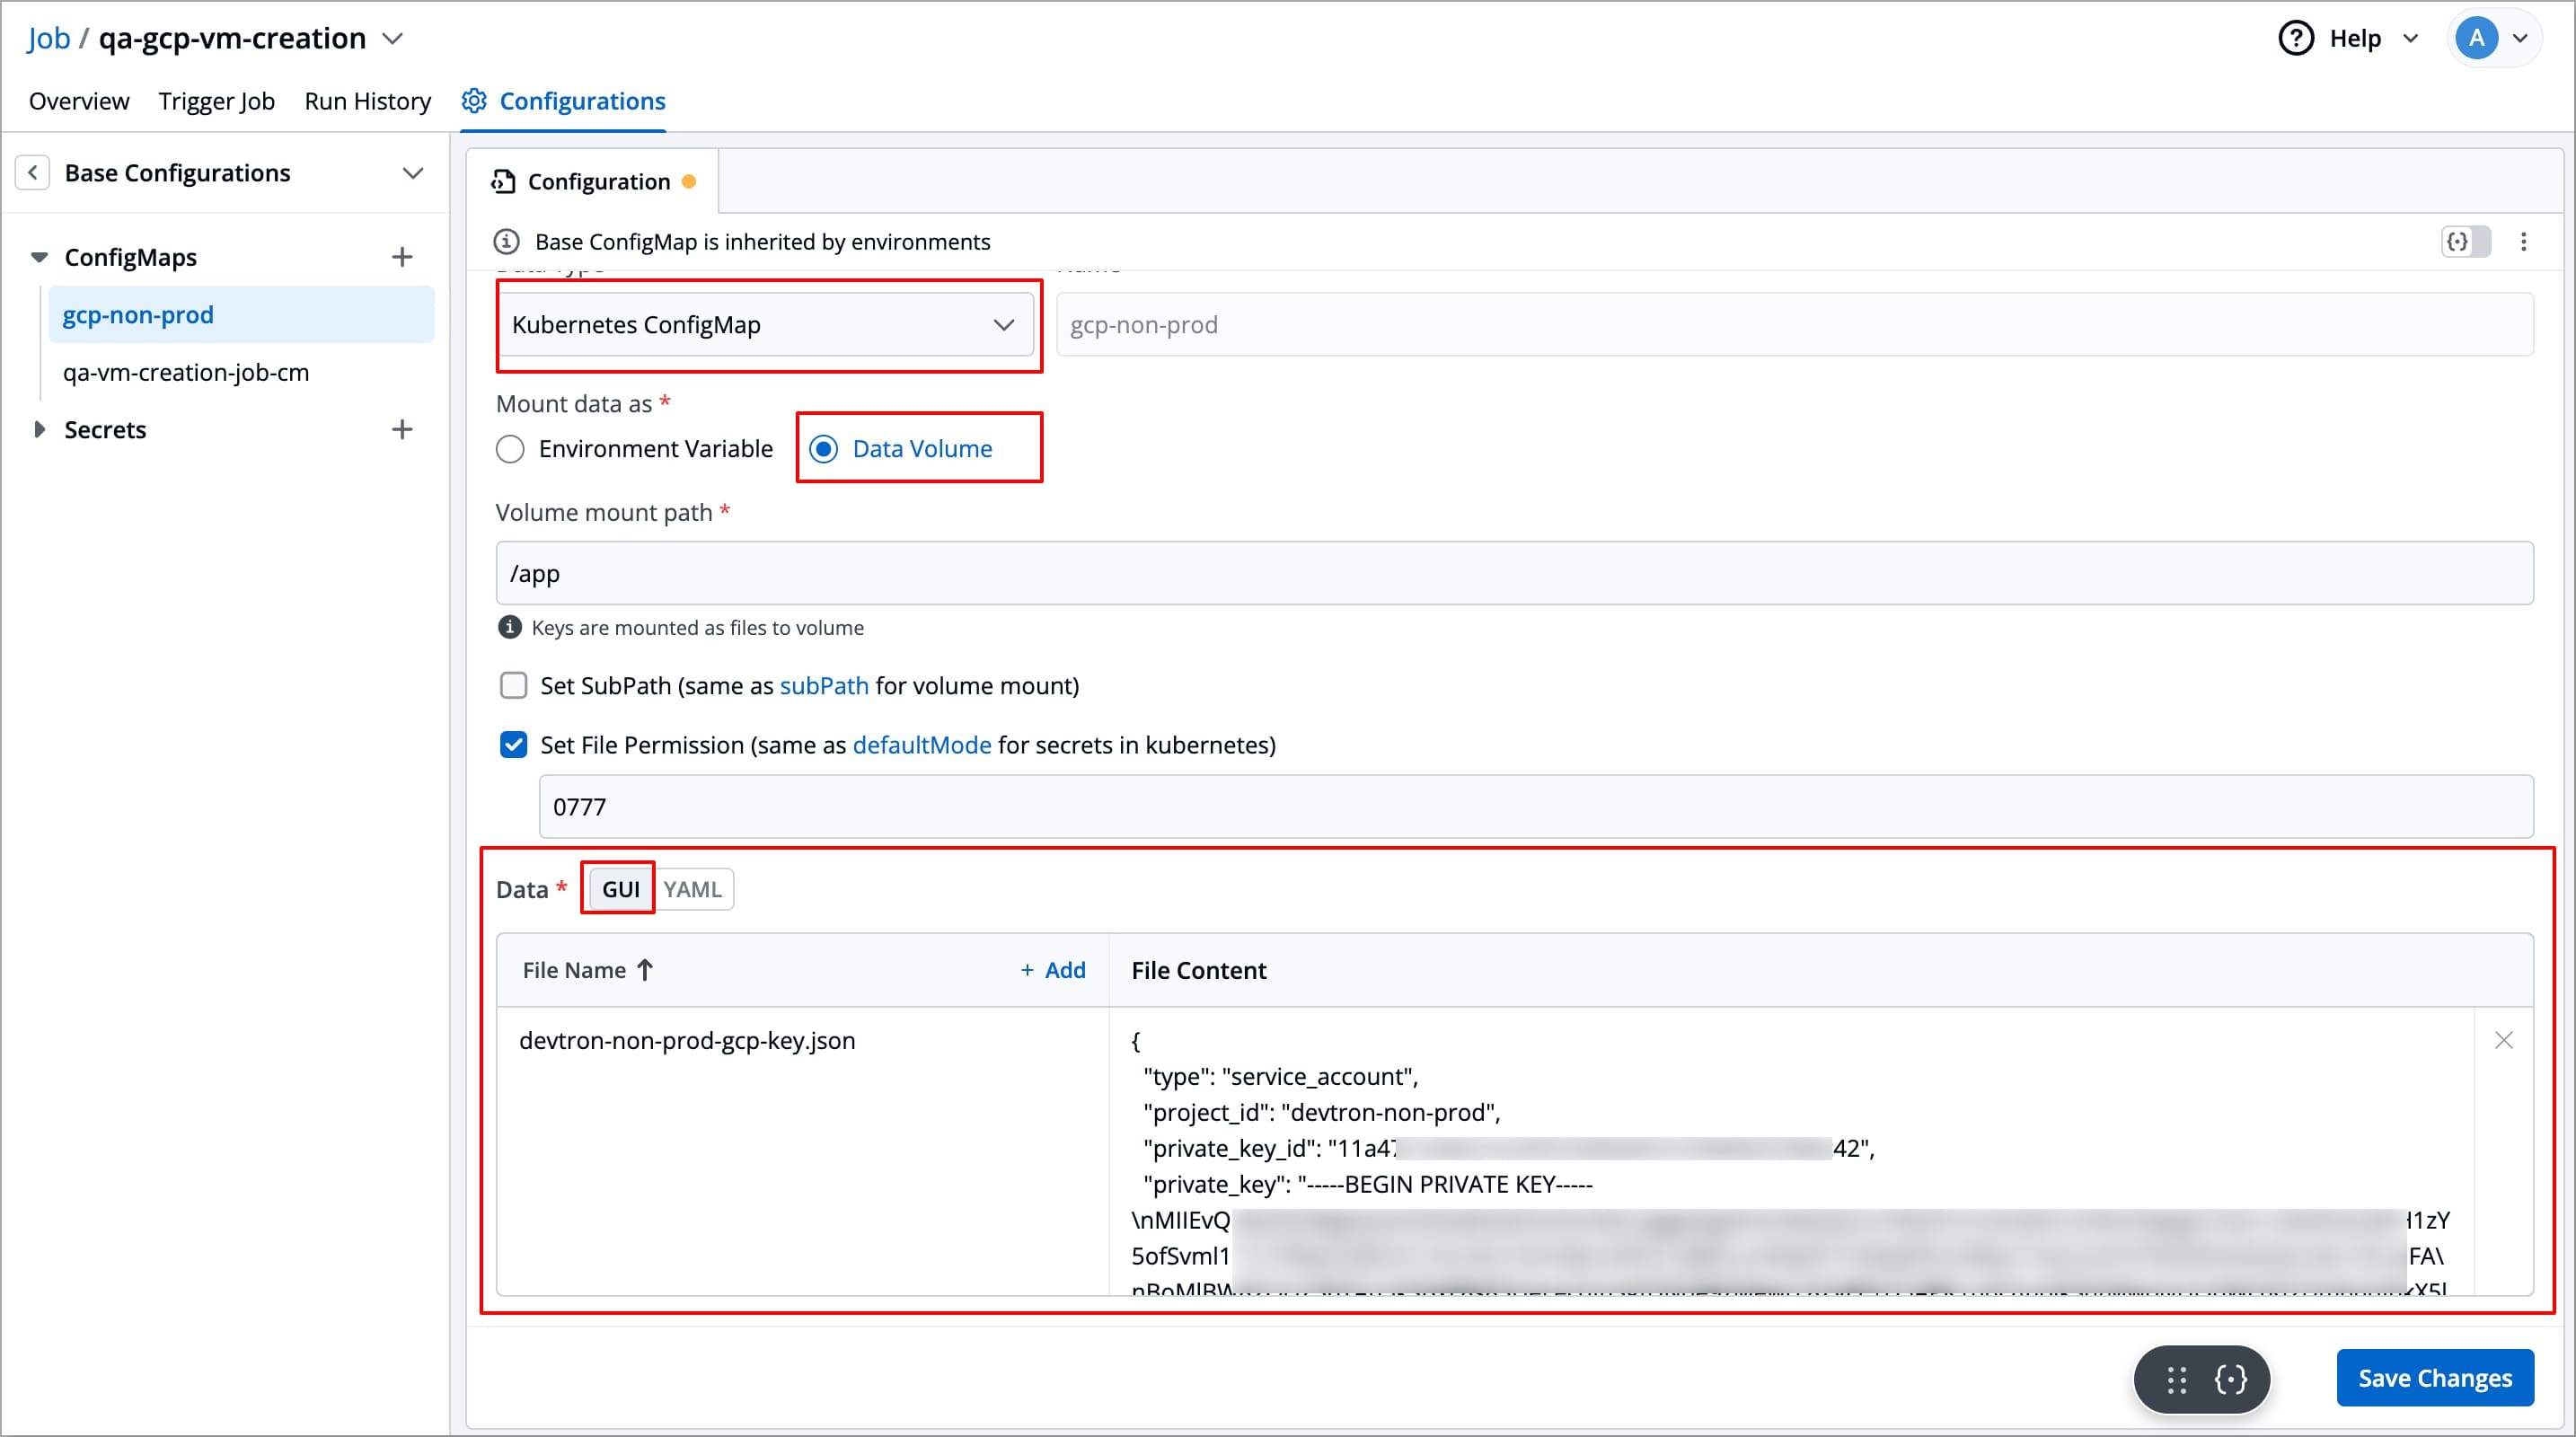 | ||
|
|
||
| * **YAML mode** – Raw YAML for entering key-value pairs in the format **`key: value`**. Boolean and numeric values must be wrapped in double quotes. | ||
|
|
||
| 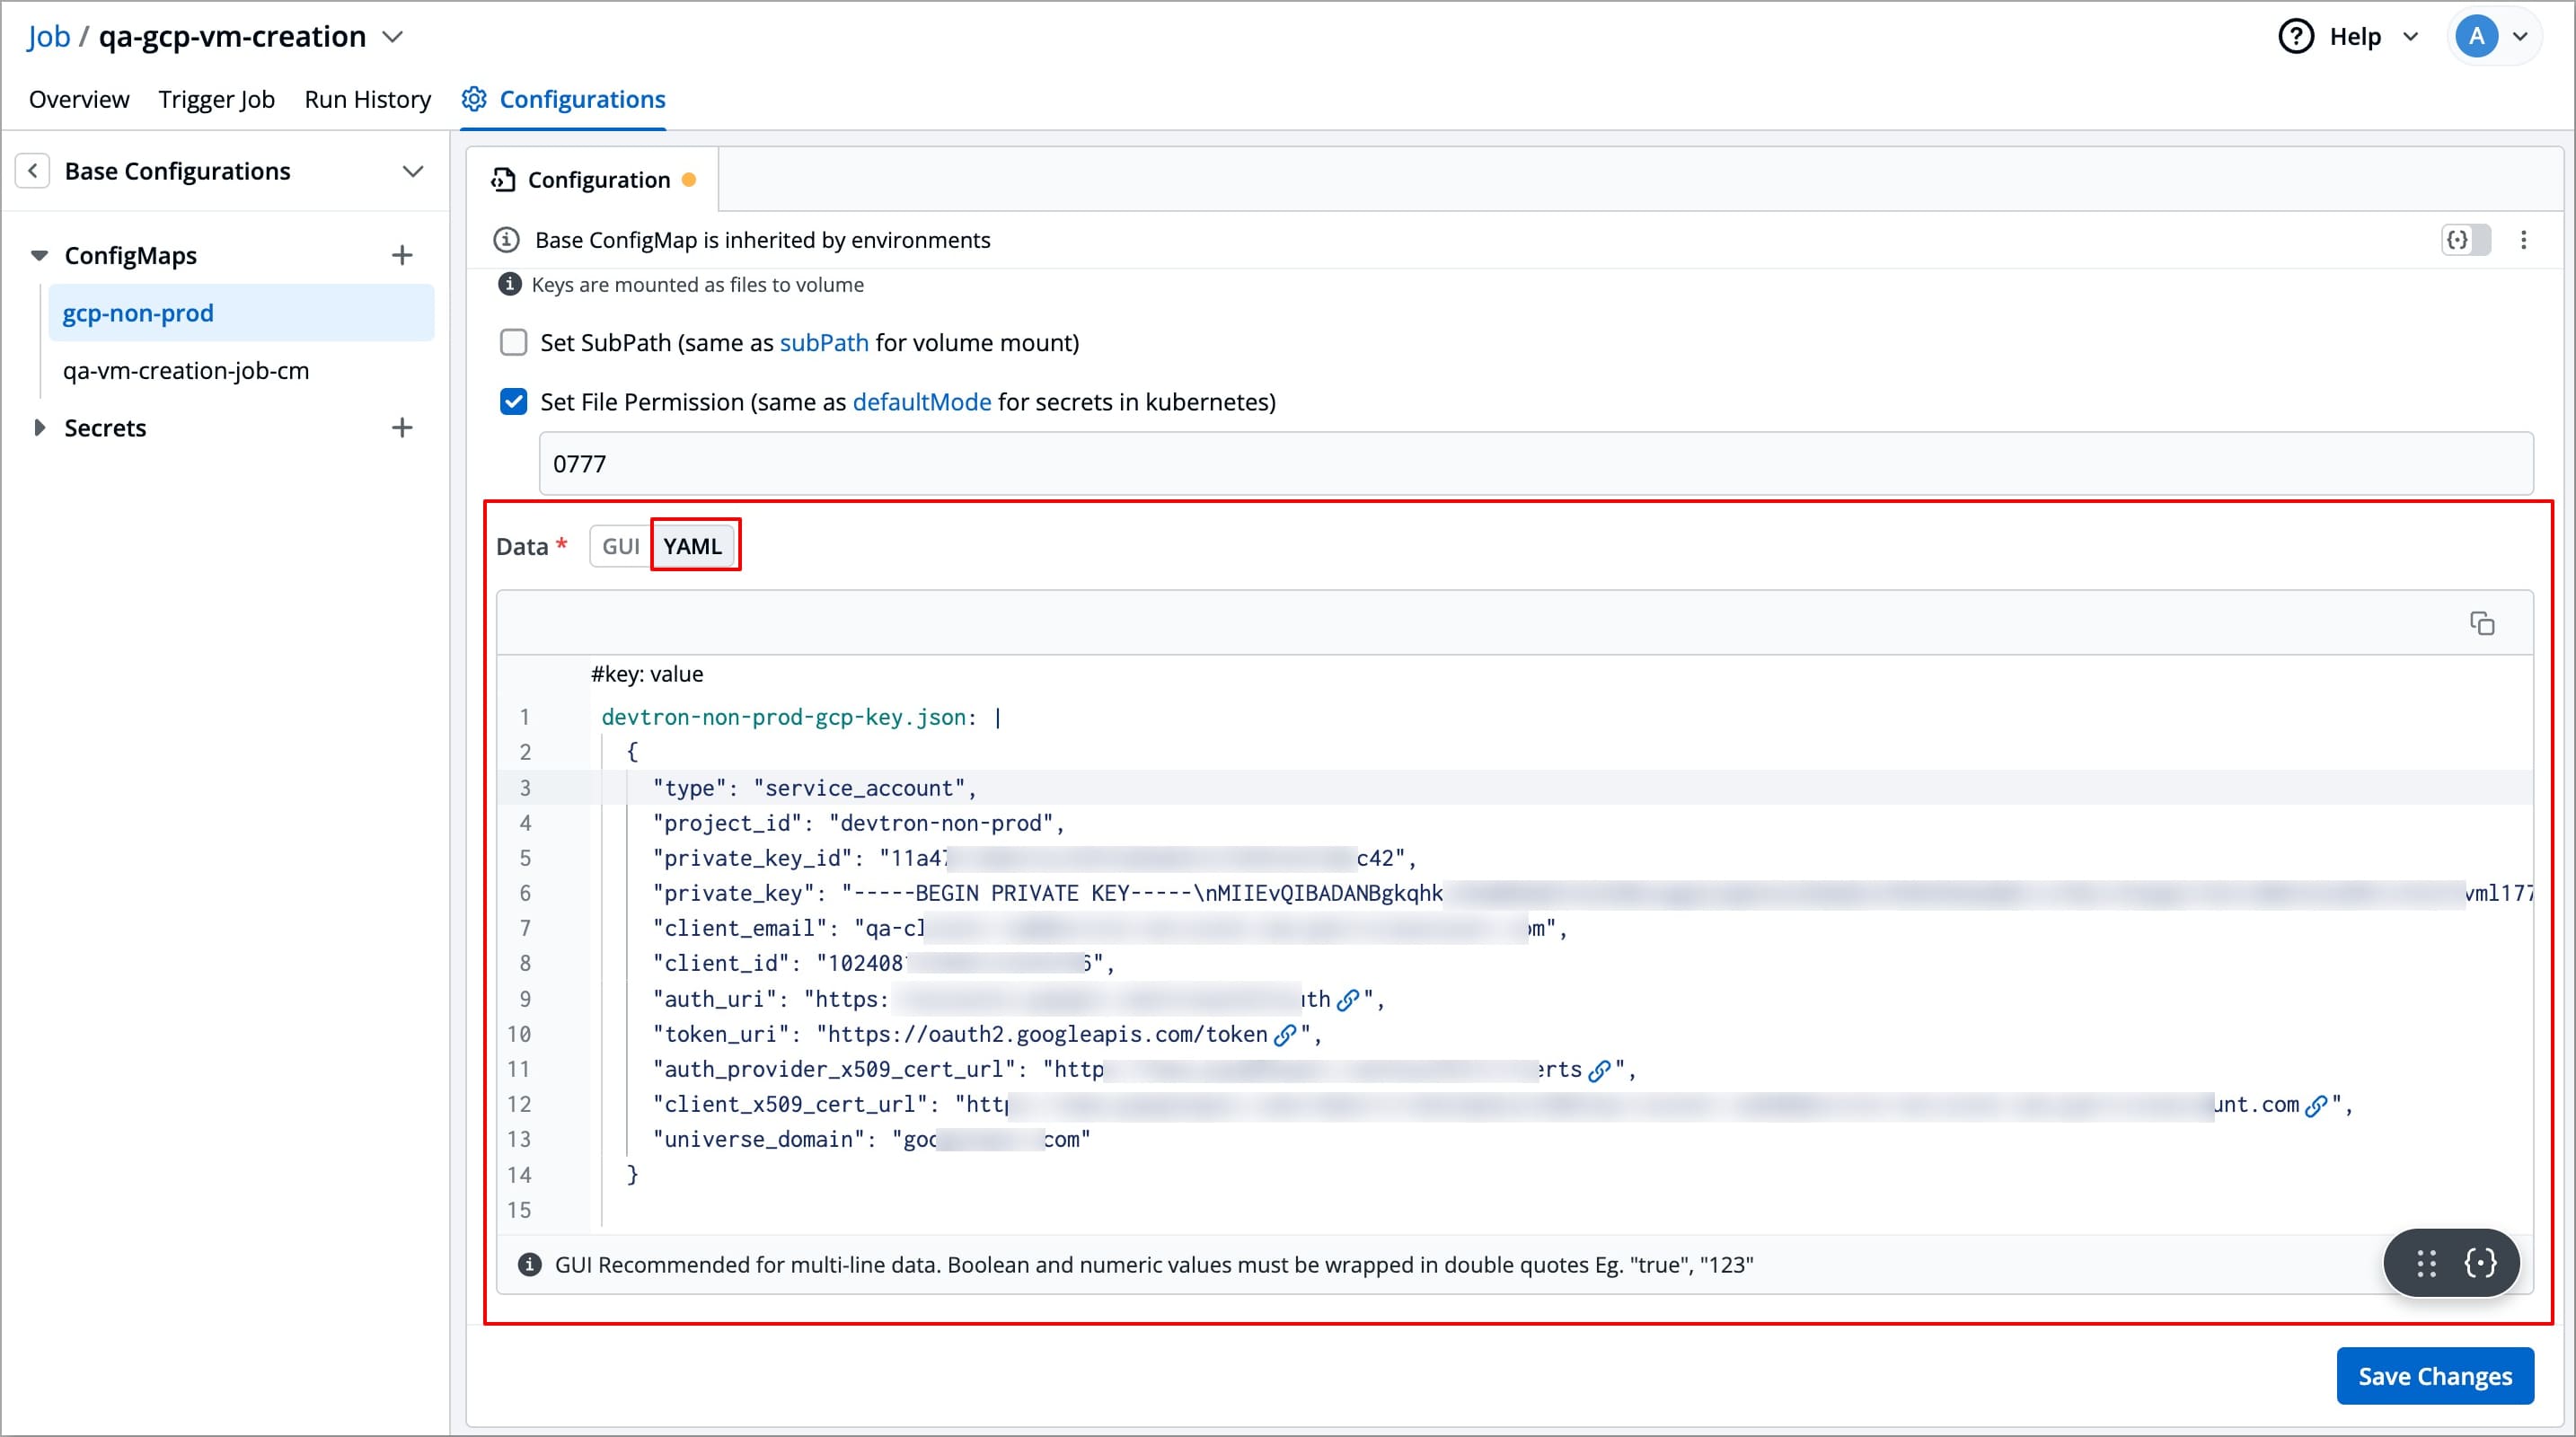 | ||
|
|
||
| #### For Kubernetes External ConfigMap | ||
|
|
||
| If you have selected Data type as `Kubernetes External ConfigMap`, then no data is required as devtron will fetch the external ConfigMap along with any volumes attach with it and use it to create a ConfigMap. | ||
|
|
||
|  | ||
|
|
||
| --- | ||
|
|
||
| ## Update ConfigMap | ||
|
|
||
| {% hint style="warning" %} | ||
| ### Who Can Perform This Action? | ||
| Users need to have the **Admin role** or the **Super Admin role**. | ||
| Refer the [User permissions](../../../global-configurations/authorization/user-access.md#roles-available-for-jobs). | ||
| {% endhint %} | ||
|
|
||
| 1. Click your ConfigMap available inside the list of **ConfigMaps** inside **ConfigMaps & Secrets**. | ||
|
|
||
| 2. Modify its values. | ||
|
|
||
| 3. Click **Save Changes**. | ||
|
|
||
|  | ||
|
|
||
| {% hint style="warning" %} | ||
| ### Note | ||
| You cannot change the name of a ConfigMap. Create a new ConfigMap instead. | ||
| {% endhint %} | ||
|
|
||
| --- | ||
|
|
||
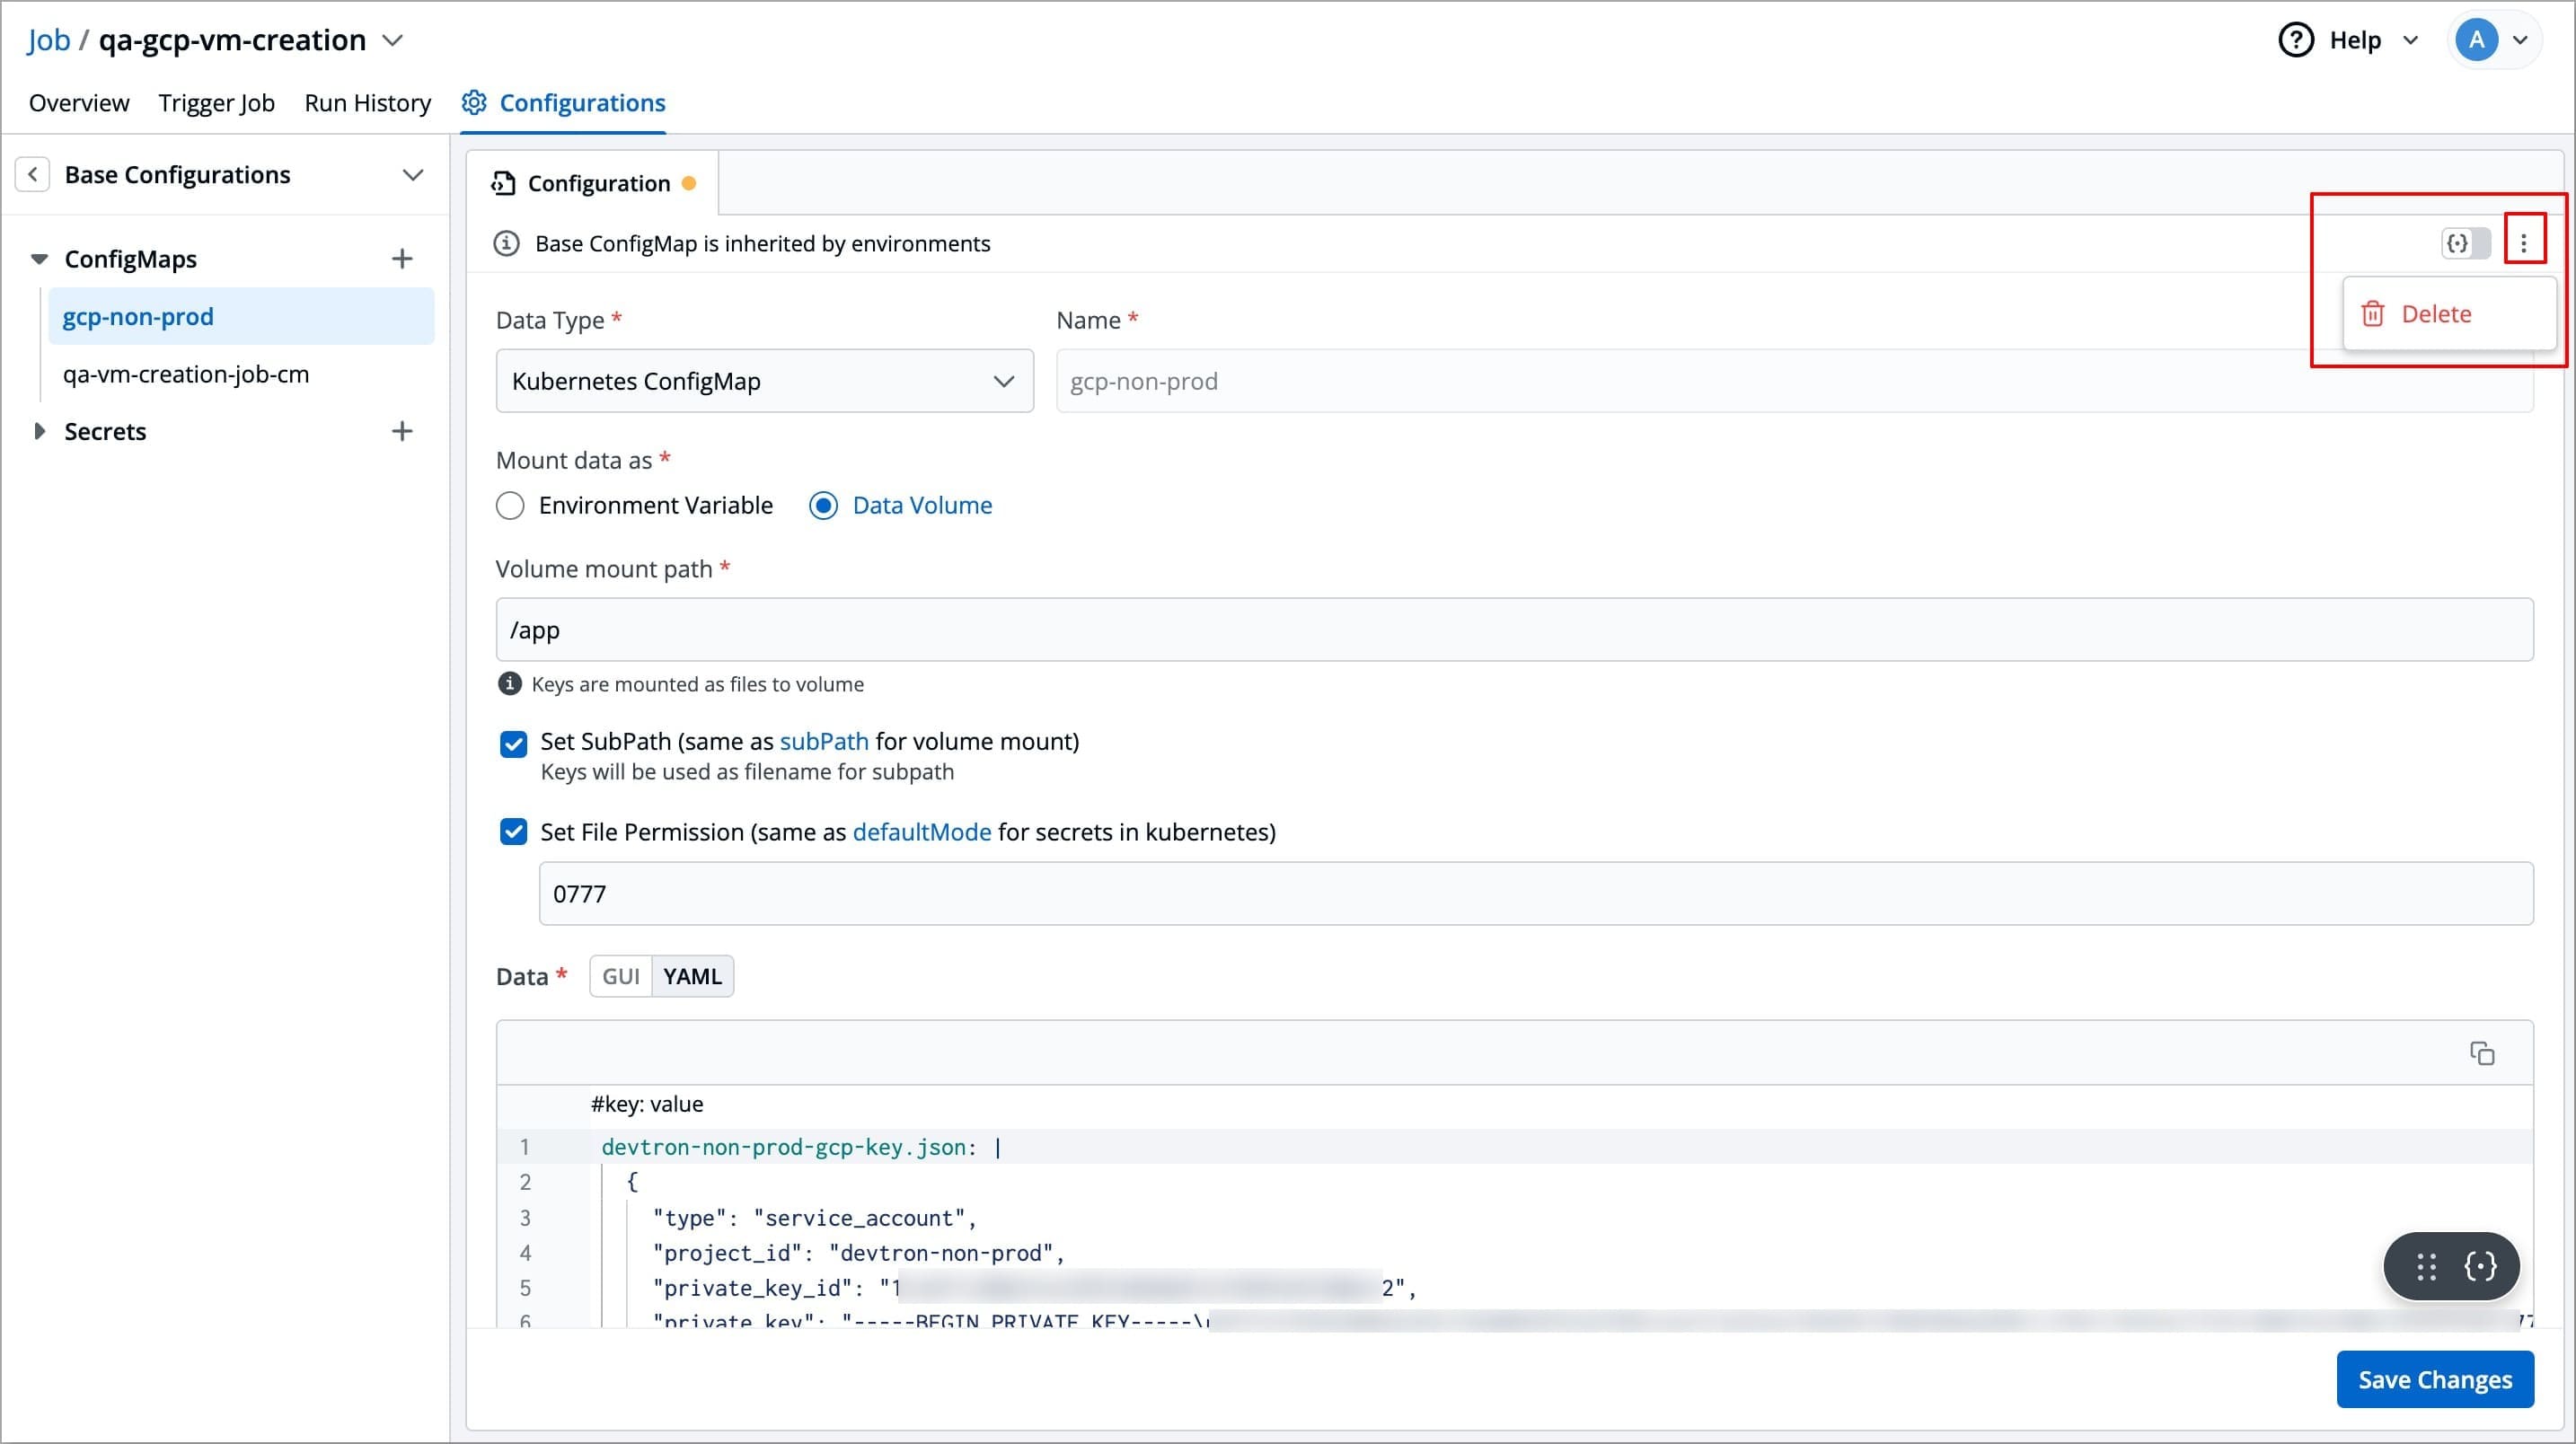
| ## Delete ConfigMap | ||
|
|
||
| {% hint style="warning" %} | ||
| ### Who Can Perform This Action? | ||
| Users need to have the **Admin role** or the **Super Admin role**. | ||
| Refer the [User permissions](../../../global-configurations/authorization/user-access.md#roles-available-for-jobs). | ||
| {% endhint %} | ||
|
|
||
| You may delete a ConfigMap if not in use anymore. Once a ConfigMap is deleted, it will not be used in future deployments. | ||
|
|
||
| 1. Click your ConfigMap available inside the list of **ConfigMaps** inside **Base Configurations**. | ||
|
|
||
| 2. On the right side, click the kebab menu (3 vertical dots). | ||
|
|
||
| 3. Click **Delete**. | ||
|
|
||
| 4. Confirm the deletion in the dialog box. | ||
|
|
||
|  | ||
|
|
||
| --- | ||
|
|
||
| After configuring ConfigMaps | ||
|
|
||
| * Refer the [Secrets](./secret-job.md) section to configure secrets | ||
|
|
||
| * Refer the [Environment Override](../environment-override-job.md) section to configure Environment Overrides. | ||
|
|
||
| * Refer the [Trigger Job](../../triggering-job.md) section to trigger the job-pipeline. |
Oops, something went wrong.
Add this suggestion to a batch that can be applied as a single commit.
This suggestion is invalid because no changes were made to the code.
Suggestions cannot be applied while the pull request is closed.
Suggestions cannot be applied while viewing a subset of changes.
Only one suggestion per line can be applied in a batch.
Add this suggestion to a batch that can be applied as a single commit.
Applying suggestions on deleted lines is not supported.
You must change the existing code in this line in order to create a valid suggestion.
Outdated suggestions cannot be applied.
This suggestion has been applied or marked resolved.
Suggestions cannot be applied from pending reviews.
Suggestions cannot be applied on multi-line comments.
Suggestions cannot be applied while the pull request is queued to merge.
Suggestion cannot be applied right now. Please check back later.
Uh oh!
There was an error while loading. Please reload this page.