- ITERATION 1: MAIN PLAYER
- Create Components: Parent Classes
- Create Sub-Components: Child Classes
- Player Input: Moving the Actor, Firing
- Player Animation
- Actions and Events: Hit Events, Health Component, Apply Damage
- ITERATION 2: ENEMIES AND AI
- Create Components: Parent Classes
- Player Input: Moving the Actor, Firing
- ITERATION 3: Game Mode and Effects
- Game Rules, Game Mode and Game Controller (Game Cycle: Start > Death > Winning, Loosing > End)
- Special Effects (Sounds, Particles)
Create a new C++ class "ShooterCharacter" inheriting from the Character class that will be the base class for both our player and our enemies. On File click on Refresh Virtual Studio Code project.
In Unreal, select the c++ class and click on Create a new blueprint based on "this class", name it "BP_ShooterCharacter".
- Inside the BP, View Port > Details > Static Mesh: select which static mesh you are going to use to physically represent your player in the world.
- Add a camera and a spring arm component (+AddComponent), attach the camera to the spring arm and adjust its position.
- In BP, View Port > Details > Rendering > disable player hidden in game.
- Hide the bone attached to the default weapon that already came with the mesh so that we can replace with our own standalone weapon class
ShooterCharacter.cpp
void AShooterCharacter::BeginPlay()
{
	Super::BeginPlay();

	//Hide the gun that is currently there
	GetMesh()->HideBoneByName(TEXT("weapon_r"), EPhysBodyOp::PBO_None); //Then, in the Skeleton asset, add a new socket
}In Unreal, Create a new BP class inheriting from GameMode Base: BP_ShooterGameMode In Unreal, Blueprints, GameMode, Select GameMode base class, select our BP_ShooterGameMode class. Include a Player Start component into the level
- Create a new BP class derived from BP_ShooterCharacter to be our BP_PlayerShooterCharacter, our main player.
- Create a c++ gun component of actor type.
- Create a BP subclass based on this c++ class: BP_Rifle
- Add components in the Gun actor: Skeletal Mesh attached to the root
Gun.h
private:

	UPROPERTY(VisibleAnywhere)
	USceneComponent* Root;

	UPROPERTY(VisibleAnywhere)
	USkeletalMeshComponent* Mesh;
Gun.cpp
#include "Gun.h"
#include "Components/SkeletalMeshComponent.h"

// Sets default values
AGun::AGun()
{
 	// Set this actor to call Tick() every frame.  You can turn this off to improve performance if you don't need it.
	PrimaryActorTick.bCanEverTick = true;

	Root = CreateDefaultSubobject<USceneComponent>(TEXT("Root"));
	SetRootComponent(Root);

	Mesh = CreateDefaultSubobject<USkeletalMeshComponent>(TEXT("Mesh"));
	Mesh->SetupAttachment(Root);

}- In Unreal > BP_Rifle > Details > Select a mesh component for the type of gun
- #include Gun.h in both ShooterCharacter.h and ShooterCharacter.cpp
- Create a gun class that will receive our gun blueprint by connecting our c++ code to the Unreal blueprint using TSubclassOf. Make it editable from the character blueprint
- Spawn rifle component be shown close to our actor mesh
- Attach scene component (BP_Rifle) to the socked of the ShooterCharacter skeleton mesh
- Asign the owner for the rifle to be the shooter character
ShooterCharacter.h
#include "CoreMinimal.h"
#include "GameFramework/Character.h"
#include "Gun.h"
#include "ShooterCharacter.generated.h"


private:
	UPROPERTY(EditDefaultsOnly) /*so that no one can edit it at run time*/
	//To Spawn an object in the world from C++ we need to connect the C++ code to the Unreal Blueprint that contains the object's mesh. To do this we use TSubclassOf<>. TSubclassOf<> makes the connection between the C++ code and the blueprint. (Reflection)
	//Use TSubclassOf<> to declare a variable that represents the type of the class of the object we want to spawn in the world
	TSubclassOf<AGun> GunClass;

	UPROPERTY()
	//Declare an instance of the class (pointer) Gun for us to store our Gun variable
	AGun* Gun;
ShooterCharacter.cpp
#include "Engine/World.h"
#include "Components/SkeletalMeshComponent.h"
#include "Gun.h"
#include "ShooterCharacter.h"


void AShooterCharacter::BeginPlay()
{
	Super::BeginPlay();

	//Spawn the rifle component from our actor component at run time
	Gun = GetWorld()->SpawnActor<AGun>(GunClass); //Then select the BP_Rifle as the GunClass Mesh in our BP_ShotterCharactert

	//Attach the new gun to the actor's hand
	Gun->AttachToComponent(GetMesh(), FAttachmentTransformRules::KeepRelativeTransform, TEXT("WeaponSocket"));

	//Set up the gun to have this class as its owner. allows the gun actor to know that the ShooterCharacter is its owner. Useful to assign who is generating damage by shooting which gun.
	Gun->SetOwner(this);

	//Then go to Unreal, set the rifle in the right position in the world copy the location coordinates, then open BP_Rifle and paste the coordinates in the mesh component
}- In Unreal > BP_ShooterCharacter > Details > ShooterCharacter > Gun Class > select BP_Rifle
- Unreal > Edit > Project Settings > Input > Bindings > Axis Mapping / Action Mapping
- Click add and create one axis mapping function Move to move forwards and backwards: assign one key for forwards with value +1 and one key for backwards with value -1.
- Click add and create one axis mapping function LookUp: assign one key to look up (mouse Y) with value -1.
- Also create one function Turn for turning left and right and look left and right and assign its respective keys with respective values
- Click add and create one action mapping function for fire and for jump and assign a key to it.
- Declare the Move() and Turn() funtions.
- Include Rotation Rate variables to fine tune the player's movements.
ShooterCharacter.h
 private:

  void MoveForward(float AxisValue);

  void MoveRight(float AxisValue);

  UPROPERTY(EditAnywhere)
float RotationRate = 10;void AShooterCharacter::MoveForward(float AxisValue)
{
//Add movemen input using the specified movement vector multiplied by the axis value (if positive 1, move forward, if negative 1 backwards)
//Pass in a vector * a direction value
AddMovementInput(GetActorForwardVector() * AxisValue);
}
void AShooterCharacter::MoveRight(float AxisValue)
{
AddMovementInput(GetActorRightVector() * AxisValue);
}-
Into the pre existing SetupPlayerInputComponent function, bind each movement function to its action mapping.
-
Bind each user input axis or action mapping to its correspondent action callback functions and create the default call back functions for move forward and move right
-
Define the action callback functions to Move forward, move right
-
In unreal > BP_ShooterCharacter > set simulate physics off for both the CapsuleComponent and the BaseMesh
-
Make sure you move the capsule and the base mesh a little above the ground so that they don't get stuck in the terrain
-
In Unreal > BP_ShooterCharacter > select the camera component > details > camera options > select use pawn control rotation
In ShooterCharacter.cpp
 // Called to bind functionality to input
void AShooterCharacter::SetupPlayerInputComponent(UInputComponent* PlayerInputComponent)
{
	Super::SetupPlayerInputComponent(PlayerInputComponent);

	//Set up character movement
		//Setup actions and axis inside project settings
		//Bind movement functions for our character
	PlayerInputComponent->BindAxis(
		TEXT("MoveForward"), /*Axis function name in project settings*/
		this, /*target context*/
		&AShooterCharacter::MoveForward /*Address of the movement function to be called*/
		);

	PlayerInputComponent->BindAxis(
		TEXT("LookUp"), /*Axis function name in project settings*/
		this, /*target context*/
		&APawn::AddControllerPitchInput /*Address of the movement function to be called: already inheriter from Pawn so we don't need to implement it here*/
		);

	PlayerInputComponent->BindAxis(
		TEXT("MoveRight"), /*Axis function name in project settings*/
		this, /*target context*/
		&AShooterCharacter::MoveRight /*Address of the movement function to be called: already inheriter from Pawn so we don't need to implement it here*/
		);

	PlayerInputComponent->BindAxis(
		TEXT("LookRight"), /*Axis function name in project settings*/
		this, /*target context*/
		&APawn::AddControllerYawInput /*Address of the movement function to be called: already inheriter from Pawn so we don't need to implement it here*/
		);

	PlayerInputComponent->BindAction(
		TEXT("Jump"), /*Axis function name in project settings*/
		EInputEvent::IE_Pressed, /*type of input event that will be the trigger for this discrete action*/
		this, /*target context*/
		&ACharacter::Jump /*Address of the movement function to be called: already inherited from ACharacter so we don't need to implement it here*/
		);
}Gun.h
public:
	void PullTrigger();
Gun.cpp
void AGun::PullTrigger()
{
	UE_Log(LogTemp, Warning, TEXT("You have pulled the trigger"));
}- Declare our Shoot() callback function in ShooterCharacter.h
ShooterCharacter.h
public:
void Shoot();- Define Shoot() callback function
- Call our PullTrigger function from within Shoot() callback function inside the ShooterCharacter c++
ShooterCharacter.cpp
void AShooterCharacter::Shoot()
{
	Gun->PullTrigger();
}- Bind the Shoot action mapping to our Shoot() call back function
void AShooterCharacter::SetupPlayerInputComponent(UInputComponent* PlayerInputComponent)
{
	Super::SetupPlayerInputComponent(PlayerInputComponent);

	InputComponent->BindAction("Shoot", IE_Pressed, this, &AShooterCharacter::Shoot);
}- Create an Animation Blueprint: In Unreal, Add new > Animation > Animation Blueprint > select target skeleton > select that of our character (wraith) > call it ABP_ShooterCharacter
- in BP_ShooterCharacter > Details > Animation > Anim Class > select our own custom animation blueprint: ABP_ShooterCharacter
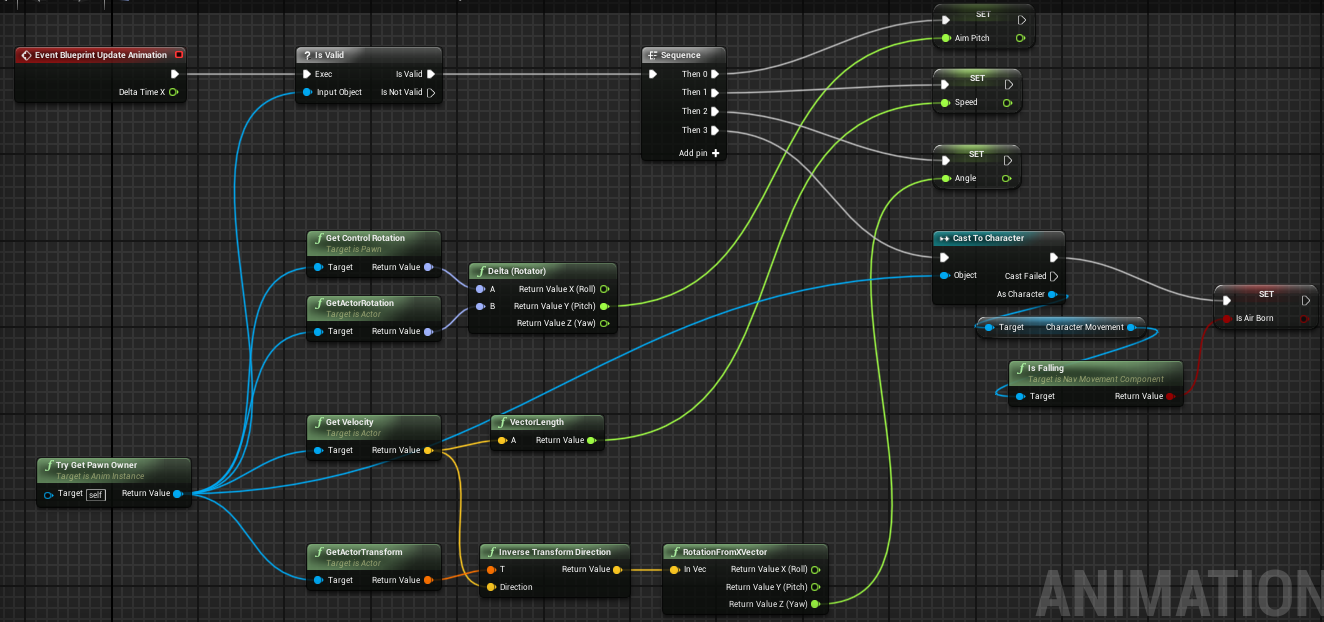
in ABP_ShooterCharacter > Event Graph:
Use Event Blueprint Update Animation to get update information on the pawn movements Use Try Get Pawn Owner to get the pawn object (BP_ShooterCharacter) and get info from the pawn about its movement.
-
Set the character's aim:
- EventBlueprintUpdateAnimation / TryGetPawnOwner > ?IsValid > Sequence > (create an SetAimPitch float) > link to execution pin for SetAimPitch
- TryGetPawnOwner > GetControlRotation / GetActorRotation > Delta (Rotator): return valueY > SetAimPitch
- Delta (Rotator): control rotation is global. we need to find the delta distance btw the actor's rotation and the global control rotation
-
Set Speed:
- EventBlueprintUpdateAnimation > ?IsValid > Sequence > (create an SetSpeed float) > link to execution pin for SetSpeed
- TryGetPawnOwner > GetVelocity > VectorLength > SetSpeed
-
Set Angle:
- EventBlueprintUpdateAnimation > ?IsValid > Sequence > (create an SetAngle float) > link to execution pin for Angle
- TryGetPawnOwner > GetActorTransform / GetVelocity > InverseTransformDirection > RotationFromXVector > SetAngle
- GetActorTransform: transform to rotate the pawn by indicating where the pawn is in the world
- InverseTransformDirection: velocity is in global space and we should convert it to local space in order to get the angle (direction) to which the player should be going
- RotationFromXVector: set the yawn to know how far it is turning to the right or left. (Right click on Return Value, select "split struct pin" to get only the return for the yaw.
-
Set IsAirBorn: check whether the character is jumping or falling
- TryGetPawnOwner / sequence execution pin > CastToCharacter > (create a Is AirBorn bool) > link execution pin to Set IsAirBorne
- TryGetPawnOwner > CastToCharacter (object) > pull from As Character > IsFalling > Set IsAirBorne
-
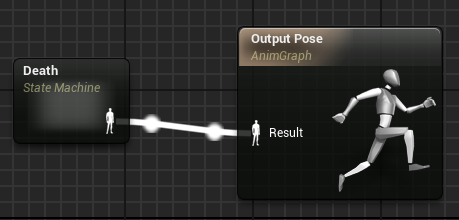
Open ABP_ShooterCharacter > AnimGraph
-
Add a new state machine "Death" > link it to the output pose
-
-
Inside the Death state add new states: Entry > Alive > Dead > Alive
-
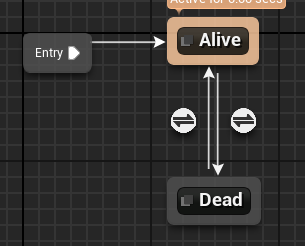
- Create a bool "IsDead"
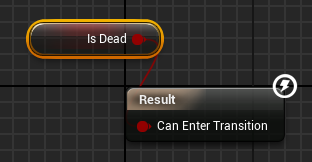
- In Alive to Dead: Get IsDead and link to result
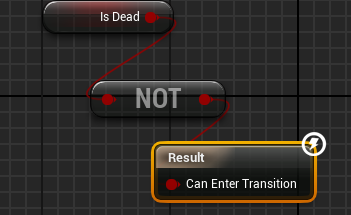
- In Dead to Alive: Get IsDead > NOT > link to result
- Inside Dead, plug a death animation to result
- In Details > Anim Preview Editor > set IsDead manually to true or false and click "apply" just for testing purposes
-
In the Alive node
- Include a new node to be our idle default pose:
- From Asset Browser, pull in "Idle_AO_Combat" > Output animation pose
- Adjust the pitch for our default pose in the AnimGraph according to our aim, so that the character can aim up, down:
- Idle_AO_Combat > right click on Pitch > promote to variable > "AimPitch"
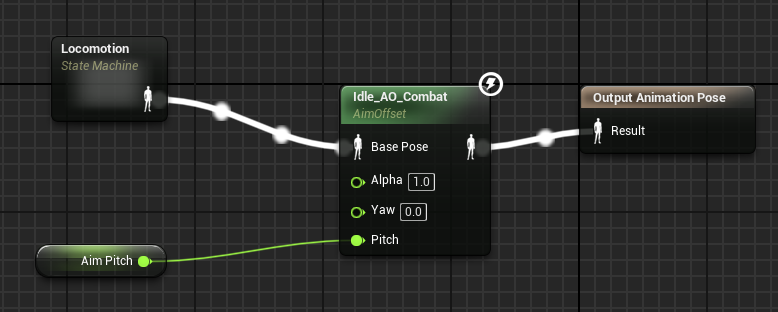
- Add locomotion capabilities to our idle pose: Create a Locomotion state machine > Idle_IO_Combat base pose
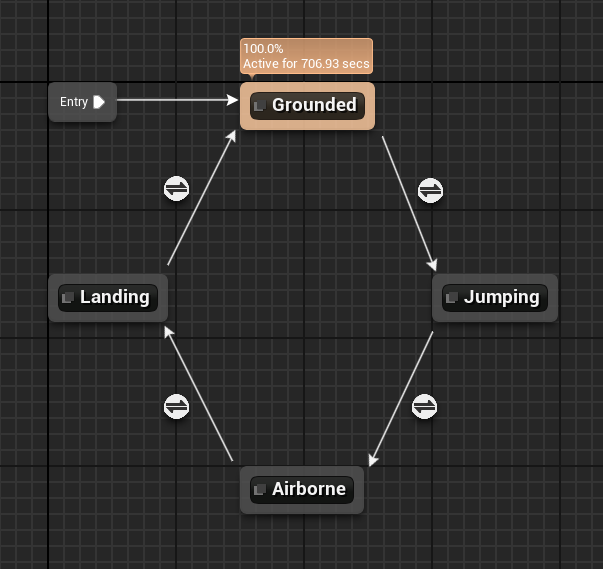
- Inside Locomotion: add new states and link them with transitions. Edit the states based on float var and transitions based on bool variables. These var need to be set in two places: In the EventGraph so that an event can set their value and in the AnimGraph to tell the state machine the direction of an animation or when to enter a transition: Entry > Grounded > Jumping > Airborne > Landing > Grounded
- In Grounded:
- Create a new Blend Space animation to make a soft transition between different animations
- In Unreal > Add New > Animation > Blend Space > select Wraith skeleton > "BS_Locomotion"
- Inside BS_Locomotion, go in details > asset browser > and drag in the animations to each movement node:
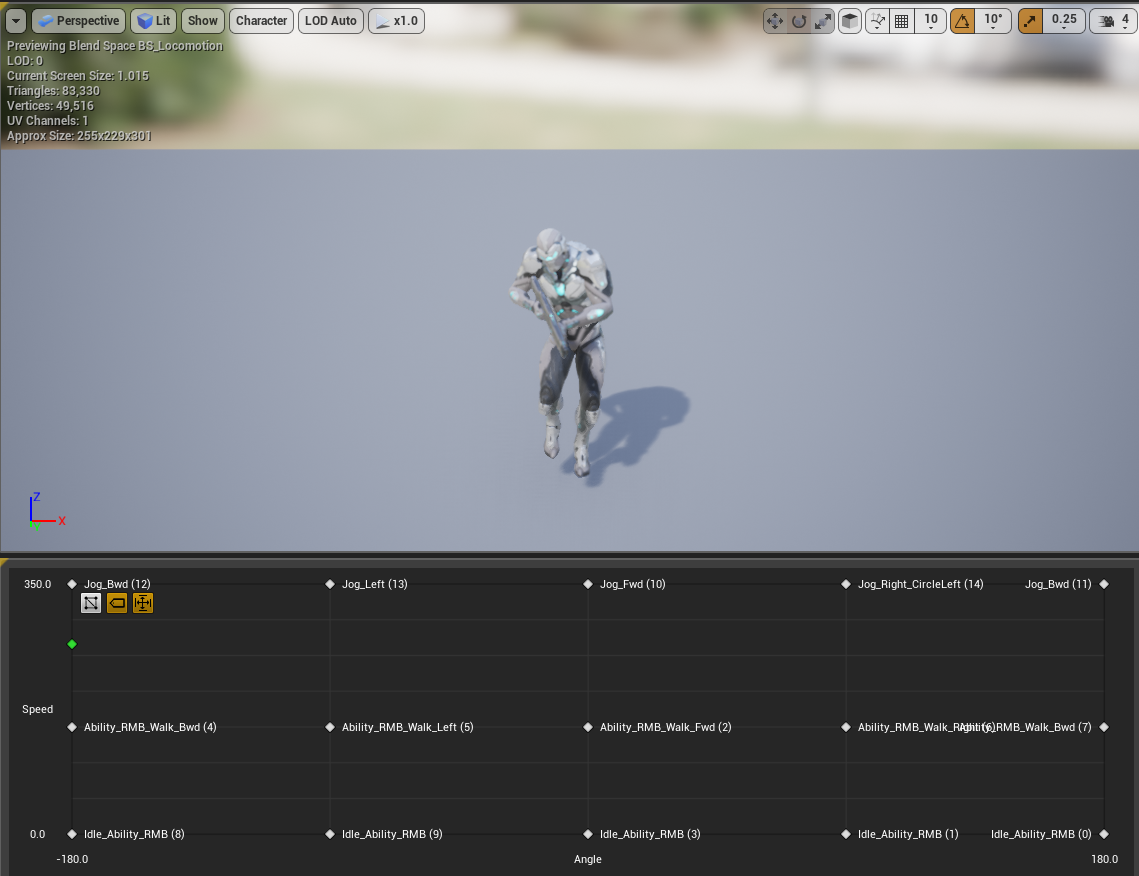
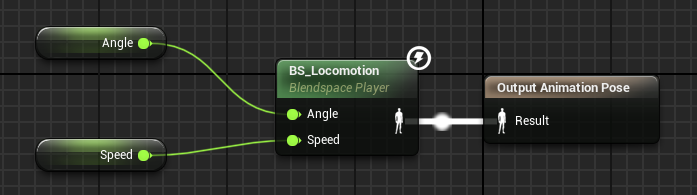
- Get Angle var / Get Speed var > BS_Locomotion > Output animation pose
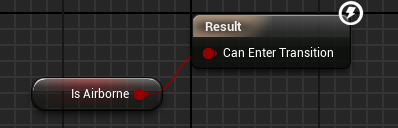
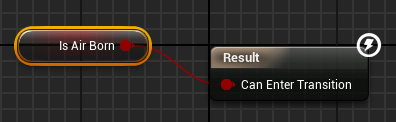
- In Grounded to Jumping: add variable > bool "IsAirborne" > get IsAirborne > Result can enter transition
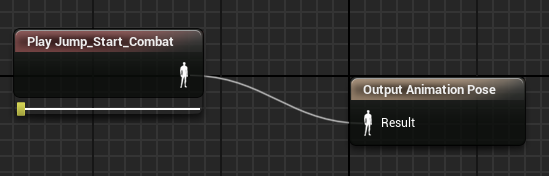
- In Jumping: add Jump_Start_Combat > Output animation pose
- In Jumping to Airborne: add variable > bool "IsAirborne" > get IsAirborne > Result can enter transition
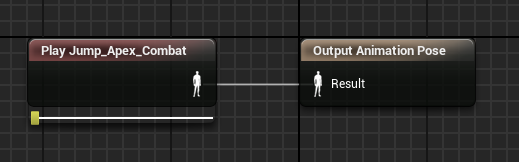
- In Airborne: Output Animation pose > pull off result pin > Play Jump_Apex_Combat > Details > Settings > uncheck Loop Animation
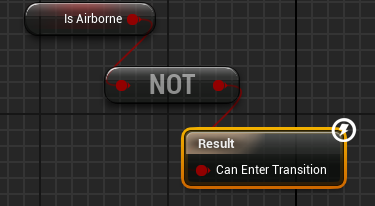
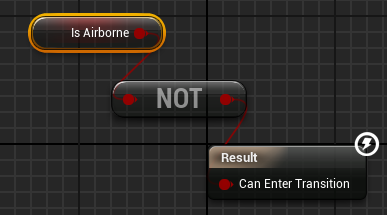
- In Airborne to Landing: IsAirborne bool > NOT > Result
- In Landing: Add Jump_Land_Combat > Output animation pose
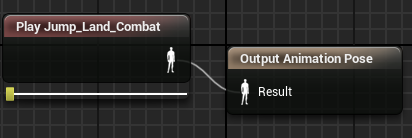
- In Landing to grounded: Get IsAirborne bool > NOT > Result: Can Enter the Transition
- Include a new node to be our idle default pose:
-
In Alive to Dead: Get IsDead bool > Result
-
-
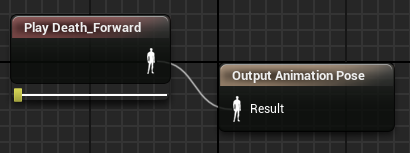
In the Dead node: Add Play Death_Forward animation > Output animation pose
-
in details > Settings > uncheck loop animation
-
-
In Dead to Alive: Get IsDead bool > NOT > Result
-
- In order to hit and damange something we need to define which is the line trace that the bullet will do after it is shoot so that we can define what targets were in reach and which got actually hit.
- So in Gun c++ :
- Set player view point
- Set line trace by channel
Gun.h
private:
	bool GunTrace(FHitResult& Hit, FVector& ShotDirection);

	AController* GetOwnerController() const;
Gun.cpp
bool AGun::GunTrace(FHitResult& Hit /*a hit result out param (will be modified by this function), with an & because it is a reference to this variable's address*/,
				 FVector& ShotDirection /*a shot direction out param (will be modified by this function)*/)
{
	//Call the GetOwnerController() function to get the controller and assign it to a AController variable
	AController* OwnerController = GetOwnerController();

	//Get Player's location and rotation
	FVector Location;
	FRotator Rotation;

		//Use GetPlayerViewPoint to fill in the Location and Rotation variables as out paramters
	OwnerController->GetPlayerViewPoint(Location, Rotation);

	//Create a line trace for the bullet

		//Declare and define variable with the shot starting point (it is going to come from where the player stands)
		FVector Start = Location;

		//Declare and define a variable with the shot direction (it will point to where the player is pointing)
			//Rotation.Vector() gets a vector that points in the direction to which the rotation is pointing of size = 1
		ShotDirection = Rotation.Vector();

		//Declare and define a variable with the shot end point
		FVector End = Start + ShotDirection * MaxRange;

		//Define actors that should be ignored: this and GetOwner() so that the actor doesn't shoot itself
		FCollisionQueryParams Params;
		Params.AddIgnoredActor(this);
		Params.AddIgnoredActor(GetOwner());

	//Return LineTraceBySingleChannel passing Hit result, Start point, End point, the collision channel, and settings params
		//Set our custom trace channel in Project Settings > Collision > Trace Channels > define presets to define interaction with each type of objects
		//Fetch the enum of the collision channel for our bullet in Project Folder > Config > Default Engine > search for the name of the custom collision channel we crated, "Bullet" and see which channel was asigned to it
	return GetWorld()->LineTraceSingleByChannel(Hit, Start, End, ECollisionChannel::ECC_GameTraceChannel1, Params);

}

AController* AGun::GetOwnerController() const
{
	//Get the viewpoint of the player. need to get the player controller from the gun owner
		//Gun owner is an actor so we need to cast it to APawn (because our shooter character inherits from APawn)
	APawn* OwnerPawn = Cast<APawn>(GetOwner());

	if (OwnerPawn == nullptr) return nullptr;

	//Get the controller for the gun owner
	return OwnerPawn->GetController();
}
- in Gun.cpp, Call the GunTrace() function from inside the PullTrigger() function and asign the result to a bool
void AGun::PullTrigger()
{
	FHitResult Hit;
	FVector ShotDirection;
	bool bSuccess = GunTrace(Hit, ShotDirection);
} - Include another BP_ShooterCharacter into the world. Unreal will automatically make this second actor AI controlled
- Inside Gun c++:
- Get a DamageEvent
- Get a hold of the actor we will damage
- Call the custom TakeDamage() function that Gun is inheriting from the parent actor class
Gun.h
	UPROPERTY(EditAnywhere)
	float DamageAmount = 100;
Gun.cpp
void AGun::PullTrigger()
{
	UE_LOG(LogTemp, Warning, TEXT("vc puxou o gatilho"));

	FHitResult Hit;
	FVector ShotDirection;
	bool bSuccess = GunTrace(Hit, ShotDirection); //Hit and ShotDirections are out params - will have their values assigned by this function

	//If the shot hit something
	if (bSuccess)
	{
		//Get the actor that got hit
		AActor* HitActor = Hit.GetActor();

		//And if this something we hit was an actor
		if (HitActor != nullptr)
		{
			//Fill in a DamageEvent struct
				//FPointDamageEvent is a category of damage event that is applied to a specific point
				//It is also of type "struct" - struct is like an array that can take different types of variables at the same time
				//by doing FPointDamageEvent DamageEvent(values) we are initializing this struct of type FPointDamageEvent and already filling it the values for each of its correspondent variables
				//Then we will pass this struct filled in with values in our TakeDamage function below
			FPointDamageEvent DamageEvent(DamageAmount, Hit, ShotDirection, nullptr);

			//Get the Damage Instigator
			AController* Instigator = Cast<AController>(HitActor->GetInstigator());

			//Apply damage to the actor that got hit
			HitActor->TakeDamage(DamageAmount, DamageEvent, Instigator, this);

			UE_LOG(LogTemp, Warning, TEXT("vc atingiu o ator: %s"), HitActor);
		}
	}
}- Create our own custom TakeDamage() function overriding the custom TakeDamage() function from the Actor class so that we can receive this damage in our custom actor. Store damage inside the actor and not in its own component.
- Set initial health in begin play
- Define our custom TakeDamage()
ShooterCharacter.h
public:
	//Include a function for the character to receive damage and override the equivalent virtual function TakeDamage in the Actor parent class
	virtual float TakeDamage(float DamageAmount, struct FDamageEvent const& DamageEvent, class AController* EventInstigator, AActor* DamageCauser) override;

private:
	UPROPERTY(EditDefaultsOnly)
	float MaxHealth = 100;

	UPROPERTY(VisibleAnywhere)
	float Health;
ShooterCharacter.cpp
void AShooterCharacter::BeginPlay()
{
	Super::BeginPlay();

	//get total health
	Health = MaxHealth;
}

float AShooterCharacter::TakeDamage(float DamageAmount, struct FDamageEvent const& DamageEvent, class AController* EventInstigator, AActor* DamageCauser)
{
	//since we are overriding a function, before we should call the parent method to make sure we inherit all the other behaviors we don't want to override
		// The inherited TakeDamage() function returns a damage amount which we will store inside our DamageToApply variable to be able to manipulate it the way we want inside our custom TakeDamage() function
	float DamageToApply = Super::TakeDamage(DamageAmount, DamageEvent, EventInstigator, DamageCauser);

	//if whatever health left is smaller than DamageToApply decreasing health by DamageToApply will give us a negative number.
		//to avoid this we want to: if DamageToApply is smaller then the Health left, then we decrease by DamageToApply, if the Health left is smaller than DamageToApply, then we decrease by the amount of Health that is left
		//Use whichever is smaller and assign it to DamageToApply
	DamageToApply = FMath::Min(Health, DamageToApply);

	Health -= DamageToApply;

	UE_LOG(LogTemp, Warning, TEXT("Your current Health is %f"), Health);

	return DamageToApply;
}ShooterCharecter.h
#include "Components/CapsuleComponent.h"

public:
	// Create a function that can be accessed from the character blueprint - BlueprintPure and const function
		//a pure node is a node that doesn't have an execution pin - doesn't have any effect on the thing that it is calling, only on its result
		//every time we call this function it is going to have the same effect on the program and output the same result
		//It doesn't change anything globally. the only impact it has are the outputs that it produces.
	UFUNCTION(BlueprintPure)
	bool IsDead() const;
ShooterCharacter.cpp
bool AShooterCharacter::IsDead() const
{
	return Health <= 0;
}

float AShooterCharacter::TakeDamage(float DamageAmount, struct FDamageEvent const& DamageEvent, class AController* EventInstigator, AActor* DamageCauser)
{
	if (IsDead())
	{

		//Stop the character from being controlled - moved.
		DetachFromControllerPendingDestroy();
		//Switch off capsule collision
		GetCapsuleComponent()->SetCollisionEnabled(ECollisionEnabled::NoCollision);
	}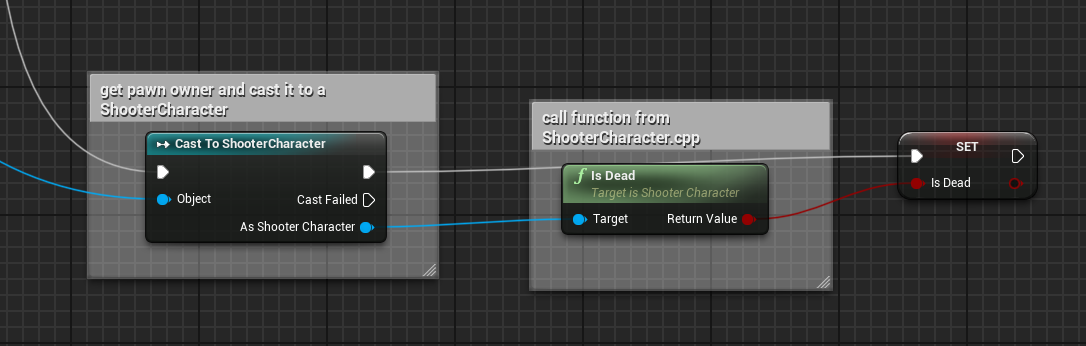
}- In Unreal, ABP_ShooterCharacter, Event Graph, create a IsDead bool and hook it up to our animation graph
- TryGetPawnOwner / Sequence > CastToShooterCharacter (get pawn owner and cast it to a ShooterCharacter) > IsDead (call function from ShooterCharacter.cpp) > Set IsDead
- Include a new BP_ShooterCharacter in the world to be our enemy
- Create a new c++ inheriting from AI Controller class, name ShooterAIController.
- Create e new BP to be child from the ShooterAIController class: BP_ShooterAIController
- In Unreal, open BP_ShooterCharacter > details > Pawn > AIController Class > choose BP_ShooterAIController
Hook up the blueprints:
-
Animation: BP_ShooterCharacter > hooked to Anim Class: ABP_ShooterCharacter > hooked to Mesh: Wraith
-
AI: BP_ShooterCharacter > hooked to AI Controller Class: BP_ShooterAIController > hooked to behavior tree AIBehavior: BT_EnemyAI
-
Set AI Path finder: create a mesh to tell the AI where in the world it can navigate
- In Unreal: Modes > search for Nav Mesh Bounds Volume > drag it into the world and put it through the floor
- In Unreal, in the world screen > Show > check Navigation
- Increase nav mesh X and Y sizes to encompass the entire level
- Add New > Artificial Intelligence > Behavior tree and Blackboard : "BT_EnemyAI", "BB_EnemyAI"
- Declare the AIController component in c++
- Get hold of the pawn actor in c++
ShooterAIController.h
UCLASS()
class SIMPLESHOOTER_API AShooterAIController : public AAIController
{
	GENERATED_BODY()
protected:
	virtual void BeginPlay() override;

private:
	//Declare a behavior tree variable
	UPROPERTY(EditAnywhere)
	class UBehaviorTree* AIBehavior;
}
ShooterAIController.cpp
void AShooterAIController::BeginPlay()
{
    Super::BeginPlay();

    //Run our Behavior tree
        //allows us to set a logic sequence of behavior for our AI
        //Then set it up inside BP_ShooterAIcontroller > Shooter AI Controller > AIBehavior
    if (AIBehavior != nullptr)
    {
        RunBehaviorTree(AIBehavior);

        //Set a new key in BB_EnemyAI > AI Blackboard to store data on players location in begin play
            //Blackboard is like the memory of the AI. Stores variables you input from the game. sets properties that stores information of the world.
                //and the behavior tree reads the blackboard variables to decide what actions is going to do next

        //Get Player pawn
        APawn* PlayerPawn = UGameplayStatics::GetPlayerPawn(GetWorld(), 0);
    }
}- Hook up our behavior tree to BP_ShooterAIController: in Unreal > BP_ShooterAIController > Details > AIBehavior > select BT_EnemyAI
- Define the vector var in c++
ShooterAIController.cpp
void AShooterAIController::BeginPlay()
{
        //Set the AI initial locaiton for the variable in the Blackboard
        GetBlackboardComponent()->SetValueAsVector(TEXT("StartLocation"), GetPawn()->GetActorLocation());
        //Add a new vector variable inside BB_EnemyAI > Blackboard and give it the same name as given inside this function
    }
}- Create a vector variable for PlayerLocation: Blackboard details > key > key type > Vector > rename : PlayerLocation
- Create a vector variable for StartLocation
- Create a vector variable called LastKnownPlayerLocation
- Create an object variable with base class "Actor" called SelfActor
- Create an object variable with base class "Actor" called Player > base class "actor"
- Logic: If AI sees player, run towards him. If it doesn't, investigate moving to the player's last know location
- Custom Tasks and Custom Services allow us to perform any action defined in code when a specific node in our behavior tree is activated
- Custom Tasks and Services will perform this actio and update whatever blackboard variable is assigned to the Task or Service
- Tasks are used for descrete action which the AI does and stops. Eg. Move to, Shoot once and stop etc
- Services are used for continuous actions that require a lot of memory because they run all the time. Eg. Keep shooting as long as you are seing the player, keep updating the player location constantly so that the AI can keep chasing the player around etc.
-
If AI sees player, updated player location in the AI memory
-
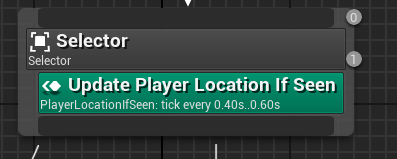
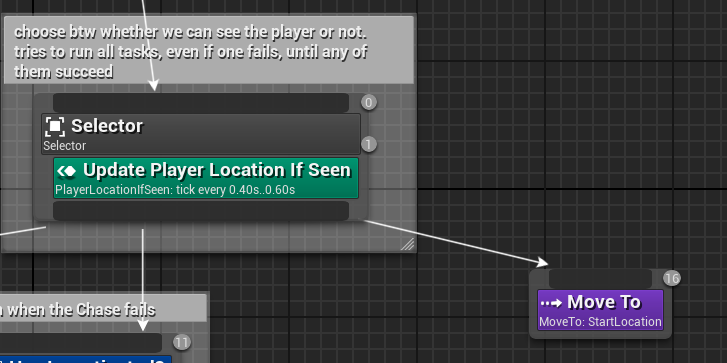
In BT_EnemyAI, Behavior Tree section, After Root, include a SELECTOR to shift between behavior nodes
- SELECTOR runs all behaviors in the tree until the first one succeeds. Moves through the ones that fail. Stops when succeeds. Performs only one task (the first that is viable)
- SEQUENCE runs all behaviors until one of the fails. Runs all behaviors that succeed. Stops when fails. Performs all tasks that are viable.
-
Include AIModule and GameTasks as Dependency Modules inside the project build:
in [ProjectName].Build.cs:
PublicDependencyModuleNames.AddRange(new string[] { "Core", "CoreUObject", "Engine", "InputCore", "AIModule", "GameplayTasks" });- include a SERVICE to Update the Player Location in the AI location memory (PlayerLocation) var only if the player is seen by the AI
- Create a new BTService class: In Unreal > Add New > New C++ class > show all classes > BTService_BlackboardBase: call it BTService_PlayerLocationIfSeen
- BTService_BlackboardBase is a custom service that allows us to refer to the variables or keys we included in the Blackboard
BTService_PlayerLocationIfSeen.h
class SIMPLESHOOTER_API UBTService_PlayerLocationIfSeen : public UBTService_BlackboardBase
{
   GENERATED_BODY()

public:
   //Constructor
   UBTService_PlayerLocationIfSeen();
}
BTService_PlayerLocationIfSeen.cpp
UBTService_PlayerLocationIfSeen::UBTService_PlayerLocationIfSeen()
{
   NodeName = "Update Player Location If Seen";
}- Get PlayerPawn
- Use the OwnerComp class to:
- IF AI line of sight reaches PlayerPawn
- Update the selected blackboard key value with PlayerPawn
- Otherwise clear the value of the selected blackboard key
- If PlayerPawn or AIOwner are nullptr, return
BTService_PlayerLocationIfSeen.h
class SIMPLESHOOTER_API UBTService_PlayerLocationIfSeen : public UBTService_BlackboardBase
{
protected:
   virtual void TickNode(UBehaviorTreeComponent& OwnerComp, uint8* NodeMemory, float DeltaSeconds) override;
};
BTService_PlayerLocationIfSeen.cpp
//update next tick interval if the code passes through this node in the behavior tree
void UBTService_PlayerLocationIfSeen::TickNode(UBehaviorTreeComponent& OwnerComp, uint8* NodeMemory, float DeltaSeconds)
{
   Super::TickNode(OwnerComp, NodeMemory, DeltaSeconds);

   APawn* PlayerPawn = UGameplayStatics::GetPlayerPawn(GetWorld(), 0);

   if (PlayerPawn == nullptr)
   {
       return;
   }

   if(OwnerComp.GetAIOwner() == nullptr)
   {
       return;
   }

   //If the AI can see the player
   if (OwnerComp.GetAIOwner()->LineOfSightTo(PlayerPawn))
   {
       //Then get and update the current player location by following it's actor object (pawn)
       OwnerComp.GetBlackboardComponent()->SetValueAsObject(GetSelectedBlackboardKey(), PlayerPawn);
   }
   else
   {
       //If AI cannot see the player clear the player location from it's memory
       OwnerComp.GetBlackboardComponent()->ClearValue(GetSelectedBlackboardKey());
   }
//In our behavior tree, include this service in the Selector node and change the variable BlackboardKey to "LastKnownPlayerLocation"
}- In BT_EnemyAI > BehaviorTree: right click on the SELECTOR > add service > select our custom service "Player Location If Seen"
- In BT_EnemyAI > BehaviorTree: details > blackboard key > select: PlayerLocation
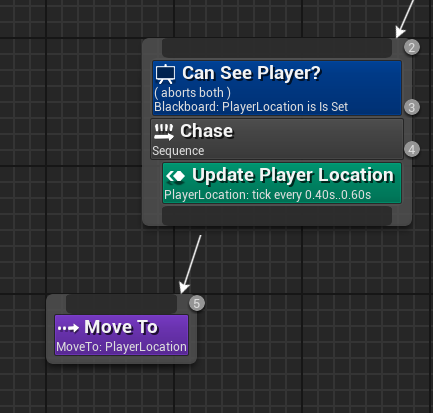
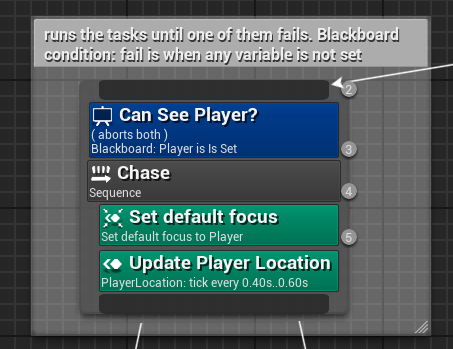
- After the selector > Add a new sequence called Chase
- Right click on the Chase sequence > Add a decorator of type Blackboard > call it "Can See Player?" > in details > Blackboard > key query = is set > blackboard key = PlayerLocation
- Blackboard condition node: only executes the sequence based on a condition related to a blackboard variable: if PlayerLocation is set
- Create a C++ class to customize the actions of this service in code
- In Unreal > Add New > New C++ class > show all classes > BTService_BlackboardBase > BTService_PlayerLocation
- Add a constructor function and name the node
BTService_PlayerLocation.h
public:
	//Contructor - which is the name of the class
	UBTService_PlayerLocation();
BTService_PlayerLocation.cpp
UBTService_PlayerLocation::UBTService_PlayerLocation()
{
    NodeName = "Update Player Location";
}- Define the tick function: For every tick, get the updated player location
BTService_PlayerLocation.h
protected:
virtual void TickNode(UBehaviorTreeComponent& OwnerComp, uint8* NodeMemory, float DeltaSeconds) override;- In cpp > Get Player Pawn > Get blackboard component > Get Selected Blackboard key > get actor location
BTService_PlayerLocation.cpp
//update next tick interval if the code passes through this node in the behavior tree
void UBTService_PlayerLocation::TickNode(UBehaviorTreeComponent& OwnerComp, uint8* NodeMemory, float DeltaSeconds)
{
    Super::TickNode(OwnerComp, NodeMemory, DeltaSeconds);

    APawn* PlayerPawn = UGameplayStatics::GetPlayerPawn(GetWorld(), 0);

    if (PlayerPawn == nullptr)
    {
        return;
    }

    OwnerComp.GetBlackboardComponent()->SetValueAsVector(GetSelectedBlackboardKey(), PlayerPawn->GetActorLocation());
}- In our Behavior tree, include this custom service in the Chase node > right click on the Chase node > add service > Player Location > the service will be named "Update Player Location" > change its BlackboardKey variable to "LastKnownPlayerLocation"
-
Go to where the player was seen last. if LastKnowPlayer location is set (if AI saw where player was last) then walk there to investigate.
-
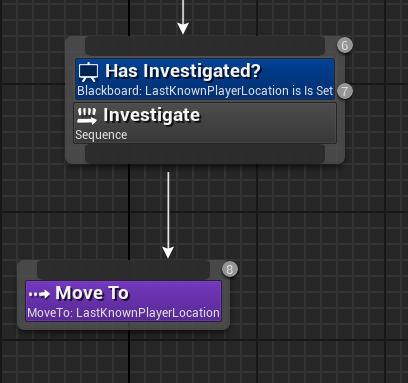
After the selector > Add a new sequence called Investigate
-
Add a new Move To node after Investigate > in details > blackboard > blackboard key = LastKnownPlayerLocation
-
Click on the "Can See Player" Blackboard decorator > In details > flow control > observer aborts > select both : it aborts both the nodes in the selector (Chase and Investigate) in case something fails.
-
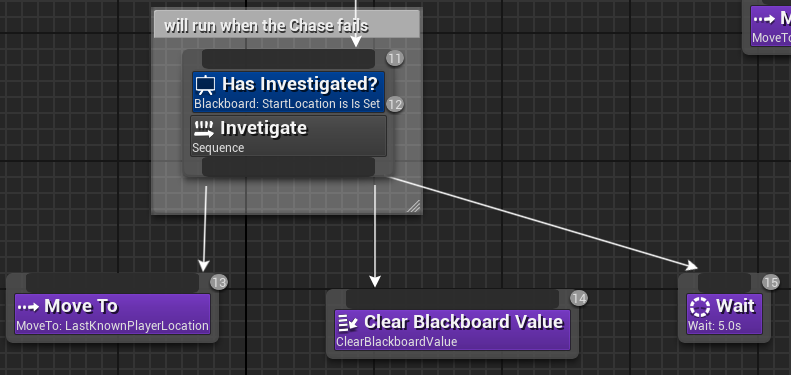
Right click on the Investigate sequence > Add a decorator of type Blackboard > call it "has Investigated?" > in details > Blackboard > key query = is set > blackboard key = LastKnonwPlayerLocation
-
Forget about where the player was last and move back to the initial position. Clear LastKnowPlayer location from memory.
-
Create a new BTTask class: In Unreal > Add New > New C++ class > show all classes > BTTask_BlackboardBase: call it BTTask_ClearBlackboardValue
- BTTask_BlackboardBase is a custom Task that allows us to refer to the variables or keys we included in the Blackboard
BTTask_ClearBlackboardValue.h
public:
	//Constructor of this class
	UMyBTTask_ClearBlackboardValue();
BTTask_ClearBlackboardValue.cpp
//allows us to clear any variable in the blackboard. will clear last know location so that the AI goes back to the initial position if he does not see me

UMyBTTask_ClearBlackboardValue::UMyBTTask_ClearBlackboardValue()
{
    NodeName = "Clear Blackboard Value";
}- Implement a NodeResult
- There are 4 types of NodeResults: Succeeded, Failed, Aborted, InProgress
- A NodeResult must return something. Return Succeeded.
- Inside the NodeResult Implement the Execute Task which we are going to use to access memory variables on Blackboard from our code and then clear the one related to LastKnowPlayerLocation
- Tasks are types of behavior we can assign to a specific node inside a behavior tree.
- There are 4 types of tasks: ExecuteTask, AbortTask, TickTask, OnMessage
- Call Super
- Get the selected blackboard key and clear its value
- Return Succeeded
BTTask_ClearBlackboardValue.h
protected:
	//protected because this function is in the default section
	virtual EBTNodeResult::Type ExecuteTask(UBehaviorTreeComponent& OwnerComp, uint8* NodeMemory) override;
BTTask_ClearBlackboardValue.cpp
//"Execute task": do this function when the task starts executing
EBTNodeResult::Type UMyBTTask_ClearBlackboardValue::ExecuteTask(
    UBehaviorTreeComponent& OwnerComp, /*access our behavior tree component*/
    uint8* NodeMemory /*access the memory pointer that stores info about the node of one particular tree*/
    )
{
    //Call Super because we are overriding the parent class with our custom functionality that we will define here (but we still need to implement all other functionalities from the parente class)
    Super::ExecuteTask(OwnerComp, NodeMemory);

    //Get hold of our blackboard and clear the variable for the selected key
        //Get the key for the variable of this decision tree node
    OwnerComp.GetBlackboardComponent()->ClearValue(GetSelectedBlackboardKey());

    //return that this nodes result so that the decision tree takes the next action based on that, in this case, succeeded
    return EBTNodeResult::Succeeded;
}- in Unreal > BT_EnemyAI > pull a new node after Investigate > select our custom task Clear Blackboard Value > in details > Blackboard > Blackboard key > select LastKnownPlayerLocation
- pull another new node after Investigate > Wait
- in Unreal > in BT_EnemyAI > After the SELECTOR node > pull a new MoveTo node > select StartLocation as a variable / Blackboard Key
- In Unreal > Add New > New C++ class > select BTTaskNode > rename to BTTask_Shoot
- Define a NodeName
in BTTask_Shoot.h
public:
	//Contructor
	UBTTask_Shoot();
in BTTask_Shoot.cpp
//Constructor
UBTTask_Shoot::UBTTask_Shoot()
{
    NodeName = TEXT("Shoot");
}- Return a node result Failed If AI Controller is a nullptr
- Implement the ExecuteTask to get hold of the AI Controller and the AI Pawn. Create a var based on out ShooterCharacter class and pass it in the value of the AI Pawn
- Return a node result Failed if this var is a nullptr
- Inside ShooterCharacter.h, make the Shoot() method public to allow it to be called from outside of this class
- And them call the Shoot() method from this variable
in BTTask_Shoot.h
protected:
	//Execution
	virtual EBTNodeResult::Type ExecuteTask(UBehaviorTreeComponent &OwnerComp, uint8 *NodeMemory) override;
in BTTask_Shoot.cpp
//Define the execute task - that is what this custom task is going to do
EBTNodeResult::Type UBTTask_Shoot::ExecuteTask(
    UBehaviorTreeComponent &OwnerComp, /* Address to access our behavior tree component*/
    uint8 *NodeMemory /* memory pointer that stores info about this tree node*/
    )
{
    Super::ExecuteTask(OwnerComp, NodeMemory);

    //Get hold of AI controller and then our pawn - get the Shoot() method from ShooterCharacter
        //go to shooter character and make the Shoot() method public to be accessed from outside of the class

    //if owner component is null return that this custom task has failed
    if (OwnerComp.GetAIOwner() == nullptr)
    {
        EBTNodeResult::Failed;
    }


    AShooterCharacter* Character = Cast<AShooterCharacter>(OwnerComp.GetAIOwner()->GetPawn());

    if (Character == nullptr)
    {
        return EBTNodeResult::Failed;
    }

    Character->Shoot();

    //Will return Succeeded because we only want this task to run once
    return EBTNodeResult::Succeeded;
}- In Unreal > BT_EnemyAI > after Chase > pull a new node > SEQUENCE > add a decorator > Loop > details > check infinite loop
- In Unreal > BT_EnemyAI > after SEQUENCE > pull a new node > our custom Shoot function
- In Unreal > BT_EnemyAI > after SEQUENCE > pull a new node > wait one second
- Use Services: Services allow us to run a piece of code everytime a specific node in the Behavior tree is active
- It is better to update it on tick from the behavior tree than on tick from code because tick from code runs every frame while in the tick from behavior tree we can select the frequency in seconds you want to run it and also it only runs if the particular node is active
- Set the Default Focus
- In Unreal > BT_EnemyAI > Create a player variable in Blackboard
- In Unreal > BT_EnemyAI > in the Chase node > right click and select add Service > Default Focus > in Details > Blackboard key > select the Player variable
-
Create a new C++ class inheriting from GameModeBase > call it SimpleShooterGameModeBase
-
Create a subclass of SimpleShooterGameModeBase: In Unreal > add new > new C++ class > show all classes > SimpleShooterGameModeBase > "KillEmAllGameMode"
-
KillEmAllGameMode will be derived from and implement the default main game mode, SimpleShooterGameMode.
-
In Unreal, Create a new BP class inheriting KillEmAllGameMode, call it BP_KillEmAllGameMode
-
In Unreal, Blueprints (button on the top of the screen), GameMode, Select GameMode base class, select our BP_KillEmAllGameMode class.
-
Inside the BP_KillEmAllGameMode, Details, Classes, Default Pawn Class, select our BP_PlayerShooterCharacter.
- Define a function for when the actors are killed, PawnKilled() method, to be called from SimpleShooterGameModeBase
SimpleShooterGameModeBase.h
public:
	virtual void PawnKilled(APawn* PawnKilled);
SimpleShooterGameMode.cpp
- just create an empty implementation so that our child custom game mode can inherit from this parent game mode
void ASimpleShooterGameModeBase::PawnKilled(APawn* PawnKilled)
{
}- Also implement PawnKilled() in KillEmAllGameMode which will override the virtual PawnKilled() method in the parent SimpleShooterGameModeBase.
KillEmAllGameMode.h
public:
	//This method is going to override the virtual method in SimpleShooterGameModeBase
	virtual void PawnKilled(APawn* PawnKilled) override;
KillEmAllGameMode.cpp
void AKillEmAllGameMode::PawnKilled(APawn* PawnKilled)
{
    Super::PawnKilled(PawnKilled);

    UE_LOG(LogTemp, Warning, TEXT("The Pawn was Killed"));
}- Call PawnKilled() from ShooterCharacter TakeDamage()
ShooterCharacter.cpp
float AShooterCharacter::TakeDamage(float DamageAmount, struct FDamageEvent const& DamageEvent, class AController* EventInstigator, AActor* DamageCauser)
{
	if (IsDead())
	{
		UE_LOG(LogTemp, Warning, TEXT("IS DEAD"));

		ASimpleShooterGameModeBase* GameMode = GetWorld()->GetAuthGameMode<ASimpleShooterGameModeBase>();

		if (GameMode != nullptr)
		{
			GameMode->PawnKilled(this);
		}
		else
		{
			UE_LOG(LogTemp, Warning, TEXT("GameMode == nullptr"));
		}

		//Stop the character from being controlled - moved.
    		DetachFromControllerPendingDestroy();
		//Switch off capsule collision
    		GetCapsuleComponent()->SetCollisionEnabled(ECollisionEnabled::NoCollision);
}- In Unreal > BP_KillEmAllGameMode > Class Defaults > Change Default Pawn Class to BP_ShooterCharacter
- In Unreal > click on Blueprints in the top bar > GameMode > Select GameMode Base Class > select BP_KillEmAllGameMode
-
Implement a player controller to restart the level after the player has died
-
In Unreal > add new > new C++ class > PlayerController > "ShooterPlayerController"
-
In Unreal > create a new blueprint class based on our C++ ShooterPlayerController > "BP_ShooterPlayerController"
-
In Unreal > In BP_KillEmAllGameMode > Details > Classes > PlayerControllerClass > change to BP_ShooterPlayerController
-
ACTION ORDER: TakeDamage() WHAT DAMAGE TO APPLY? will call > IsDead() IS THE SHOT PLAYER DEAD? and PawnKilled() WHO GOT KILLED? will call > EndGame() WIN OR LOOSE? will call > GameHasEnded() WHAT TO DO WHEN GAME HAS ENDED?
- Inside ShooterAIController, implement also a IsDead() function to define when the AI is dead.
- Declare a ShooterCharacter var and call the IsDead() function already implemented inside ShooterCharacter class
ShooterAIController.h
public:
	bool IsDead() const;
ShooterAIController.cpp
bool AShooterAIController::IsDead() const
{
    AShooterCharacter* ControlledCharacter = Cast<AShooterCharacter>(GetPawn());

    if (ControlledCharacter != nullptr)
    {
        // return true if IsDead() = true
        return ControlledCharacter->IsDead();
    }

    //Also return true if Controlled character is nullptr because then the Pawn has been detached from the controller indicating death
    return true;
}- Implement the PawnKilled() function in KillEmAllGameMode to define which pawn was killed (the player or all the enemies) and call EndGame() passing the result of this function as a parameter.
- EndGame() will be implemented on the next step
KillEmAllGameMode.h
public:
	//This method is going to override the virtual method in SimpleShooterGameModeBase
	virtual void PawnKilled(APawn* PawnKilled) override;
KillEmAllGameMode.cpp
void AKillEmAllGameMode::PawnKilled(APawn* PawnKilled)
{
    Super::PawnKilled(PawnKilled);

    UE_LOG(LogTemp, Warning, TEXT("The Pawn was Killed"));
    //In Unreal, change the BP_ShooterGameMode name to BP_KillEmAllGameMode > Open > Class Settings > Change Parent Class to KillEmAllGameMode
        //click on Blueprints in the top bar > GameMode > Select GameMode Base Class > select BP_KillEmAllGameMode

    //GAME OVER: Check if the killed pawn is a player controller (if the player has died) - Lose scenario
    APlayerController* PlayerController = Cast<APlayerController>(PawnKilled->GetController());

    if (PlayerController != nullptr)
    {
        EndGame(false);
    }

    //WIN GAME: For loop over all shooterAIs in the world and check if any of them are not dead. then game is not over, so return to exit out of this function and stop executing it
    //If we iterate over all AI and they are all dead then end game - we won
    for (AShooterAIController* Controller : TActorRange<AShooterAIController>(GetWorld()))
    {
        bool bIsPlayerController = Controller->IsPlayerController();

        if (!Controller->IsDead())
        {
            return;
        }
    }
    EndGame(true);
}- Implement EndGame() to end the game define win and loose conditions. Win (all enemy pawns were killed), loose (player pawn was killed).
- Then call GameHasEnded() passing the result of this function as a parameter. GameHasEnded() will be implemented on the next step.
KillEmAllGameMode.h
private:
	void EndGame(bool bIsPlayerWinner);
AShooterAIController* ShooterAIController;- Since we call GameHasEnded() from within an actor controller, we have to know which specific controller won. If it was the player, the player controller has to call GameHasEnded() - win condition. If the AI, the AI controller has to call GameHasEnded() - lose condition.
KillEmAllGameMode.cpp
void AKillEmAllGameMode::EndGame(bool bIsPlayerWinner)
{
    //Iterate over all the controllers / actors in the world so that we can call a function on each of those actors
        //check if they are of the player controller type (meaning that it is the player, not the AI) and, if it is, check if this player controller is the winner
            //Use an engine helper - EngineUtils and the template function TActorRange
                //Will return a range of actors (like a list) and allows us to iterate in all controllers in the world

    //for (each controller variable : within this range)
    for (AController* Controller : TActorRange<AController>(GetWorld()))
    {
	// if the controller is the player controller (If the player is the one calling EndGame()) AND the player is the winner, then the caller of this function (the player) is the winner.
	// if the controller is NOT the player controller (If the AI is the one calling EndGame()) AND the player is NOT the winner, then the caller of this function (the AI in this case) is the winner
	// However, IsPlayerController() will always be true because we will always be the player controller by default in this game. So bIsWinner will only be trule if the player is the winner, not the AI

        bool bIsWinner = Controller->IsPlayerController() == bIsPlayerWinner;
        Controller->GameHasEnded(
            Controller->GetPawn(), /*keep the camera focus on the player*/
            bIsWinner /*bool defining if we won or lost*/
            );
    }
}- Implement our GameHasEnded() in our player controller class, to be called from EndGame(), and show win or loose widgets into our viewport and restart the game
- Implement a timer inside GameHasEnded() to call the RestartLevel function from within it after a time range.
MyShooter.Build.cs
PublicDependencyModuleNames.AddRange(new string[] { "Core", "CoreUObject", "Engine", "InputCore", "AIModule", "GameplayTasks", "UMG" });
ShooterPlayerController.h
public:
	virtual void GameHasEnded(class AActor* EndGameFocus = nullptr, bool bIsWinner = false) override;

private:
	UPROPERTY(EditAnywhere)
	float RestartDelay = 5.f;

	FTimerHandle RestartTimer;

	UPROPERTY(EditAnywhere)
	UUserWidget* HUD;
ShooterPlayerController.cpp
void AShooterPlayerController::GameHasEnded(class AActor* EndGameFocus, bool bIsWinner)
{
    Super::GameHasEnded(EndGameFocus, bIsWinner);

    //Set timer to count 5 seconds after we are killed and then restart the level
    GetWorldTimerManager().SetTimer(
        RestartTimer, /* TimerHandle: can be used to pause (and resume) the countdown, query or change the amount of time remaining, or even cancel the timer altogether*/
        this, /* objecto to be called*/
        &APlayerController::RestartLevel, /*the address of the function we want to delay with this timer*/
        RestartDelay /*amount of time for that timer to delay*/
        );
}- Include a public dependency "UMG" in our project build (MyShooter.Build.cs) to support for the Widgets
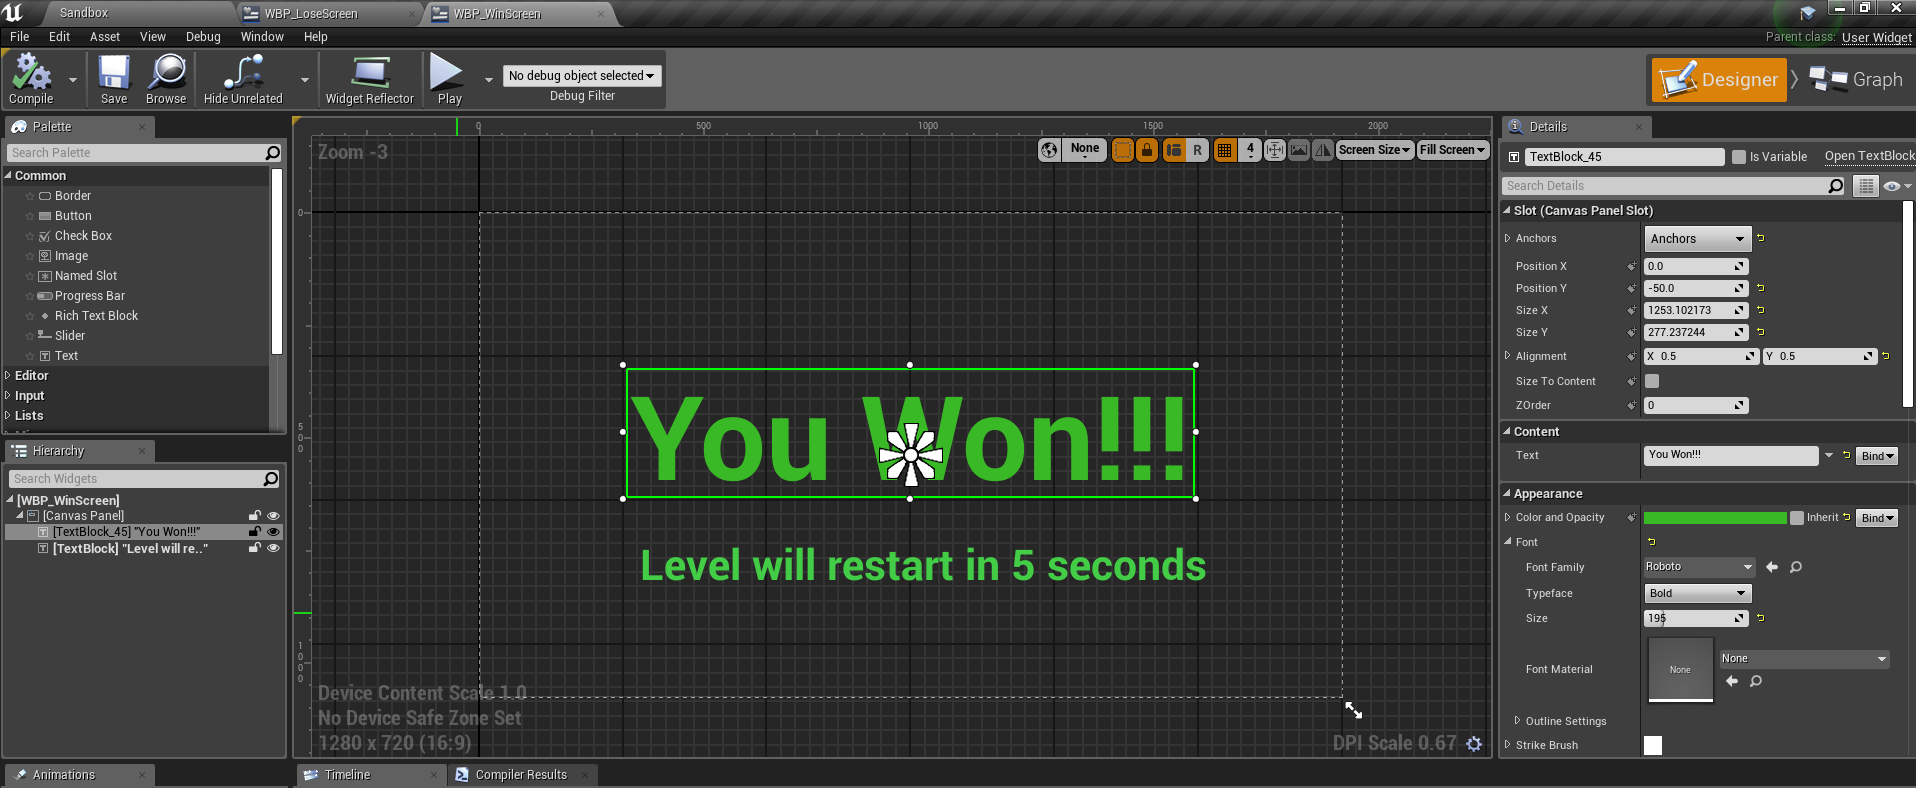
- Craete 3 new widgets: In Unreal > Add New > User interface > Widget blueprint > "WBP_LoseScreen" / "WBP_WinScreen" / "WBP_HUDScreen"
- inside WBP_LoseScreen / WBP_WinScreen > add a text component to the screen > customize it

-
In Unreal > BP_ShooterPlayerController > Details > ShooterPlayerController > Lose Screen Class > select WBP_LoseScreen
-
In Unreal > BP_ShooterPlayerController > Details > ShooterPlayerController > Win Screen Class > select WBP_WinScreen
-
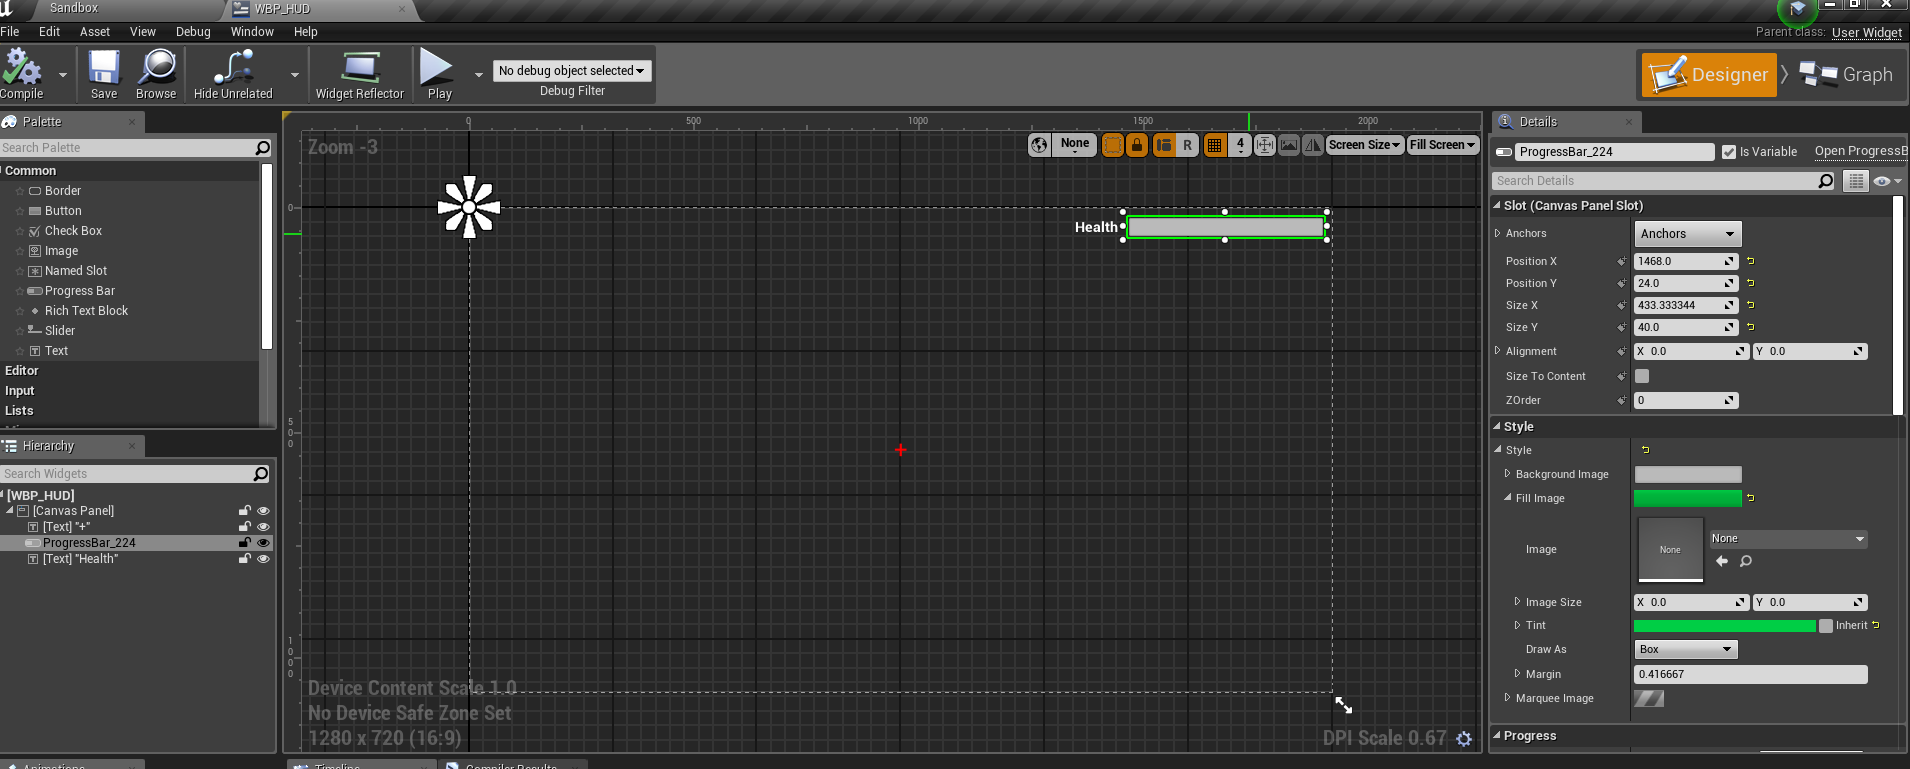
inside WBP_HUD > add crosshair and a progress bar and customize them > start percentage of progress bar as 1
- Define which widget class will be spawned
ShooterPlayerController.h
public:
	virtual void BeginPlay() override;

private:
	UPROPERTY(EditAnywhere)
	//Create a variable of class type of the widget class we are trying to spawn
		//Restrict the type of class to only be User Widget with TSubclassOf<>
	TSubclassOf<class UUserWidget> LoseScreenClass;

	UPROPERTY(EditAnywhere)
	TSubclassOf<class UUserWidget> WinScreenClass;

	UPROPERTY(EditAnywhere)
	TSubclassOf<class UUserWidget> HUDClass;

	UUserWidget* WinWidget;

	UUserWidget* LoseWidget;

	UPROPERTY(EditAnywhere)
UUserWidget* HUD;- Spawn the widgets in the world
ShooterPlayerController.cpp
void AShooterPlayerController::BeginPlay()
{
    Super::BeginPlay();

    HUD = CreateWidget(this, HUDWidgetClass);
    HUD->AddToViewport();
}

void AShooterPlayerController::GameHasEnded(AActor* EndGameFocus, bool bIsWinner)
{
    Super::GameHasEnded(EndGameFocus, bIsWinner);

    if (bIsWinner)
    {
        WinWidget = CreateWidget(this, WinWidgetClass);
        WinWidget->AddToViewport();
    }
    else
    {
        LoseWidget = CreateWidget(this, LoseWidgetClass);
        LoseWidget->AddToViewport();
    }
}- Create the code logic to update the progress bar based on player's health
ShooterCharacter.h
public:
	UFUNCTION(BlueprintPure)
	float GetHealthPercent() const;
ShooterCharacter.cpp
float AShooterCharacter::GetHealthPercent() const
{
	return Health/MaxHealth;
}- in WBP_HUD > select the progress bar > details > progress > percent > bind > create biding > rename funciton to "Get Health"
- righ click > get Owning player pawn > cast to shooter character > Get health percent > return value

- Spawn emitters on gun shooting and bullet impact
In Gun.h, create emitter components
private:
	UPROPERTY(EditAnywhere)
	UParticleSystem *MuzzleFlash;

	UPROPERTY(EditAnywhere)
	UParticleSystem *ImpactEffect;
In Gun.cpp
void AGun::PullTrigger()
{
	//Spawn an emitter at the riffle's muzzle on pull trigger
	UGameplayStatics::SpawnEmitterAttached(
		MuzzleFlash, //Particle system variable
		Mesh, //Scene component to which to attach the emitter
		TEXT("MuzzleFlashSocket") //name of the component socket to which to attach
	);
	//Then in BP_Riffle, select the emitter blueprint for this emitter

	if (bSuccess)
	{
		UGameplayStatics::SpawnEmitterAtLocation(GetWorld(), ImpactEffect, Hit.Location, ShotDirection.Rotation());
		//Then include the impact effect in BP_Rifle
	}
}in Gun.h, include sound components
private:
	UPROPERTY(EditAnywhere)
	USoundBase* MuzzleSound;

	UPROPERTY(EditAnywhere)
	USoundBase* ImpactSound;
Gun.cpp
void AGun::PullTrigger()
{
	//Spawn sound on pull trigger
	//use SpawnSoundAttach to attach sound to the barrel of our gun and make it come always from that point
	UGameplayStatics::SpawnSoundAttached(MuzzleSound, Mesh, TEXT("MuzzleFlashSocket"));
	//in BP_Rfile > Details > Gun > MuzzleSound > include our sound effect

	if (bSuccess)
	{
		UGameplayStatics::PlaySoundAtLocation(GetWorld(), ImpactSound, Hit.Location);
		//in BP_Rfile > Details > Gun > ImpactSound > include our sound effect
	}
}
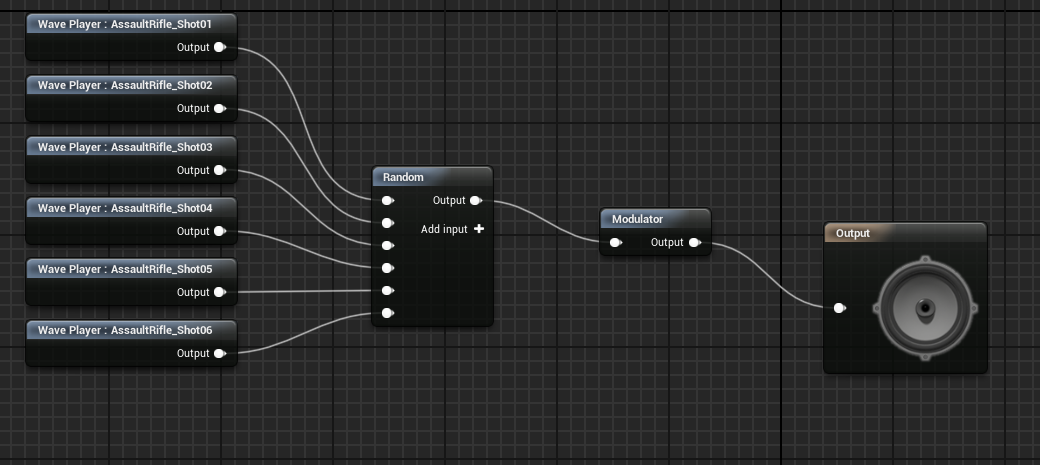
- In Unreal > add new > Sounds > Sound Cues > A_RifleShot_Cue
- in unreal > content folder > select all sound wave files to be included > A_RifleShot_Cue > right click > select Random:
- Select multiple WAVs from Unreal content folder and drag and drop into A_RifleShot_Cue > random > link to Modulator > link to Output
- details > random > select randomize without replacement
- details > modulation > select min and max pitch
- in Unreal _ A_RifleShot_Cue > details > attenuation settings > sound attenuation > "ATT_Default"
- open "ATT_Default" > details >
- In Unreal > Modes > Ambient Sound > drag it into the world > Details > Sound > select from the dropdown : shooter game music
- Make player say a line on begin play
- BP_PlayerShooterCharacter > Event Graph > Begin Play / Get Actor location > Play Sound at location / select sound asset : "intro"